
nginx 101: A Comprehensive Tutorial for Developers - Part 1/2

Introduction To nginx 101 - Part 1/2
Welcome to the first part of our two-part series on mastering nginx. In this series, we aim to provide you with an solid understanding of nginx, from basic configurations to advanced features like load balancing and reverse proxying.
In this first part, we will cover the basics of nginx, including installation, configuration, and how to serve static content. We will also explore some essential concepts and configurations that form the foundation of using nginx effectively.
In Part 2, we will dive deeper into advanced nginx configurations, focusing on using nginx as a reverse proxy and setting up load balancing for high-performance web applications. We will also walk through the process of developing a simple Flask application to demonstrate how nginx distributes requests across multiple backend servers.
Content
- Introduction
- How do we access a web site?
- Where is the nginx in this play?
- nginx acting as a Load Balancer
- TLS Termination
- How to install nginx?
- Static Content - Custom Home Page
- Location Block
- Serving Content with Alias
- Try_files
- Complete nginx Configuration
- nginx Terminology
- Wrapping Up nginx Part 1
- About The Author
Introduction
When you visit most websites, including devoriales.com, a lot of content loads into your browser.
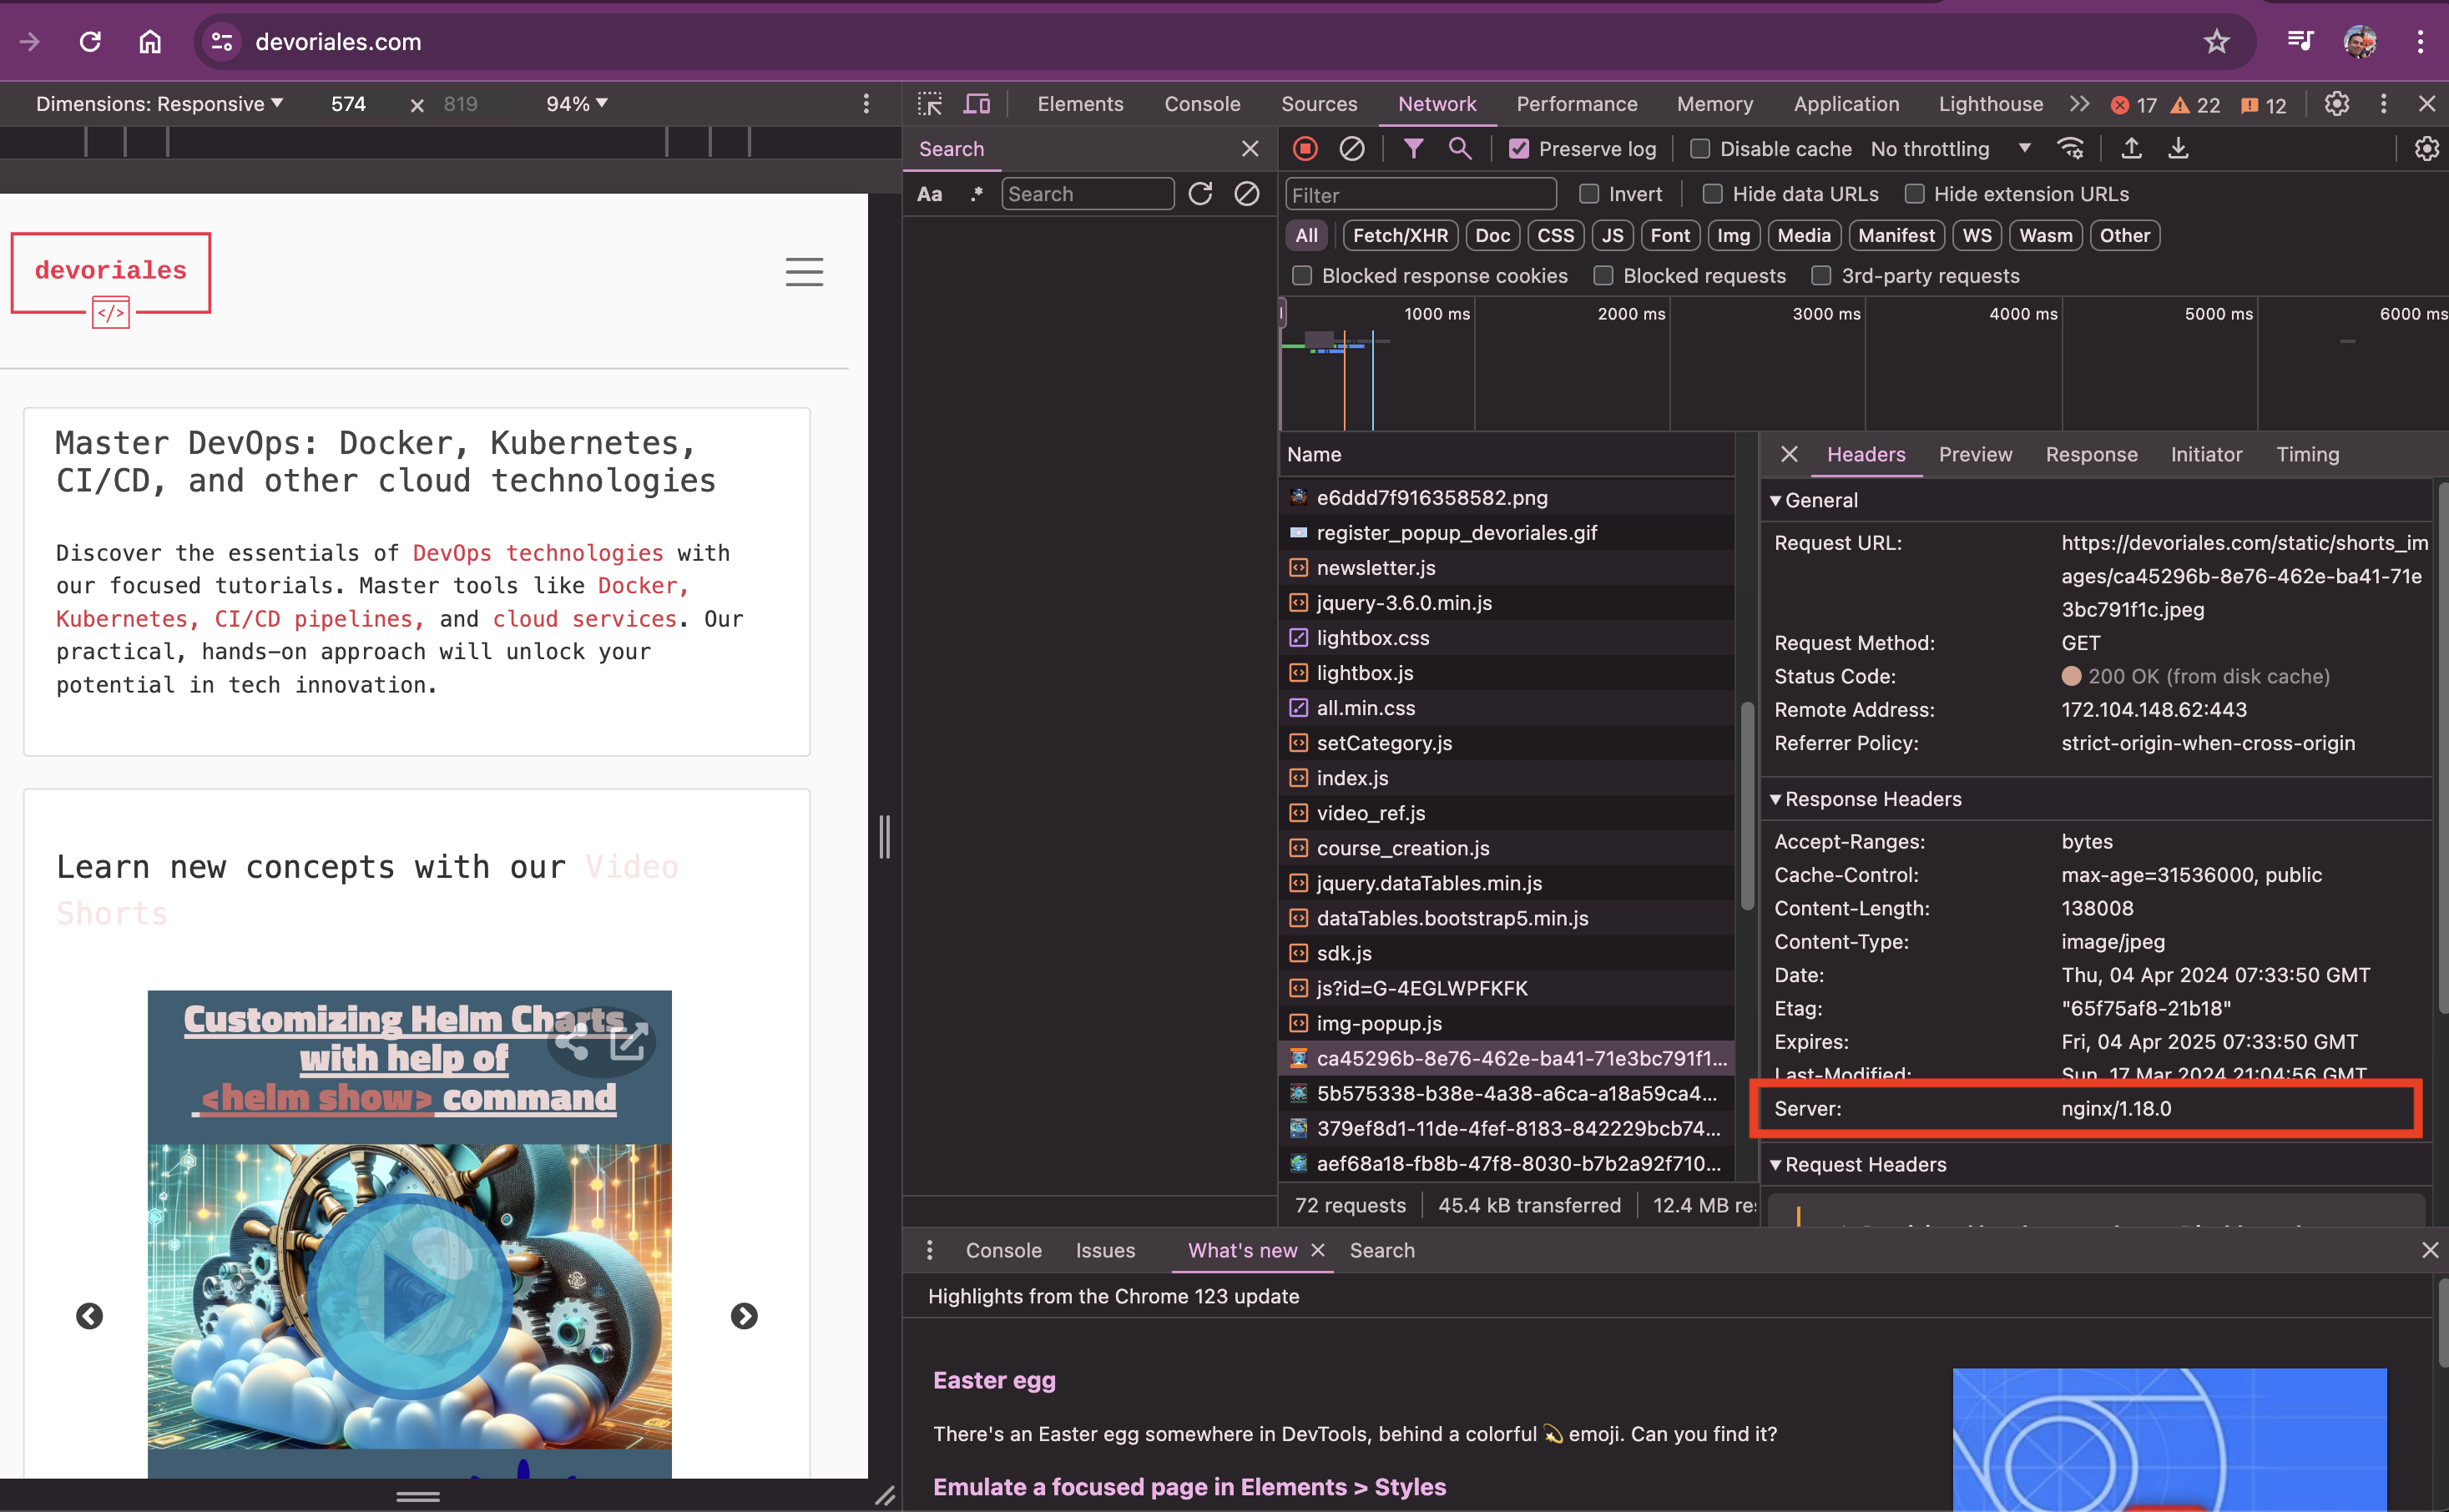
If you open Developer Tools (Inspect mode in Chrome), go to the Network tab, and reload the page, you can pick any file that gets loaded. Often, you'll see that it is served by an nginx server. This means that the content is being delivered by nginx, a popular web server used by many websites. However, it's important to note that while nginx is commonly used, it’s not the only web server out there.
For example, my site, devoriales.com, uses nginx to serve its content:
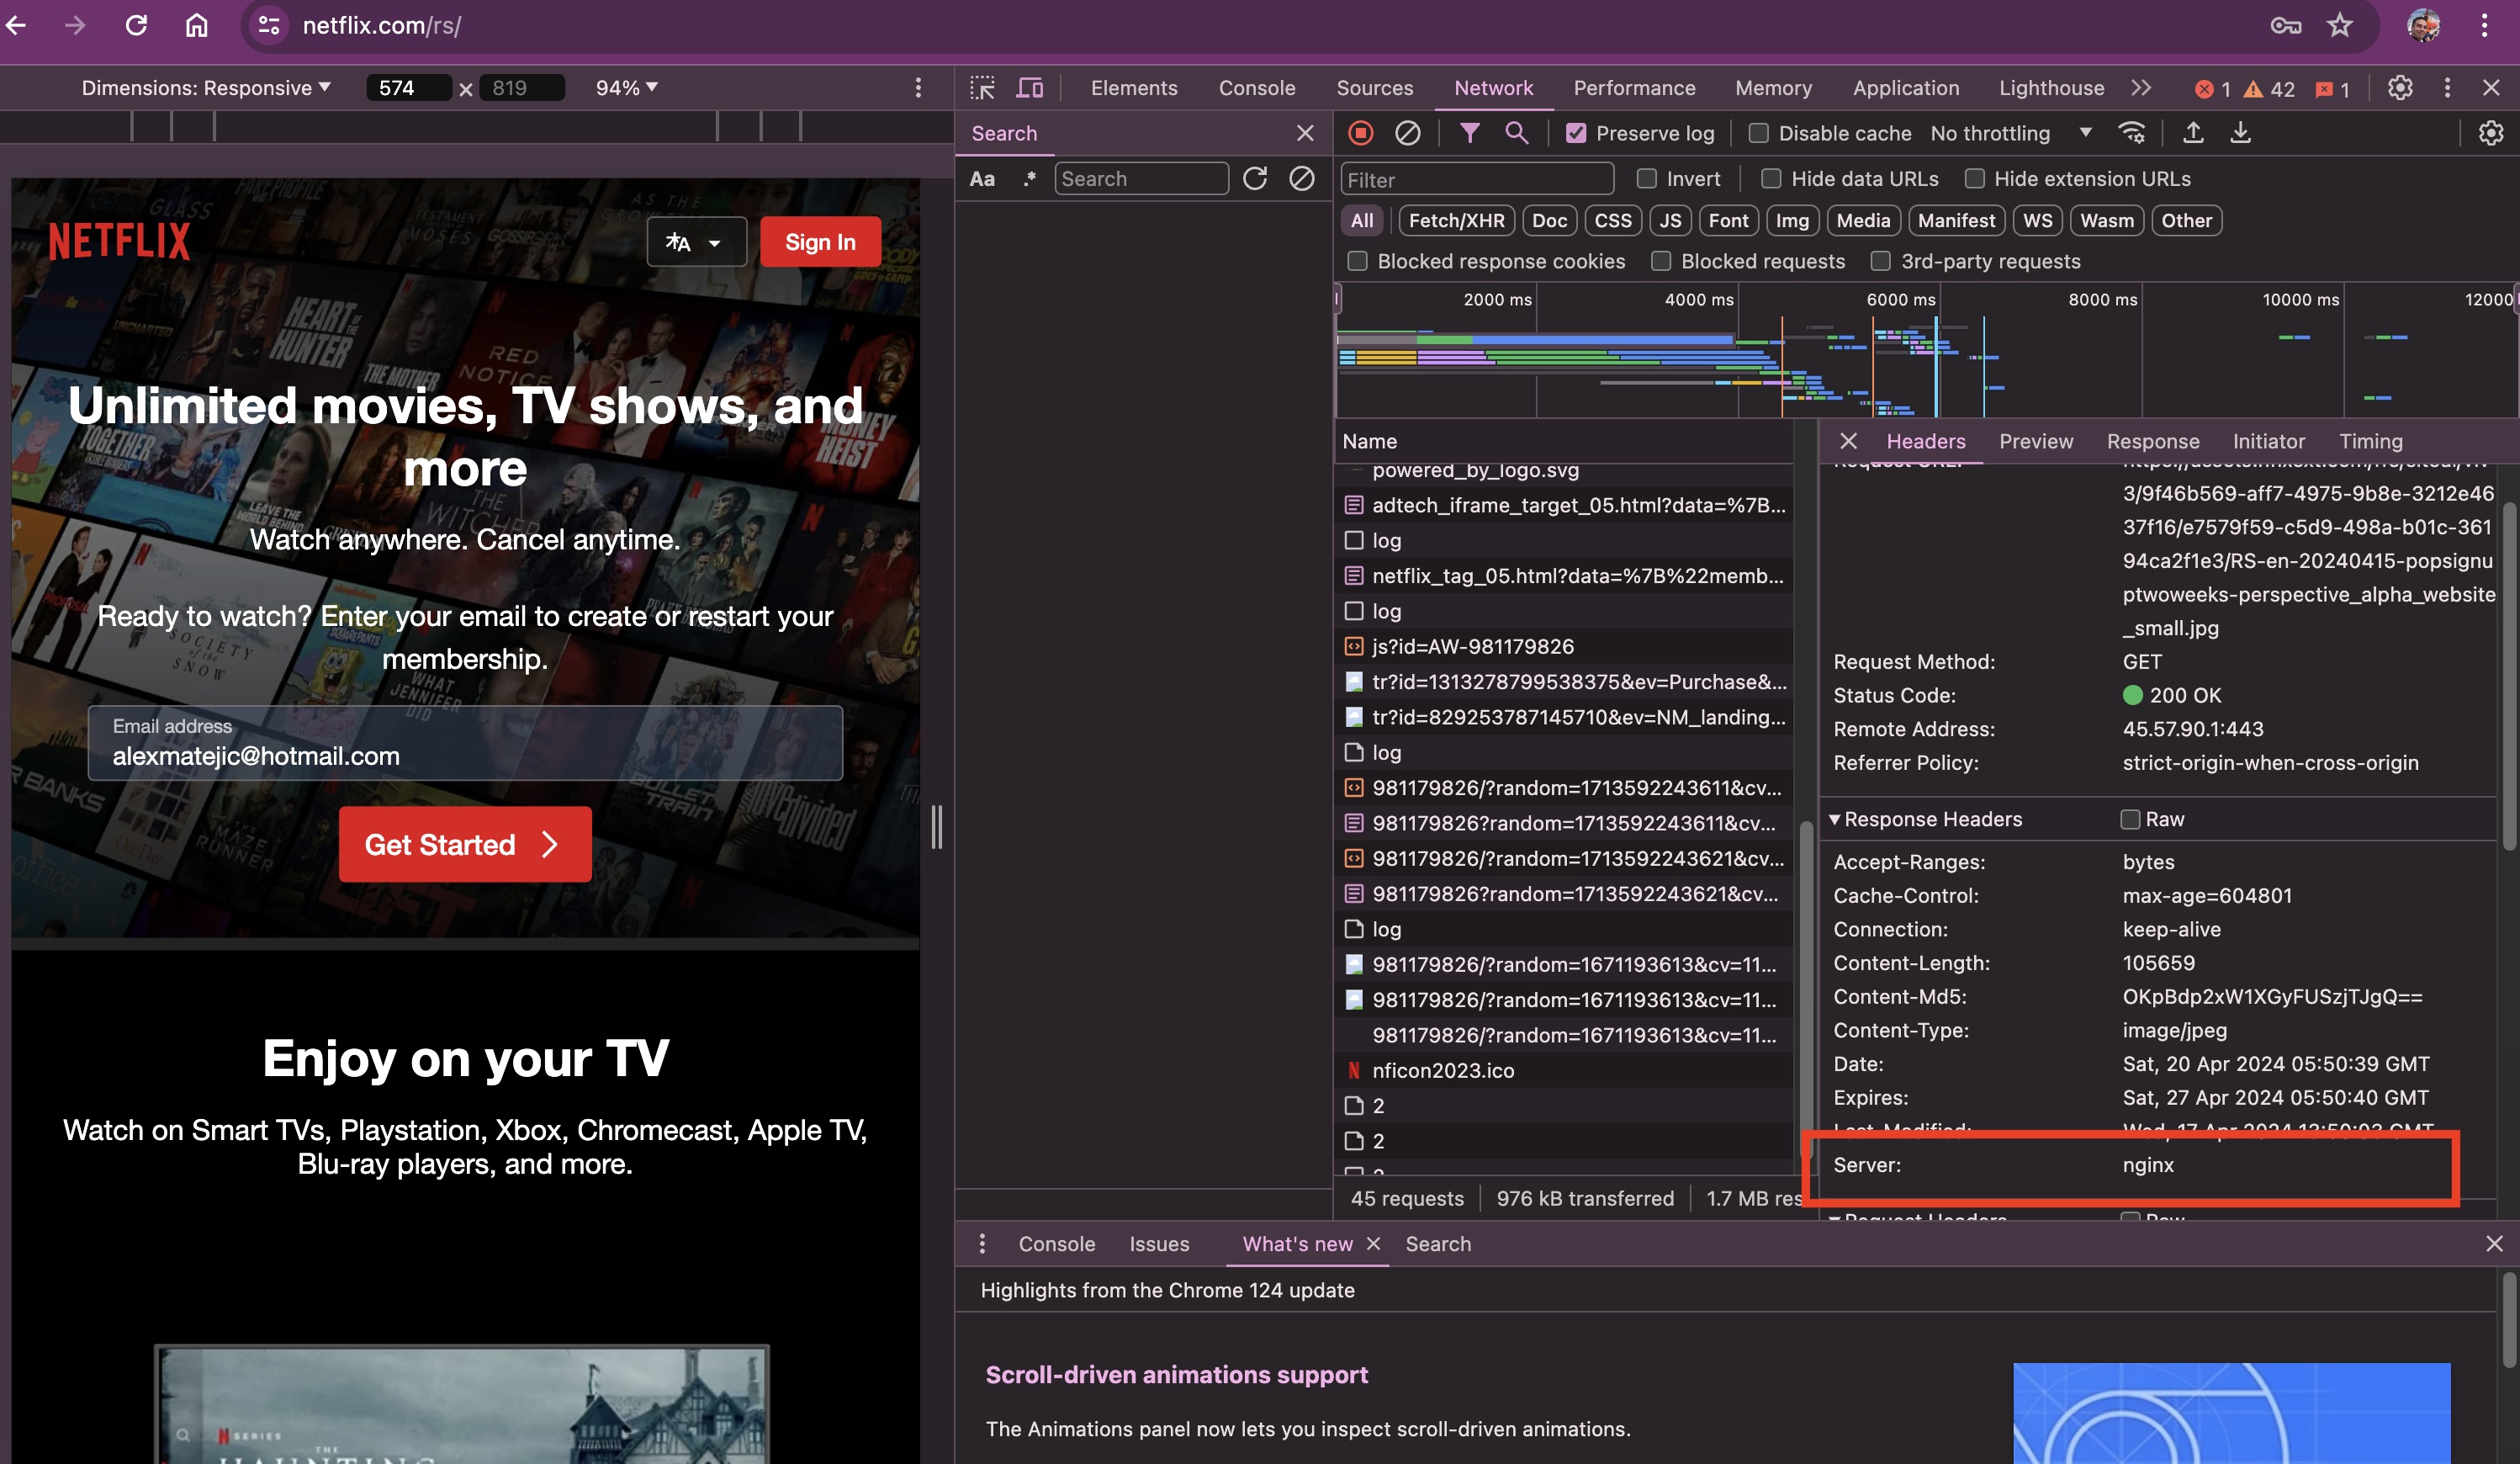
But also extremly large web sites as netflix.com use nginx:
How do we access a web site?
The diagram below provides a simplified illustration of the interaction between a user's computer, the internet, and a web server. In this context, the web server is managed by nginx.
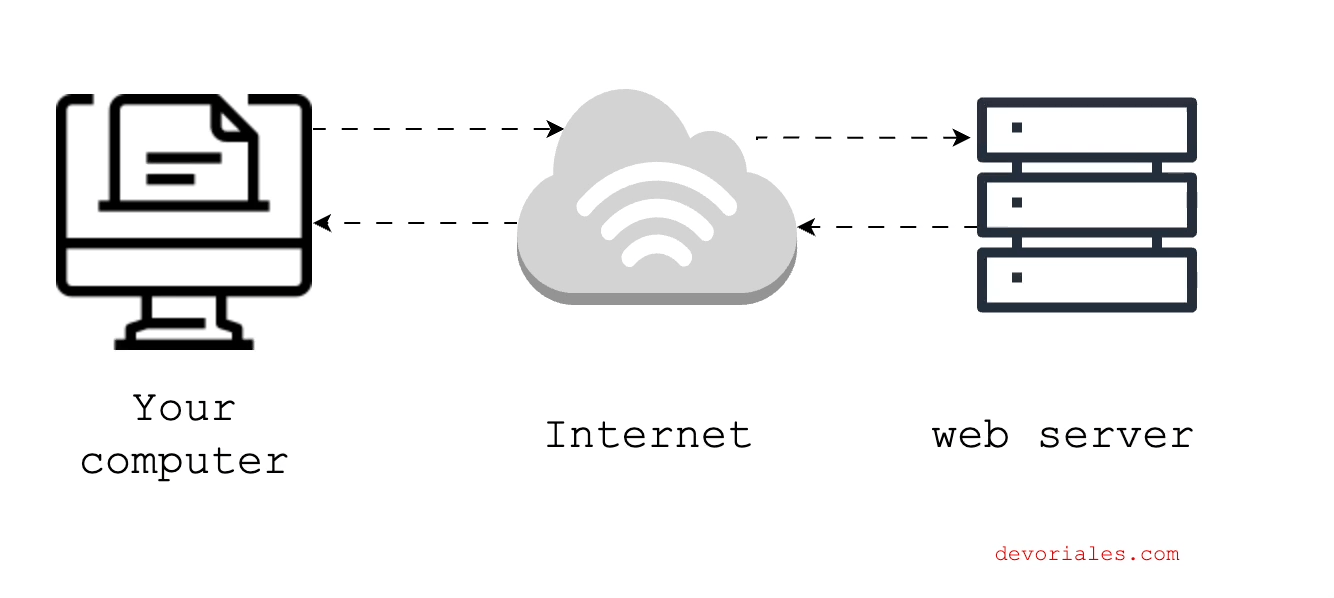
Here is what happens:
- The user types a URL into their browser.
- The browser sends an HTTP request to the server. This request travels through the Internet.
- The web server receives the request, processes it according to the server configuration (e.g., finding the requested file in the server's storage).
- the Web server sends a response back to the browser through the Internet. This could include the HTML of the webpage, associated media files, etc
The user’s browser receives the response and renders the webpage for the user to view.
Where is the nginx in this play?
nginx is a powerful, high-performance web server and reverse proxy. It is known for its efficiency, handling high volumes of concurrent connections with minimal resource usage. Originally designed to solve the C10k problem, nginx now serves as a key component in many modern web architectures, facilitating faster content delivery and improved scalability by serving as a load balancer and HTTP cache.
🤔 The C10k problem refers to the challenge of handling 10,000 concurrent connections on a single server. This term originated around the year 2000 when the increasing popularity of the internet led to a significant rise in web traffic. Traditional web servers, which were designed to handle a relatively small number of connections simultaneously, struggled to cope with this surge.
The diagram visually represents the use of nginx as a reverse proxy in a typical web application architecture:

Placing nginx in front of a web server provides several benefits:
- Enhanced Security: By controlling the access to the backend servers, nginx protects them against attacks such as DDoS and ensures that only valid traffic reaches the server.
- Improved Performance: By offloading tasks such as SSL termination, and compression, nginx reduces the workload on the web servers, allowing them to perform better under heavy loads.
- Direct Serving: nginx is optimized for speed and can serve static files directly from the filesystem. This reduces the load on application servers that are better utilized for dynamic content processing. By hosting static files, nginx eliminates the need for these requests to reach the backend servers, thereby cutting down the time taken to serve content to the user.
- Simplified Encryption Management: Managing SSL/TLS certificates and configurations is simpler because they are centralized at the nginx level rather than distributed across multiple servers.
- Cache Control: nginx can be configured to manage browser caching effectively. By setting appropriate cache headers on static files, nginx instructs the browser on how long it should locally store the files (on the client's side) before requesting them again. This not only speeds up load times for repeat visits but also reduces bandwidth usage.
nginx acting as a Load Balancer
Load balancing is crucial for distributing incoming network traffic across multiple servers. This ensures no single server bears too much demand, enhancing website reliability and speed. nginx can also play a role as a load balancer if configured to do so.
When faced with high traffic volumes, scaling up server capacity becomes essential. nginx steps in to distribute this traffic among available servers, preventing any single server from becoming a bottleneck.
The following diagram provides a visual explanation of how nginx manages the distribution of requests across different web servers, showcasing its dual role in both load balancing and content delivery:
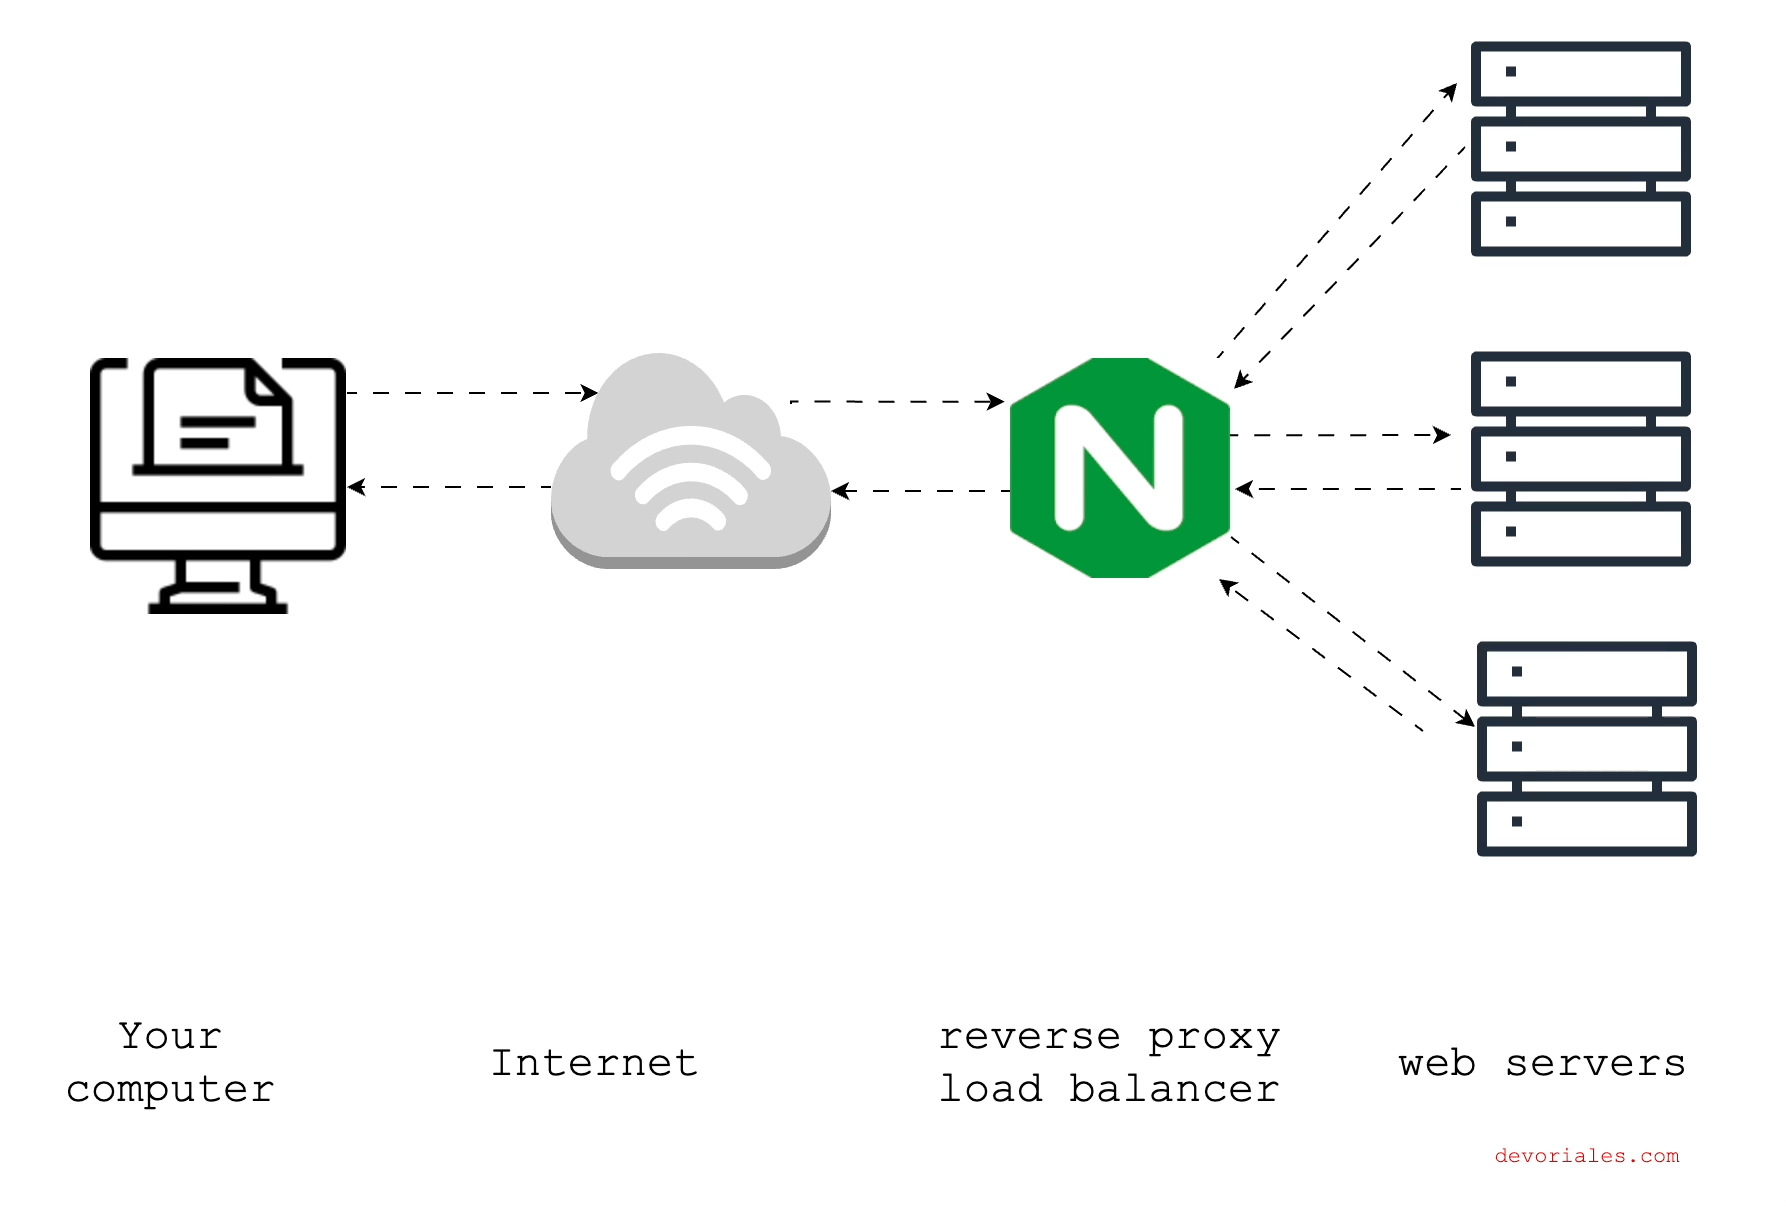
- Request Initiation: A user sends a request (e.g., by clicking a link or typing in a URL) which is directed to the web application hosted on multiple servers.
- Handling by nginx:
- Receiving the Request: nginx receives the request sent from the user over the internet.
- Load Balancing: nginx assesses the current load on each server and forwards the request to the least busy server, using algorithms like round-robin, least connections, or IP hash, among others.
- Response Handling:
- Processing the Request: The chosen server processes the request and generates a response.
- Returning the Response: The response is sent back to nginx, which then relays it through the Internet to the user's computer.
Benefits of Using nginx for Load Balancing:
- Scalability: By efficiently distributing client requests across multiple servers, nginx ensures the application can scale smoothly to handle increases in traffic.
- Fault Tolerance: nginx can detect unresponsive servers and reroute traffic to the healthy ones, improving the reliability and availability of the application.
- Flexibility: nginx offers a variety of load balancing methods and can be configured to understand the unique traffic and architecture needs of any application.
TLS Termination
When you set up nginx with SSL/TLS, it acts as the secure gateway for your site. Instead of your website traffic being sent in plain text that anyone could eavesdrop on, nginx encrypts the traffic before sending it over the internet. This means anyone intercepting the traffic would only see scrambled data, which cannot be decrypted without a decryption key.
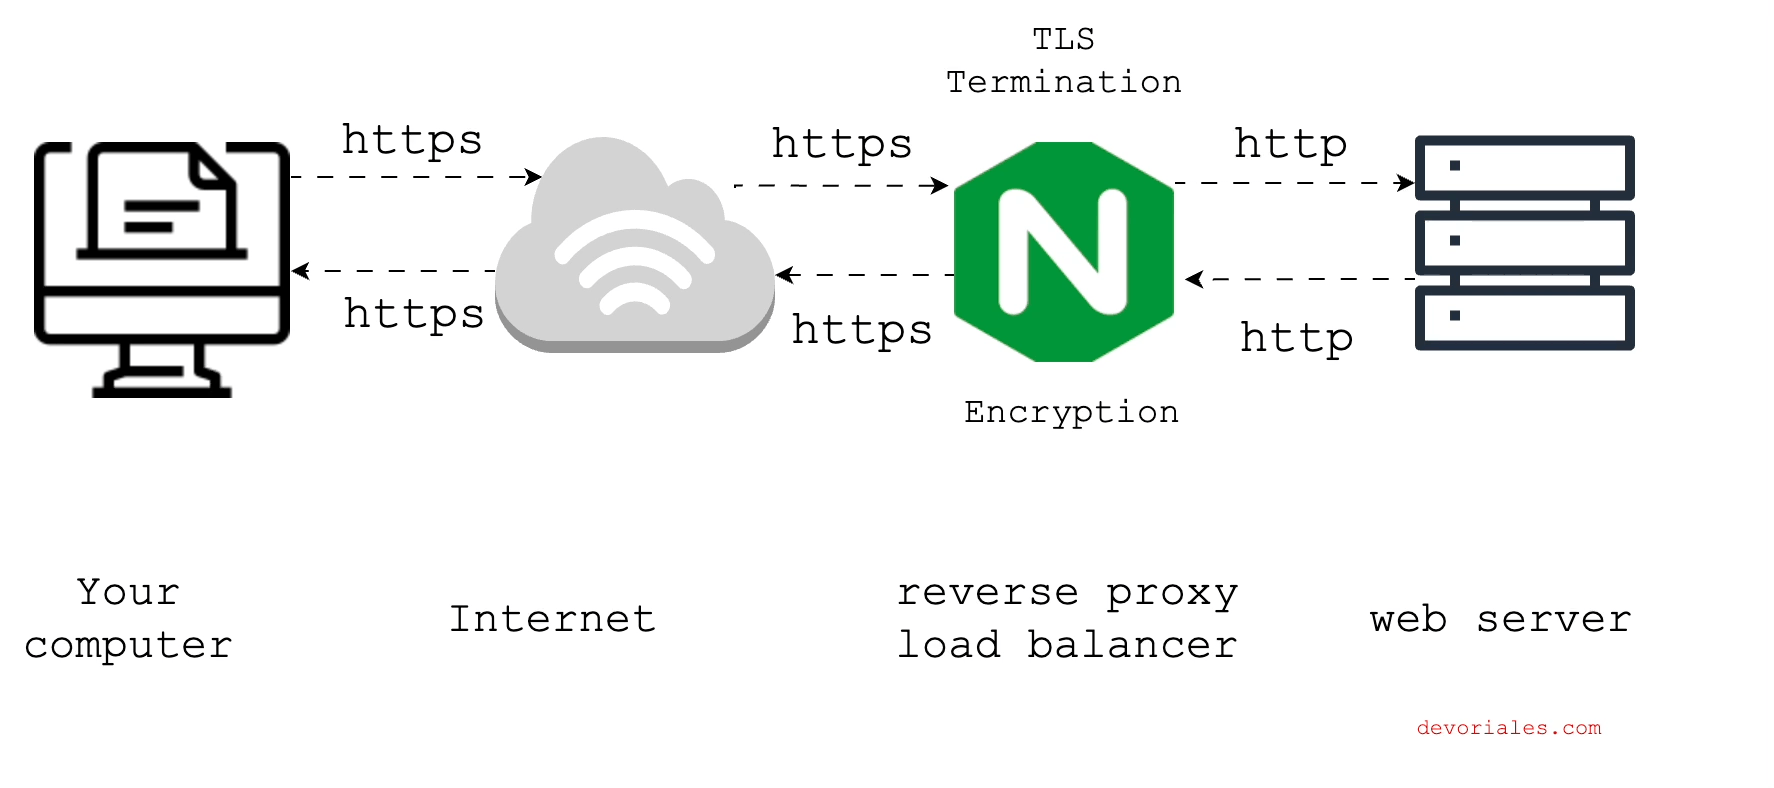
In the scenario where nginx acts as a reverse proxy handling TLS termination, here's what happens with the response:
-
HTTP Response from Web Server: After processing the request, the backend web server sends an HTTP response back to nginx. This response contains the data meant for the user, such as web pages, images, or other content. Since the communication between the web server and nginx is over HTTP, it is unencrypted.
-
TLS Encryption at nginx: Once nginx receives the HTTP response from the backend server, it encrypts the response using the TLS protocol. This step converts the unencrypted HTTP data into encrypted HTTPS data, ensuring that the information remains secure as it travels over the internet.
-
HTTPS Response to User: After encrypting the response, nginx sends this HTTPS response back to the user's browser. The browser will then decrypt the response using the established TLS session keys.
How to install nginx?
nginx supports a wide range of platforms and operating systems. Whether you're running Linux, MacOS, or Windows, nginx can run on any of those. Moreover, it can run on container orchestration systems like Kubernetes. For development and testing environments, using Docker Compose is particularly great as it ensures compatibility across different systems.
In this tutorial, we'll use Docker Compose to install and configure nginx. This approach guarantees that no matter which operating system you are using, you can follow along and achieve the same results.
Install Docker and Docker Compose
Docker
You need to have Docker installed on your system. Docker allows you to create, deploy, and run applications using containers. Here's a quick overview of installing Docker on various systems:
- Windows: Install Docker Desktop for Windows.
- Mac: Install Docker Desktop for Mac (ensure compatibility with M1 if applicable).
- Linux: Install Docker using the package manager of your choice (e.g.,
aptfor Ubuntu,yumfor CentOS). You may need to add Docker’s repository first.
Docker Compose
For Docker Desktop on Windows and Mac, Docker Compose comes integrated, so no separate installation is required.
You can find the official installation instructions here
Step 1 - Prepare Your Docker Compose File
Open a terminal and create a directory for your nginx project. Navigate into it:
mkdir nginx-docker
cd nginx-docker
Create a Docker Compose File:
Inside the nginx-docker folder, use a text editor or the vim to create a file named docker-compose.yml:
version: '3.8'
services:
  nginx:
    image: nginx:latest
    ports:
      - "80:8080"
    volumes:
      - ./nginx.conf:/etc/nginx/nginx.conf
This setup pulls the latest nginx image, maps port 80 of the container to port 80 on the host, and mounts a custom nginx configuration file which we will create in the next section.
Step 2: Add a Custom nginx Configuration File
Create the nginx Configuration File: In the same directory as your docker-compose.yml, create a file named nginx.conf. Here’s a simple configuration you can start with:
events {}
http {
    server {
        listen 80;
        server_name localhost;

        location / {
            root /usr/share/nginx/html;
            index index.html index.htm;
        }
    }
}
❗This configuration sets up a basic web server that serves content from the default directory inside the container. Don't worry about the specifics in the file, we'll go through that later in the article.
Step 3: Start Your nginx Container
Run the following command in the directory containing your docker-compose.yml:
docker-compose up -d
This command starts the nginx container in detached mode, meaning it runs in the background.
Step 4: Verify nginx is Running
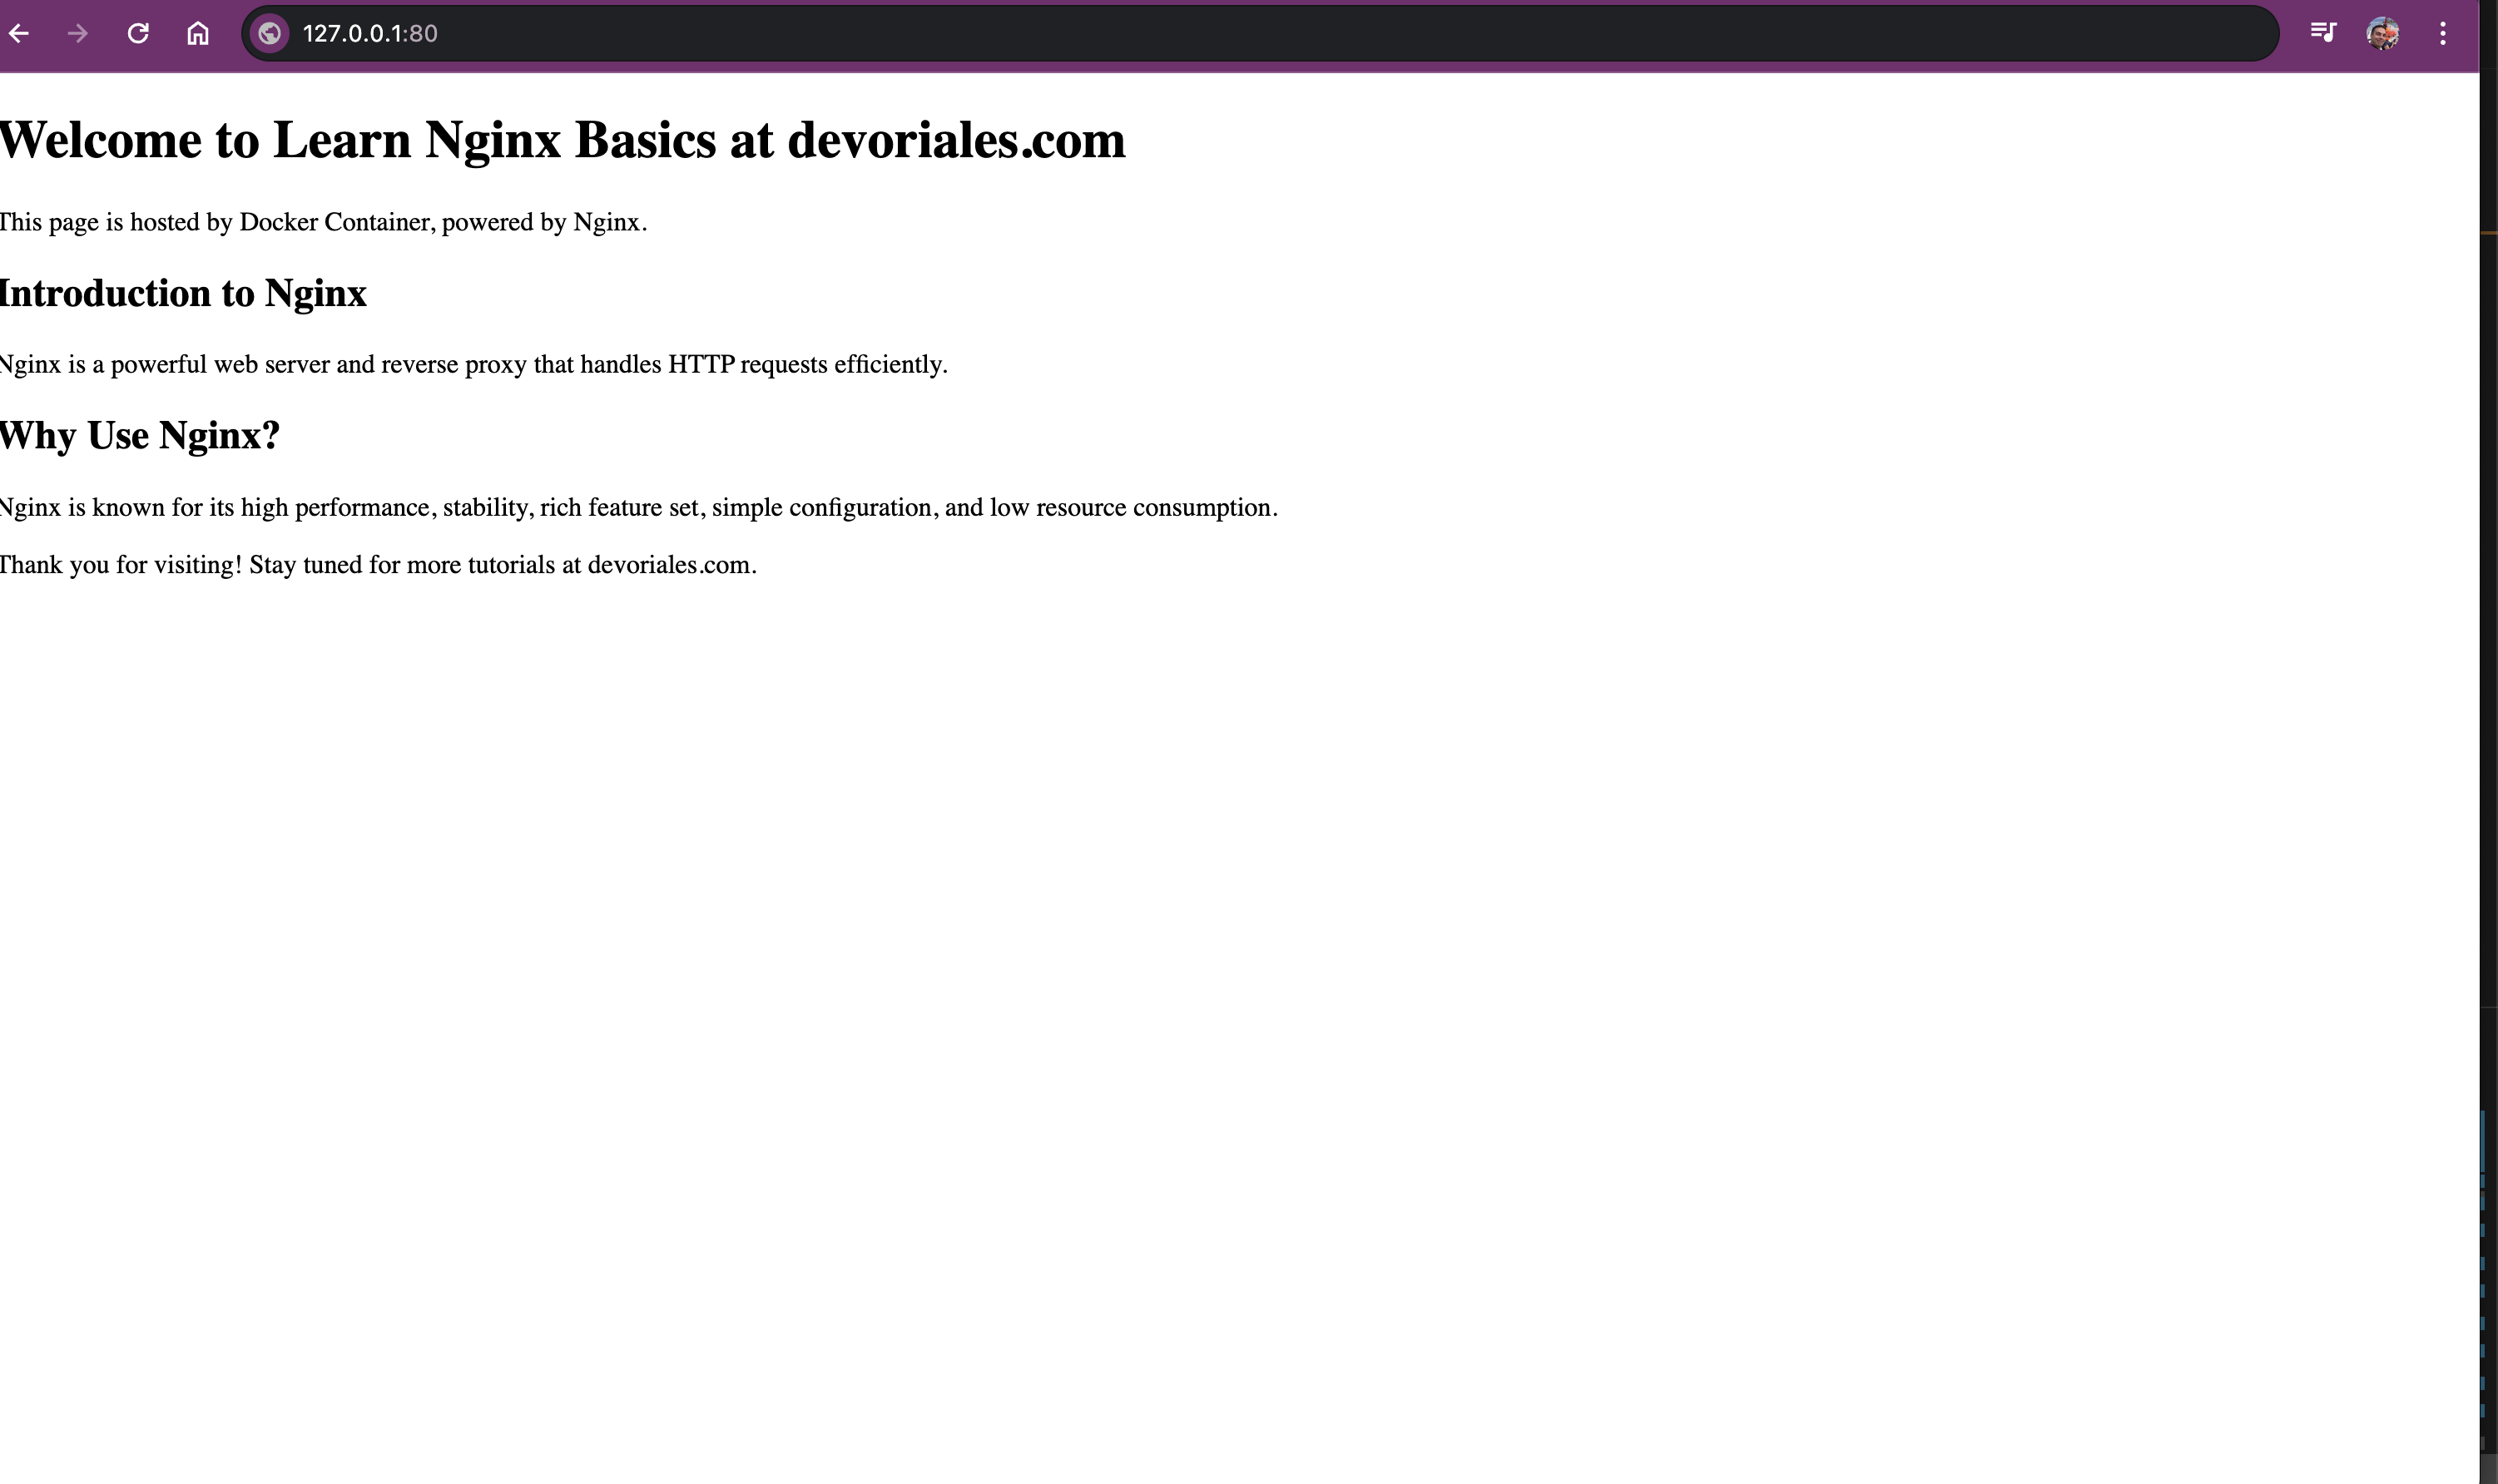
Open a web browser and navigate to http://localhost:8080.
You should see the default nginx page:

Useful stuff - Managing the Docker Container
To stop the container, you can run the following:
docker-compose down
To reload the configuration after making changes without restarting the container:
docker-compose exec nginx nginx -s reload
To view the logs:
docker-compose logs nginx
Static Content - Custom Home Page
In this section, we'll create a custom home page instead of using the default one that we've seen.
❗We won't cover HTML and CSS in this article, so the code has been pre-prepared.
In the same directory where you have your docker-compose.yaml file, create a folder called html:
mkdir htmlInside the html folder, create two files: index.html and styles.css:
touch html/index.html hmtl/styles.cssThe structure should now look like this:
nginx-docker
├── html
│   ├── index.html
│   └── styles.css
└── nginx.conf
In index.html, add the following code:
<!DOCTYPE html>
<html lang="en">

<head>
    <meta charset="UTF-8">
    <meta name="viewport" content="width=device-width, initial-scale=1.0">
    <title>Learn Nginx Basics at Devoriales.com</title>
    <link rel="stylesheet" href="styles.css">
</head>

<body>
    <header>
        <h1>Welcome to Learn Nginx Basics at devoriales.com</h1>
        <p>This page is hosted by Docker Container, powered by Nginx.</p>
    </header>
    <section>
        <article>
            <h2>Introduction to Nginx</h2>
            <p>Nginx is a powerful web server and reverse proxy that handles HTTP requests efficiently.</p>
        </article>
        <article>
            <h2>Why Use Nginx?</h2>
            <p>Nginx is known for its high performance, stability, rich feature set, simple configuration, and low
                resource consumption.</p>
        </article>
    </section>
    <footer>
        <p>Thank you for visiting! Stay tuned for more tutorials at devoriales.com.</p>
    </footer>
</body>

</html>
in style.css, add the following code:
body {
    font-family: Arial, sans-serif;
    margin: 0;
    padding: 0;
    background-color: #f4f4f9;
    color: #333;
}

header, footer {
    background-color: #022c43;
    color: #ffffff;
    padding: 10px 20px;
    text-align: center;
}

header h1 {
    margin: 0;
}

section {
    padding: 20px;
    margin: 10px;
}

article {
    background-color: white;
    border-radius: 8px;
    padding: 20px;
    margin-bottom: 20px;
    box-shadow: 0 2px 5px rgba(0,0,0,0.1);
}

footer p {
    margin: 0;
    font-size: 0.8em;
}
We also need to update the nginx.conf file with an additional volume where we have our html and css files:
version: '3.8'
services:
  nginx:
    image: nginx:latest
    ports:
      - "80:80"
    volumes:
      - ./nginx.conf:/etc/nginx/nginx.conf
      - ./html:/usr/share/nginx/html
    restart: always
If you try to reload the nginx by running docker-compose exec nginx nginx -s reload and look at the home page, you'll see something like the following:
It's great that our custom page is appearing, but you might be wondering why the styling isn't working. Let's check if style.css is being served by our nginx web server.
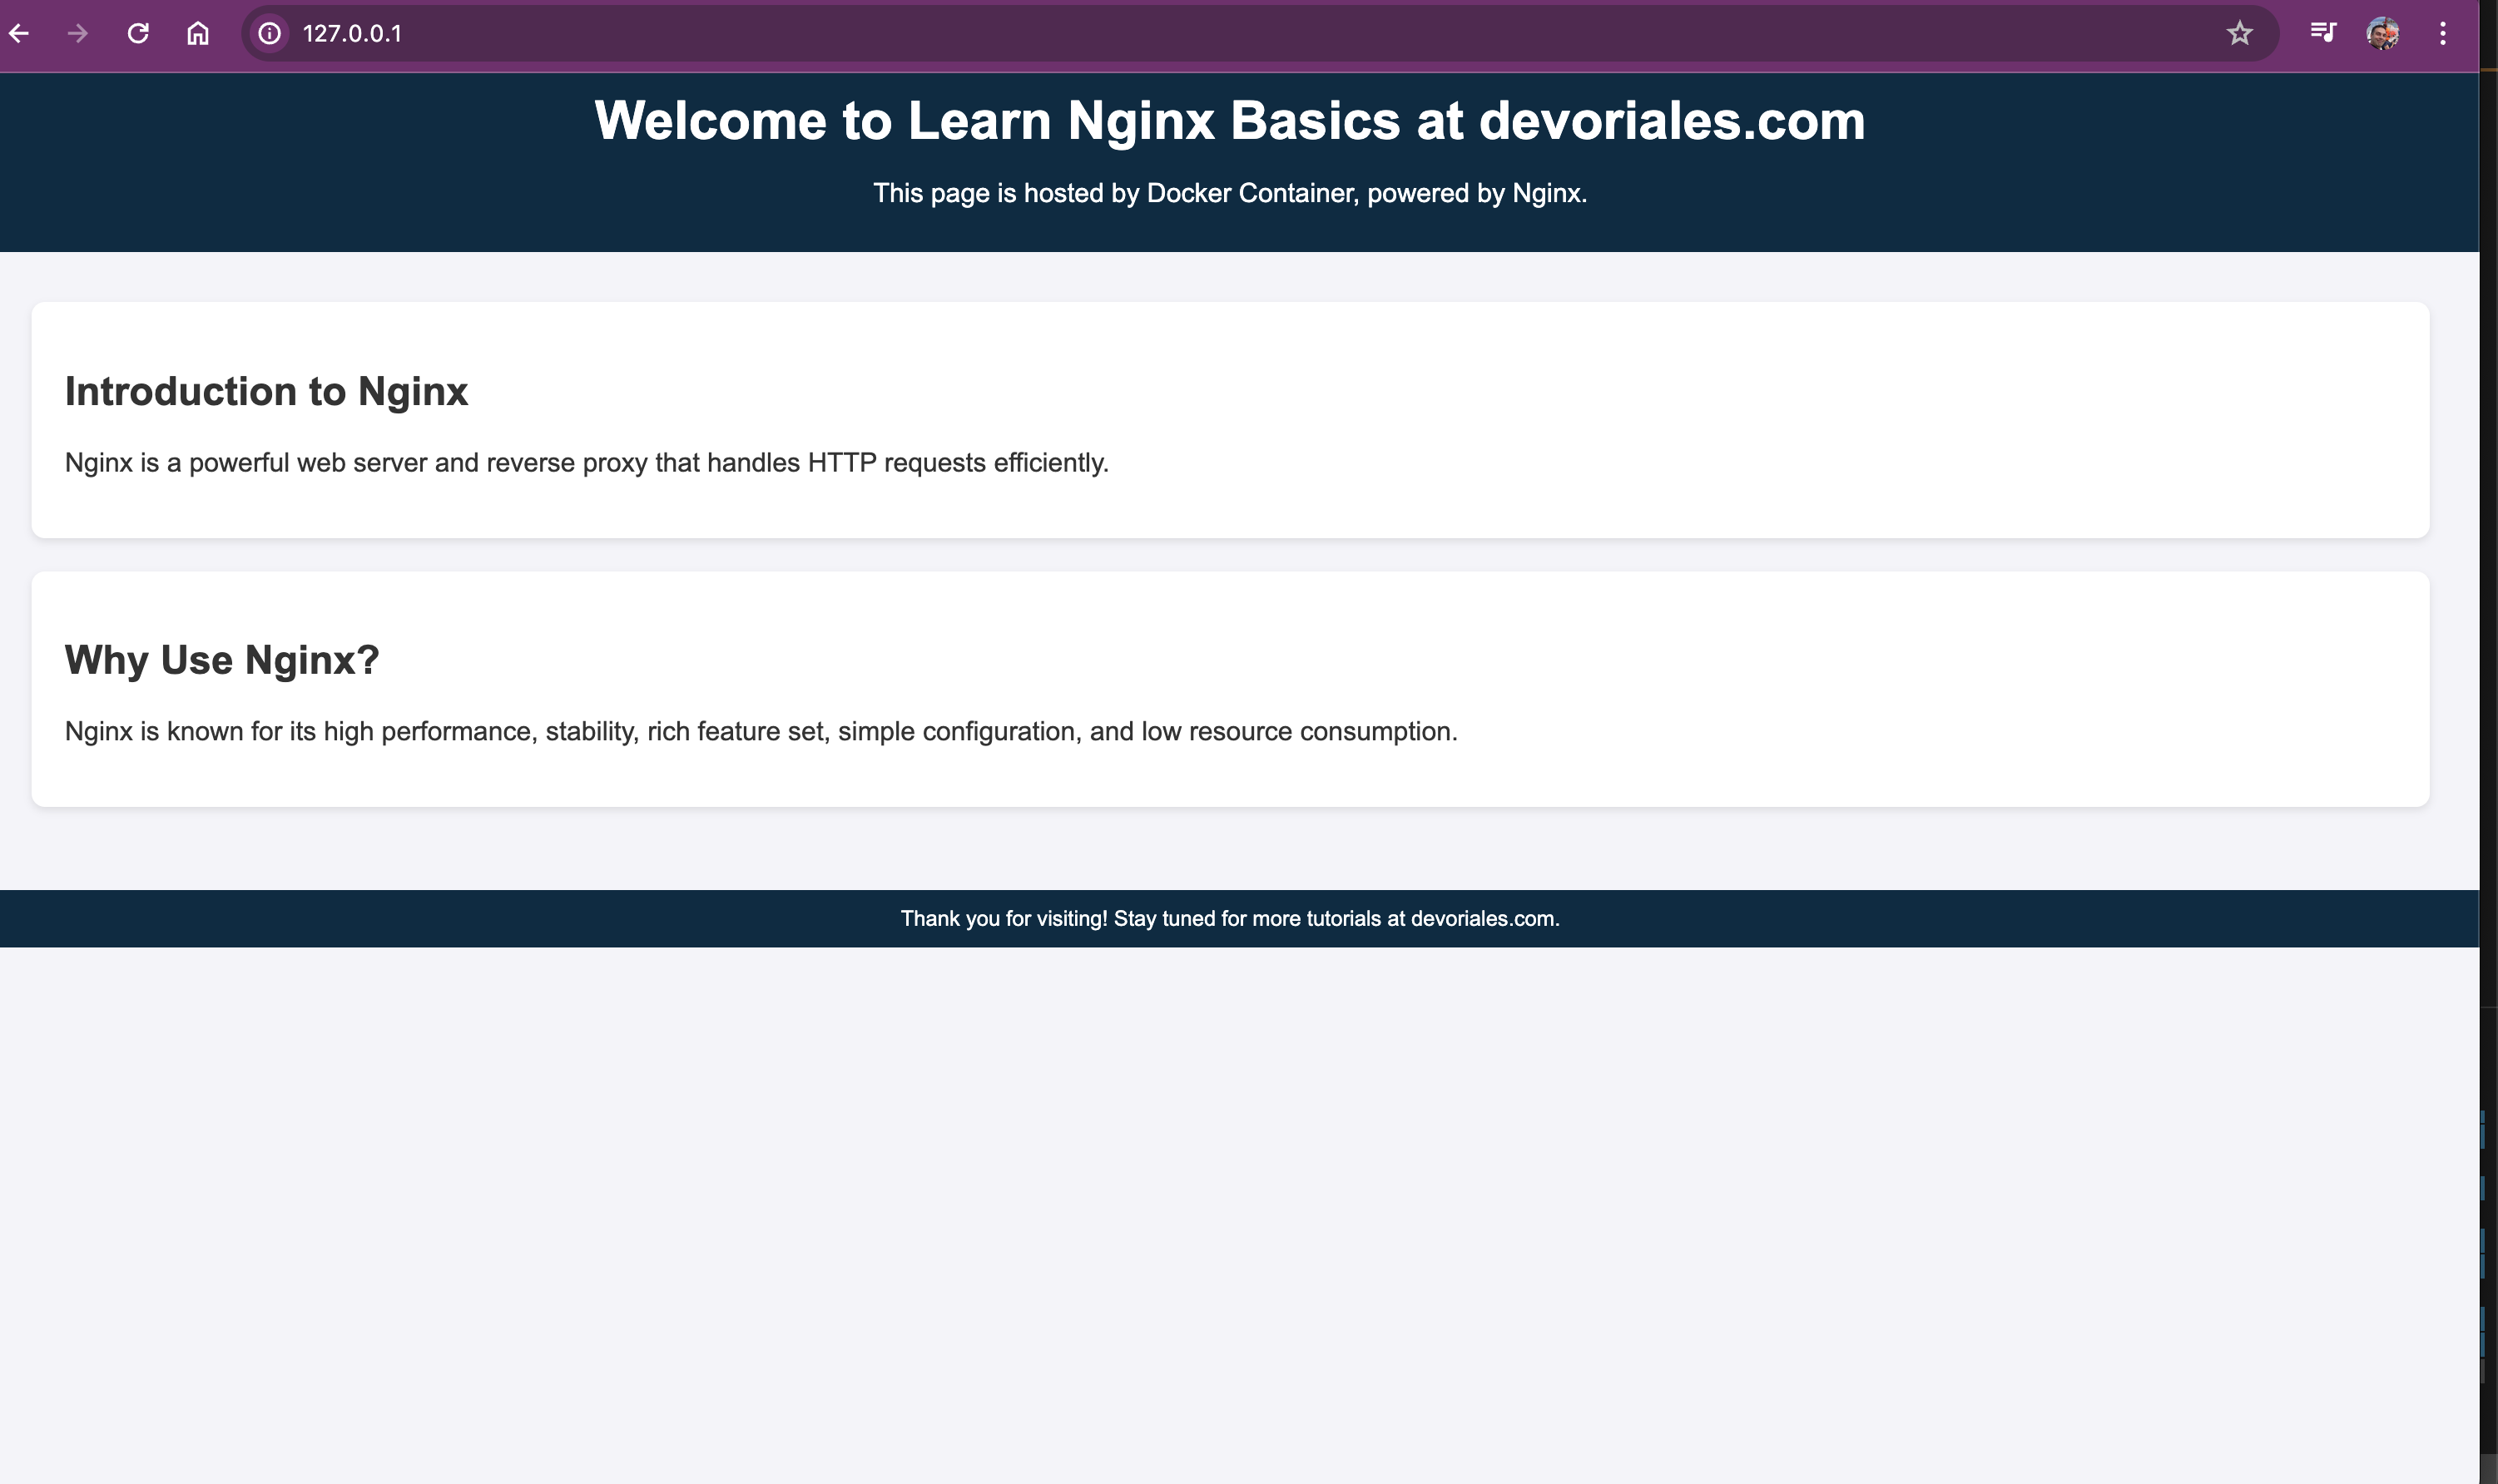
Open the developer mode (inspect mode in Google Chrome) in your browse, select the network tab and refresh the page:
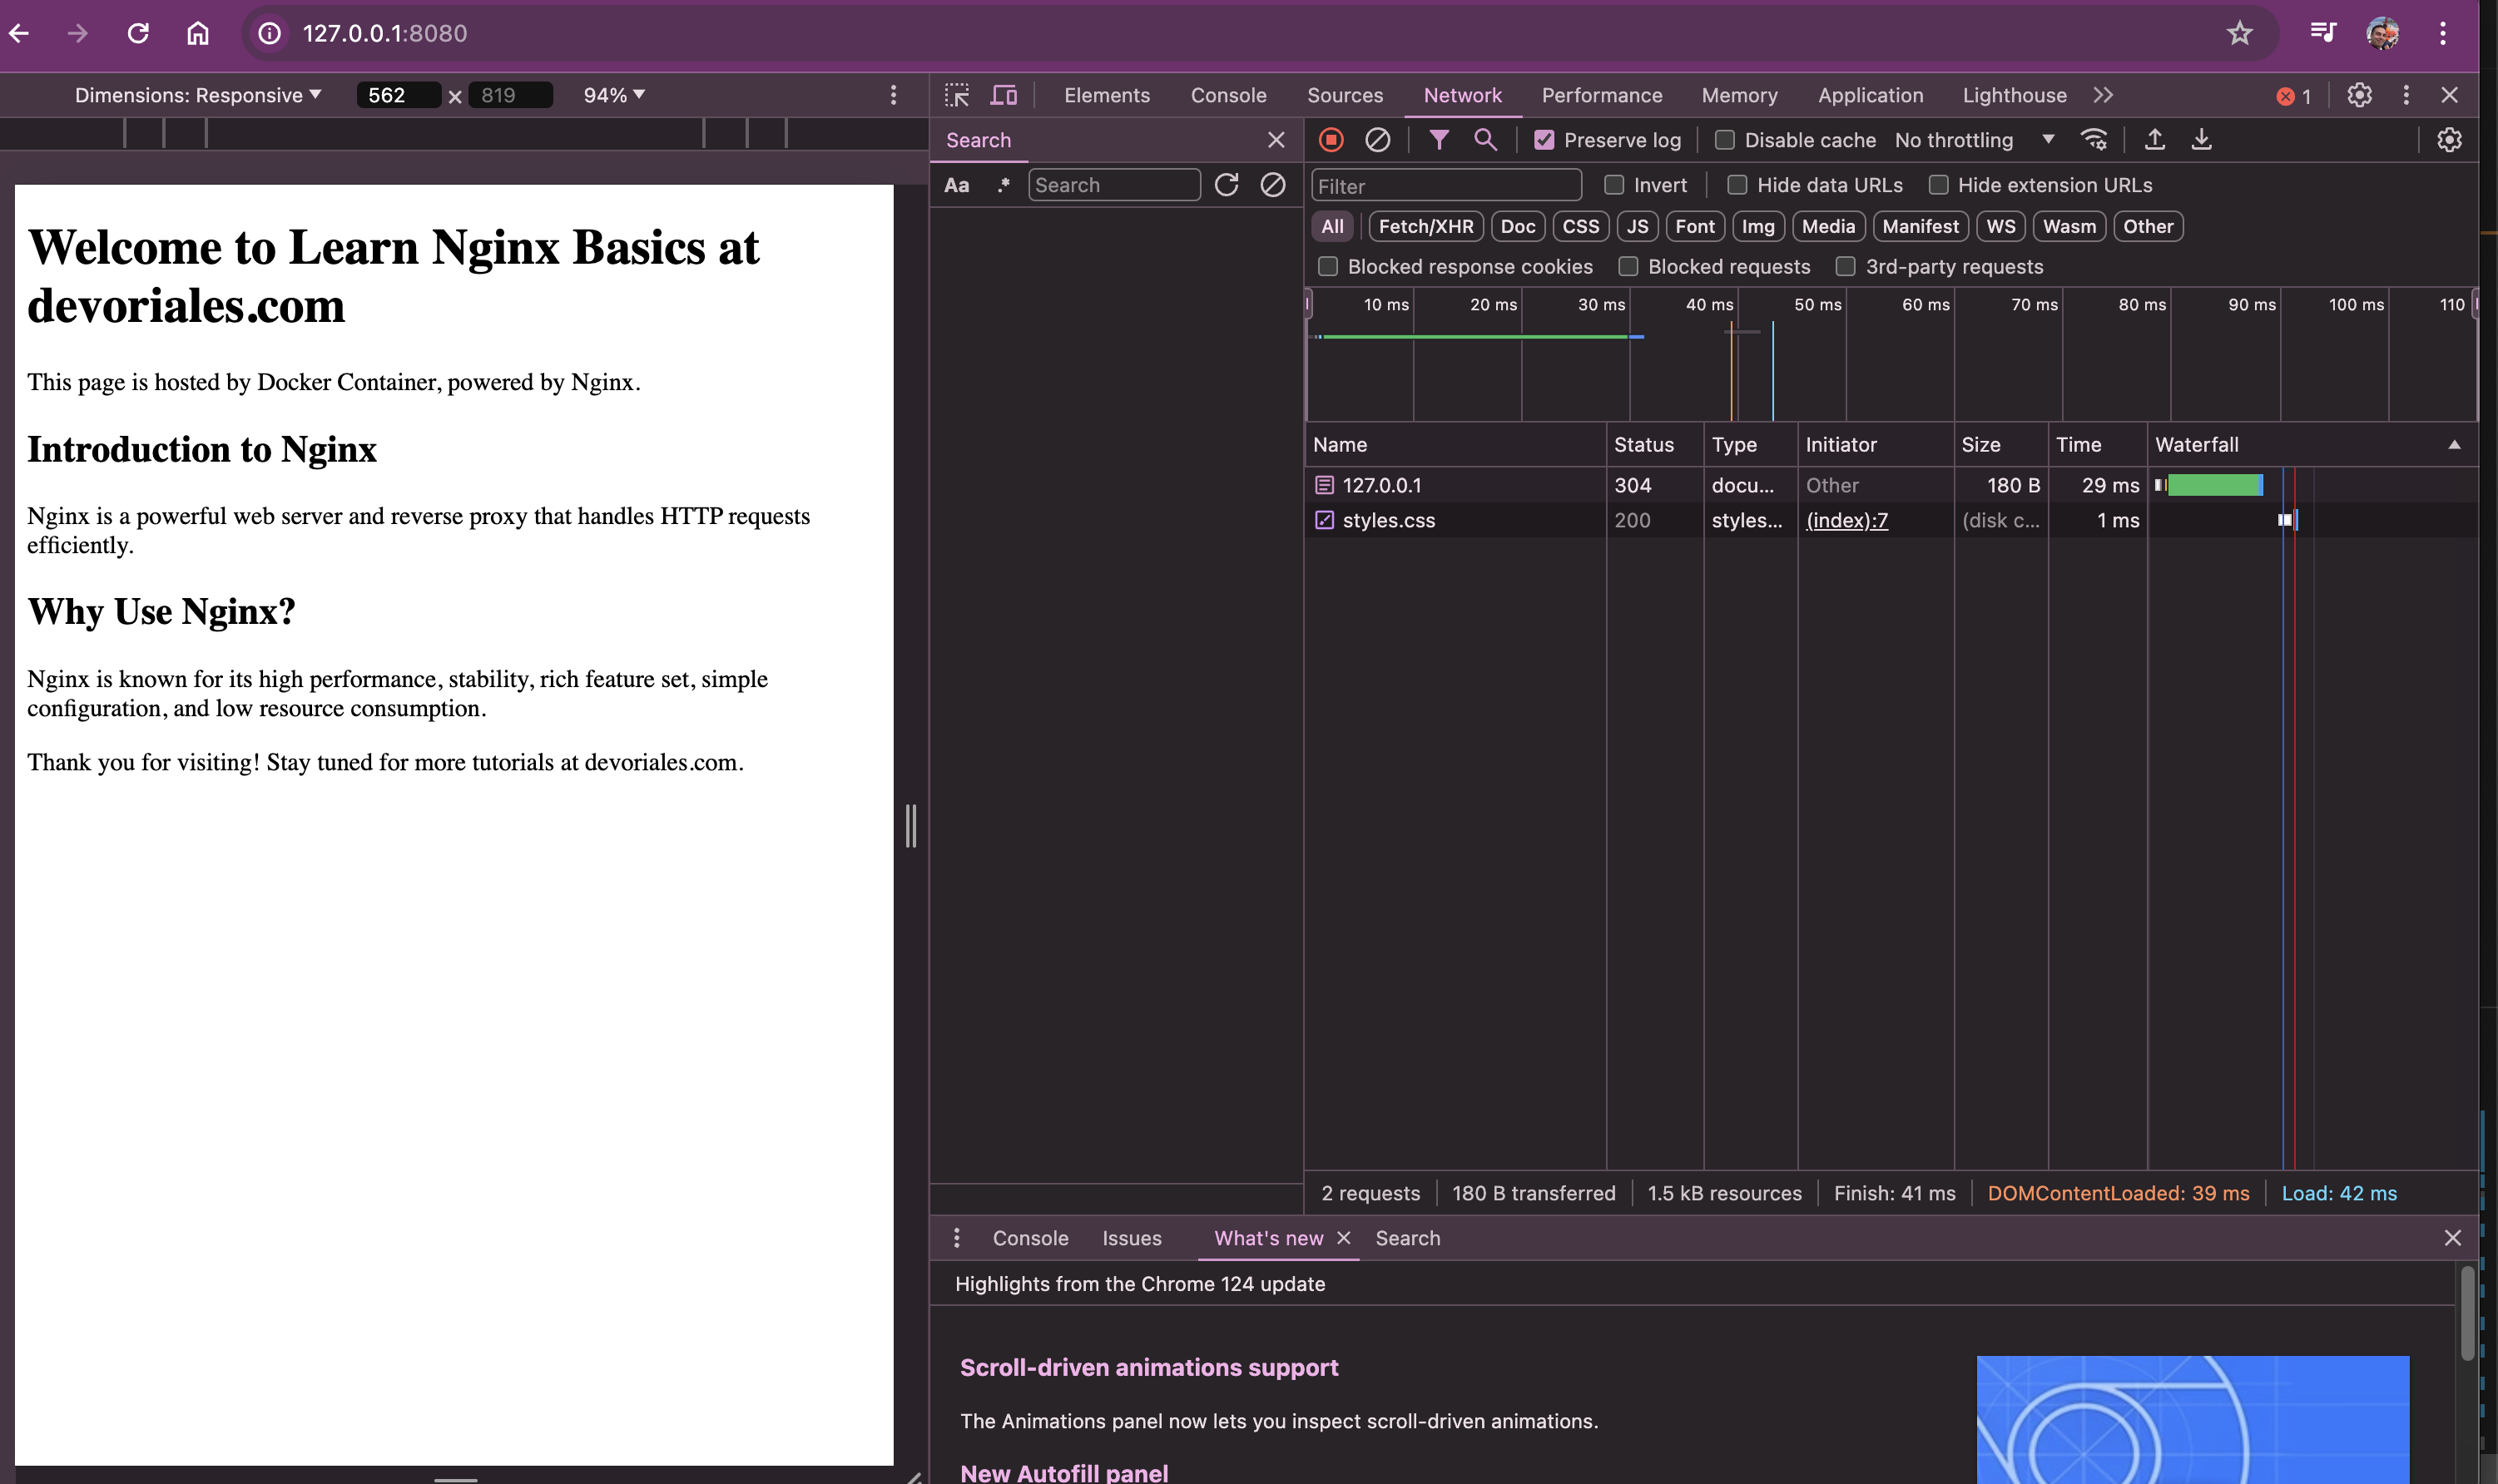
We got our custom home page, we see that both html and css files are served, but there is no styling.The next section will explain why this is happening and how to fix it.
Understanding Mime Types and Their Role in nginx
When serving a static website with an nginx server, ensuring that the server recognizes and serves files with the correct content type is essential. This is where mime types come into play.
What are Mime Types?
A mime type (Multipurpose Internet Mail Extensions type) is a standard that indicates the nature and format of a file or content type. Mime types consist of a type and a subtype, formatted as type/subtype. For example:
text/htmlindicates an HTML document.text/cssindicates a CSS stylesheet.application/javascriptindicates a JavaScript script.
Why are Mime Types Important?
Mime types serve several key roles in web development:
-
Content Interpretation: Browsers and clients rely on mime types to understand how to process and render content. For instance, a browser needs to know whether a file is an HTML document, a CSS stylesheet, or a JavaScript script.
-
Accurate Rendering: Correct mime types ensure that browsers handle files appropriately. For example, serving a CSS file with a mime type of
text/htmlmight lead to unexpected behavior, as the browser might attempt to render it as an HTML document. -
Security: Mime types can prevent security vulnerabilities. For instance, a browser can refuse to execute scripts or render content that isn't explicitly marked with the appropriate mime type.
Where are mime types defined in nginx
Mime types are defined in a file named mime.types located in /etc/nginxfolder.
If we exec into our docker container, you can have a look inside the mime.typesfile:
docker exec -it <container id> bash❗docker container IDs you get by typing the following command docker ps
Once inside the container, we can cat out the content of the /etc/nginx/mime.types file:
cat /etc/nginx/mime.types output:
types {
    text/html                                        html htm shtml;
    text/css                                         css;
    text/xml                                         xml;
    image/gif                                        gif;
    image/jpeg                                       jpeg jpg;
    application/javascript                           js;
    application/atom+xml                             atom;
    application/rss+xml                              rss;

    text/mathml                                      mml;
    text/plain                                       txt;
    text/vnd.sun.j2me.app-descriptor                 jad;
    text/vnd.wap.wml                                 wml;
    text/x-component                                 htc;
---
Adding Mime Types to nginx Configuration
There are generally two ways to add MIME types to our configuration. For instance, we can directly add the MIME types we want to support in the types block within the nginx.conf file:
events {}

http {
    default_type application/octet-stream;

    # Explicitly declaring MIME types within the nginx.conf
    types {
        text/html    html htm shtml;
        text/css     css;
        text/xml     xml;
        image/gif    gif;
        image/jpeg   jpeg jpg;
        application/javascript  js;
    }

    server {
        listen 80;
        server_name localhost;

        root /usr/share/nginx/html;
        index index.html;

        location / {
            try_files $uri $uri/ =404;
        }
    }
}
Another approach is to include the mime.types file. To ensure that our web server correctly recognizes and serves various file types, we can configure MIME types in our nginx configuration:
events {}
http {
    include       /etc/nginx/mime.types;
    default_type  application/octet-stream;

    server {
        listen       80;
        server_name  localhost;

        root   /usr/share/nginx/html;
        index  index.html;

        location / {
            try_files $uri $uri/ =404;
        }
    }
}
include /etc/nginx/mime.types;: Includes a predefined list of mime types, ensuring nginx knows how to classify and serve various file types such as HTML, CSS, and JavaScript.default_type application/octet-stream;: Specifies a fallback mime type for any files not listed inmime.types. This ensures that even unrecognized files are served safely and predictably.
We need to reload the nginx to pick the latest changes:
docker-compose exec nginx nginx -s reloadNow the web page should look something like this:
What we actually did is that we've mounted the nginx.conf, index.html and style.css to the locations in nginx container where the nginx is expecteing the files to be.
We can verify it by exec into the container. With the following command, we can find out the container id of our nginx containier:
➜  nginx docker ps
CONTAINER ID   IMAGE          COMMAND                  CREATED        STATUS          PORTS                    NAMES
3529e93d23c2   nginx:latest   "/docker-entrypoint.…"   10 days ago    Up 56 minutes   0.0.0.0:80->80/tcp       conf-nginx-1
Exec into the container with the following command:
docker exec -it 3529e93d23c2 bashWe can now inspect the folders inside the container:
root@3529e93d23c2:/# ls /usr/share/nginx/html/ /etc/nginx/
/etc/nginx/:
conf.d		mime.types  nginx.conf	 uwsgi_params
fastcgi_params	modules     scgi_params

/usr/share/nginx/html/:
index.html  styles.css
root@3529e93d23c2:/#
As we can we, we have our html and css files and also the nginx.conf as stated in the docker-compose.yml file.
The nginx.conf will be the main file that we'll be working with.
Location Block
In this section, we'll explain the purpose and functionality of the location block in an nginx configuration file. The location block in nginx is essential for defining how specific URL paths should be handled by the server. It allows you to tailor the server's response based on the request's URI.
The location block is crucial for defining how specific requests are handled.
In this example, the location block is used to match requests for the root URL (/):
location / {
    try_files $uri $uri/ =404;
}
Purpose and Functionality
-
location / {}:- This block matches all requests to the root URL and any sub-paths. It sets the handling rules for these requests.
-
try_files $uri $uri/ =404;:- This directive tells nginx to try serving the requested URI (
$uri), and if it fails, try appending a slash to the URI ($uri/). If both attempts fail, nginx returns a 404 error. - This ensures that nginx checks if the requested file or directory exists and serves it. If not, it returns a 404 Not Found error.
- This directive tells nginx to try serving the requested URI (
The $uri variable in nginx represents the URI of the request, which is essentially the part of the URL that follows the domain name and port number. For example, in the URL http://devoriales.com/path/to/resource, the URI is /path/to/resource.
What we can do is to add create a folder called articles inside the html folder:
Inside the html folder, reate a folder:
mkdir articlesNow we got the following directory structure:
nginx-docker
├── html
│   ├── articles
│   │   └── articles.html
│   ├── index.html
│   └── styles.css
└── nginx.conf
Inside the articles folder, create a file, articles.html file and paste the following code:
<!DOCTYPE html>
<html lang="en">

<head>
    <meta charset="UTF-8">
    <meta name="viewport" content="width=device-width, initial-scale=1.0">
    <title>Learn Nginx Basics at Devoriales.com</title>
    <link rel="stylesheet" href="styles.css">
</head>

<body>
    <header>
        <h1>Welcome to Learn Nginx Basics at devoriales.com</h1>
        <p>This page is hosted by Docker Container, powered by Nginx.</p>
    </header>
    <section>
        <article>
            <h2><a href="https://devoriales.com/post/342/how-to-configure-ingress-nginx-for-local-kubernetes-development">How to Configure Ingress Nginx for Local Kubernetes Development</a></h2>
            <p>Learn how to set up and configure Ingress Nginx for your local Kubernetes development environment.</p>
        </article>
        <article>
            <h2><a href="https://devoriales.com/post/332/resolve-stuck-namespaces-in-kubernetes-a-step-by-step-tutorial">Resolve Stuck Namespaces in Kubernetes: A Step-by-Step Tutorial</a></h2>
            <p>This guide provides a detailed walkthrough on resolving stuck namespaces in Kubernetes.</p>
        </article>
        <article>
            <h2><a href="https://devoriales.com/post/318/understanding-kubernetes-container-runtime-cri-containerd-and-runc-explained">Understanding Kubernetes Container Runtime: CRI, containerd, and runc Explained</a></h2>
            <p>An in-depth explanation of Kubernetes container runtimes, including CRI, containerd, and runc.</p>
        </article>
    </section>
    <footer>
        <p>Thank you for visiting! Stay tuned for more tutorials at devoriales.com.</p>
    </footer>
</body>

</html>
For instance, the location / block in the configuration handles all requests to the root URL and any sub-paths. It uses the try_files directive to check if the requested URI points to a file or directory, and serves it accordingly. If neither exists, a 404 error is returned, ensuring proper handling of non-existent resources.
Additionally, the location /articles block is configured to manage requests specifically for the /articles path. Unlike the root location block, it serves a different index file (articles.html). This allows for customized content delivery based on the URL path, providing flexibility in how different sections of the website are served.
By using location blocks, you can create precise rules for handling various request patterns, enhancing the server's ability to serve content efficiently and correctly.
events {}

http {
    include /etc/nginx/mime.types;
    default_type application/octet-stream;

    server {
        listen 8080;
        server_name localhost;

        root /usr/share/nginx/html;
        index index.html;

        location / {
            try_files $uri $uri/ =404;
        }

        # we add a new location block for the /articles path
        location /articles {
            root /usr/share/nginx/html; # we set the root to the same directory as the server block and not the /articles directory
            index articles.html; # pay attention to this line since the index file is different, we call it articles.html instead of index.html
        }
    }
}
As stated in the comment, we need to specify the name of the file since it's not called index.html, but articles.html
After the changes, don't forget to reload the nginx:
docker-compose exec nginx nginx -s reload
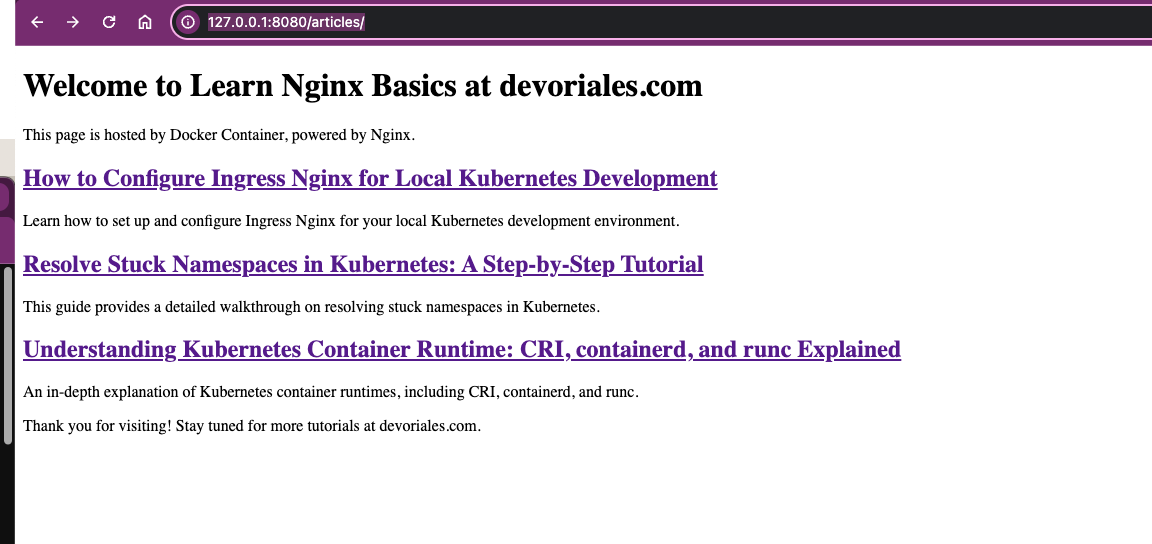
In our browser we can now type the following path:
http://127.0.0.1:8080/articles/You should get a page that looks something like the following:
Serving Content with Alias
In this section, we'll explore how to use the location block with the alias directive to serve content from a different directory.
Suppose you want requests to 127.0.0.1:8080/posts to serve content from a directory other than the server's root directory. By default, a request to /posts would result in a 404 error if there is no corresponding content in the root directory. To handle this, we can use the alias directive within a location block.
Here’s how you can configure nginx to serve content from a different directory using alias:
        # new location block to serve /posts from different directory using alias
        location /posts {
            alias /usr/share/nginx/html/articles; # we use the alias directive to serve the /posts directory
            index articles.html; # we set the index file to articles.html
        }
The location /posts {} block matches requests to the /posts path.
The alias /usr/share/nginx/html/articles; directive specifies that requests to /posts should be served from the /usr/share/nginx/html/articles directory. Unlike the root directive, which defines the root directory for the entire server, alias maps the requested path directly to the specified directory.
The index articles.html; directive sets the default file to serve when a directory is requested. Here, it specifies that articles.html should be served when the /posts path is accessed. With these changes, requests to /posts will serve the articles.html file located in the /usr/share/nginx/html/articles directory.
This configuration ensures that the correct file is served for the specified path.
Reload the nginx configuration and try to reach 127.0.0.1:8080/posts, it should work and will show you the following content:
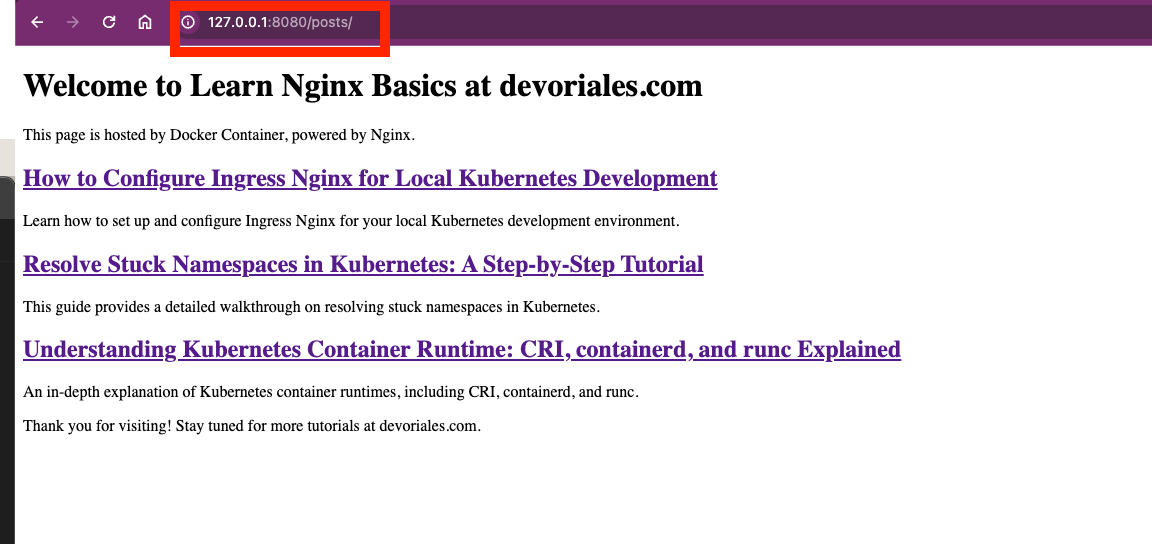
❗Pay attention to the page you're requesting, it's now 127.0.0.1/8080/posts
try_files
In this section, we'll learn how to use the try_files directive in nginx to attempt to serve different files and fall back to a default if none are found.
Using try_files
The try_files directive allows nginx to check for the existence of files in a specific order and serve the first found file. If none of the specified files are found, nginx can return a specified error code, such as 404 Not Found.
Here’s an example configuration to serve content from a specific directory and fall back to a main index file if the specified file is not found:
events {}

http {
    include /etc/nginx/mime.types;
    default_type application/octet-stream;

    server {
        listen 8080;
        server_name localhost;

        root /usr/share/nginx/html;
        index index.html;

        location / {
            try_files $uri $uri/ =404;
        }

        # we add a new location block for the /articles path
        location /articles {
            root /usr/share/nginx/html; # we set the root to the same directory as the server block and not the /articles directory
            index articles.html; # pay attention to this line since the index file is different, we call it articles.html instead of index.html
        }

        # new location block to serve /posts from different directory using alias
        location /posts {
            alias /usr/share/nginx/html/articles; # we use the alias directive to serve the /posts directory
            index articles.html; # we set the index file to index.html
        }

        # use try_files to serve /courses from different directory using alias and fall back to main index file if not found
        location /courses {
            root /usr/share/nginx/html; # we set the root to the same directory as the server block and not the /courses directory
            # if non found, throw a 404
            try_files courses/index.html /index.html =404;
        }

    }
}
The try_files directive tries to serve the courses/index.html file first. If this file is not found, it attempts to serve the index.html file in the root directory. If neither file is found, it returns a 404 Not Found error.
By using the try_files directive, you can create more resilient nginx configurations that handle various scenarios where specific files might not be available. This ensures that users always receive a meaningful response, improving the overall user experience.
To illustrate how nginx searches for the index file, let's look at the following directory structure (this is inside the container):
/usr/share/nginx/html/
├── index.html
├── courses/
│   └── index.html
- If a user navigates to
127.0.0.1:8080/courses, nginx will first try to serve/usr/share/nginx/html/courses/index.html. - If
courses/index.htmlis not found, nginx will fall back to serving/usr/share/nginx/html/index.html. - If neither file exists, nginx will return a 404 Not Found error
Let's try this. Again, start with reloading the nginx:
docker-compose exec nginx nginx -s reload
Now, when you navigate to 127.0.0.1:8080/courses in your browser, nginx will try to serve the courses/index.html file first and fall back to index.html if the former is not found.
In your nginx.conf file, try to intentanionally mispell the last index.html, like: try_files courses/index.html /indexx.html =404;
Now reload the nginx again and see what happens, you should get 404 error.
Complete nginx Configuration
The following is the complete nginx.conf file that we have written so far:
events {}

http {
    include /etc/nginx/mime.types;
    default_type application/octet-stream;

    server {
        listen 8080;
        server_name localhost;

        root /usr/share/nginx/html;
        index index.html;

        location / {
            try_files $uri $uri/ =404;
        }

        # we add a new location block for the /articles path
        location /articles {
            root /usr/share/nginx/html; # we set the root to the same directory as the server block and not the /articles directory
            index articles.html; # pay attention to this line since the index file is different, we call it articles.html instead of index.html
        }

        # new location block to serve /posts from different directory using alias
        location /posts {
            alias /usr/share/nginx/html/articles; # we use the alias directive to serve the /posts directory
            index articles.html; # we set the index file to index.html
        }

        # use try_files to serve /courses from different directory using alias and fall back to main index file if not found
        location /courses {
            root /usr/share/nginx/html; # we set the root to the same directory as the server block and not the /courses directory
            # if non found, throw a 404
            try_files courses/index.html /index.html =404;
        }

    }
}
nginx Terminology
Now that we've covered the basics of nginx and introduced some initial configurations, it's important to understand the terminology used in nginx.
A solid understanding of these terms is essential for effective configuration. In this section, we'll explore key terms and concepts fundamental to nginx configurations. I've intentionally placed this section later in the post because it's helpful to first see what you can do before diving into the terminology. Let's now learn about the terminology.
We'll use a sample nginx.conf:
events {}
http {
    include       /etc/nginx/mime.types;
    default_type  application/octet-stream;

    server {
        listen       80;
        server_name  localhost;

        root   /usr/share/nginx/html;
        index  index.html;

        location / {
            try_files $uri $uri/ =404;
        }
    }
}
Key nginx Terminology and our configurations:
-
nginx.confFile: This is the primary configuration file for nginx. It defines how nginx functions and handles requests. It consists of multiple directives organized into blocks. -
Directives: These are individual configuration commands that set various behaviors and parameters for nginx. For instance,
listen 80;is a directive that specifies the port nginx listens on. Directives look like key value pairs. -
Blocks: Directives can be organized into nested blocks that define broader configuration structures. Key blocks include:
events {}: Defines settings related to nginx's event handling, such as how it manages connections and worker processes.http {}: Specifies the configuration for serving HTTP requests. This block can contain several server blocks and other directives related to MIME types, default file types, and more.server {}: Defines a specific server configuration, including its listening ports, server name, and root directory for serving content.
-
includeDirective: This directive allows you to include external configuration files into the main configuration. For example,include /etc/nginx/mime.types;loads a file that defines various MIME types, ensuring that nginx recognizes and serves files correctly. -
server_nameDirective: Specifies the domain or hostname that the server responds to. In this example,server_name localhost;tells nginx to respond to requests made tolocalhost. -
rootDirective: Defines the root directory from which nginx serves content. Here,root /usr/share/nginx/html;tells nginx to serve content from the specified directory. -
indexDirective: Specifies the default file to serve when accessing the root directory or any directory without a specific file. In this example,index index.html;tells nginx to serve anindex.htmlfile by default. -
locationBlock: Defines how to handle specific URL paths or patterns. Here, thelocation /block matches all URLs and uses thetry_filesdirective to attempt serving the requested URI or directory, or return a 404 error if neither is found. -
try_filesDirective: Attempts to serve a list of specified files or directories. In this example,try_files $uri $uri/ =404;attempts to serve the requested URI or directory, or returns a 404 error if neither exists.
Wrapping Up nginx Part 1
In Part 1, we have laid the groundwork for understanding and utilizing nginx. We began by discussing the basic concepts and the importance of nginx in web architecture, especially its role in handling high volumes of concurrent connections and serving static content efficiently.
We then walked through the process of installing nginx using Docker Compose, ensuring that you can follow along on any operating system. By creating a custom home page and configuring MIME types, we demonstrated how to serve static files correctly and ensure they are interpreted accurately by browsers.
Additionally, we explored the configuration of location blocks, which are crucial for defining how nginx handles specific URL paths. We showed how to serve different content based on URL patterns using directives like try_files and alias, enhancing the flexibility and efficiency of your web server configuration.
In Part 2, we will build on this foundation by diving into more advanced nginx features. We will focus on using nginx as a reverse proxy and setting up load balancing for high-performance web applications. We will also develop a simple Flask application to demonstrate how nginx can distribute requests across multiple backend servers, further improving scalability and reliability.
Aleksandro Matejic, a Cloud Architect, began working in the IT industry over 21 years ago as a technical specialist, right after his studies. Since then, he has worked in various companies and industries in various system engineer and IT architect roles. He currently works on designing Cloud solutions, Kubernetes, and other DevOps technologies.
You can contact Aleksandro by visiting his LinkedIn Profile