
nginx 101: A Comprehensive Tutorial for Developers - Part 2/2

Introduction To NGINX 101 - Part 2/2
In Part 1, we covered the basics of NGINX, including its installation, basic configuration, and how to serve static content. We also discussed the concept of load balancing and the benefits of using NGINX as a web server.
In this Part 2 article, we'll dive deeper into NGINX's advanced features, focusing on regex, its reverse proxy capabilities, and how to set up load balancing. Additionally, we'll cover the process of securing your NGINX server with TLS using Certbot and Let's Encrypt.
We’ll also walk through the process of developing a simple Flask application that will serve as our backend API, demonstrating how to distribute requests across multiple backend servers.
Content
- Using Regular Expressions in NGINX Location Blocks
- NGINX Proxy Pass
- nginx - Load Balancing
- Automating TLS with Certbot in nginx Using Docker Compose
- Wrapping Up The nginx Series
- About The Author
Using Regular Expressions in NGINX Location Blocks
Regular expressions are a powerful feature in NGINX configuration, allowing for flexible and precise matching of URLs. This can be particularly useful when you need to apply certain rules to a group of URLs that share a common pattern. In this section, we’ll explore how to use regular expressions in the location block.
Basic Syntax
NGINX supports two types of regular expressions:
~: Case-sensitive matching~*: Case-insensitive matching
Scenario
To optimize performance, we want to configure NGINX to serve these images from a specific directory and apply caching to reduce server load and improve user experience.
We can use a regular expression in NGINX to match image file types and apply caching rules. This ensures that all image requests are handled uniformly and efficiently.
we can set up our directory structure like this:
/usr/share/nginx/
├── html/
│   └── index.html
├── images/
│   ├── image1.png
│   ├── image2.png
│   └── example.gif
We need to mount the images directory to our container so it's accessable to the nginx:
version: '3.8'
services:
  nginx:
    image: nginx:latest
    ports:
      - "8080:8080"
    volumes:
      - ./nginx.conf:/etc/nginx/nginx.conf
      - ./html:/usr/share/nginx/html
      - ./images:/usr/share/nginx/images  #<<<< we add this line
    restart: always
You can basically add some dummy images to the directory. In my case, I've added some random images from devoriales.com
We now need to update the nginx.conf by adding the following location block:
# Serve image files (JPEG, PNG, GIF) with caching
location ~* \.(jpg|jpeg|png|gif)$ {
    root /usr/share/nginx/images;
    expires 30d; # Cache images for 30 days
}
Let's break it down:
location ~* \.(jpg|jpeg|png|gif)$:
-
~*: This tells NGINX that the location block uses a case-insensitive regular expression. -
\.: The backslash\is an escape character in regex. It is used to indicate that the following character (in this case,.) should be treated literally. - The dot
.is a special character in regex that matches any character except a newline. To match a literal dot (.), you need to escape it with a backslash. Thus,\.matches a literal period in the URL. -
(jpg|jpeg|png|gif)$: This is a group of alternatives separated by the pipe|character, meaning it matches any of the stringsjpg,jpeg,png, orgif. - The
$at the end of the pattern signifies the end of the string, ensuring that the pattern matches the entire file extension exactly. expires 30d;: (bonus by adding this directive🔅)- Caching: This directive sets the caching policy for the matched files, telling browsers to cache these files for 30 days.
Since we have added a new volume to the docker compose file, you need to restart the container to pick up the images:
docker-compose restartIn your browser, access the image:
http://127.0.0.1:8080/image1.png
You should now see the image in your browser. If you inspect the request headers in the network tab (using the browser's developer tools), you'll notice that the image is set to be cached for 30 days (2592000 seconds):
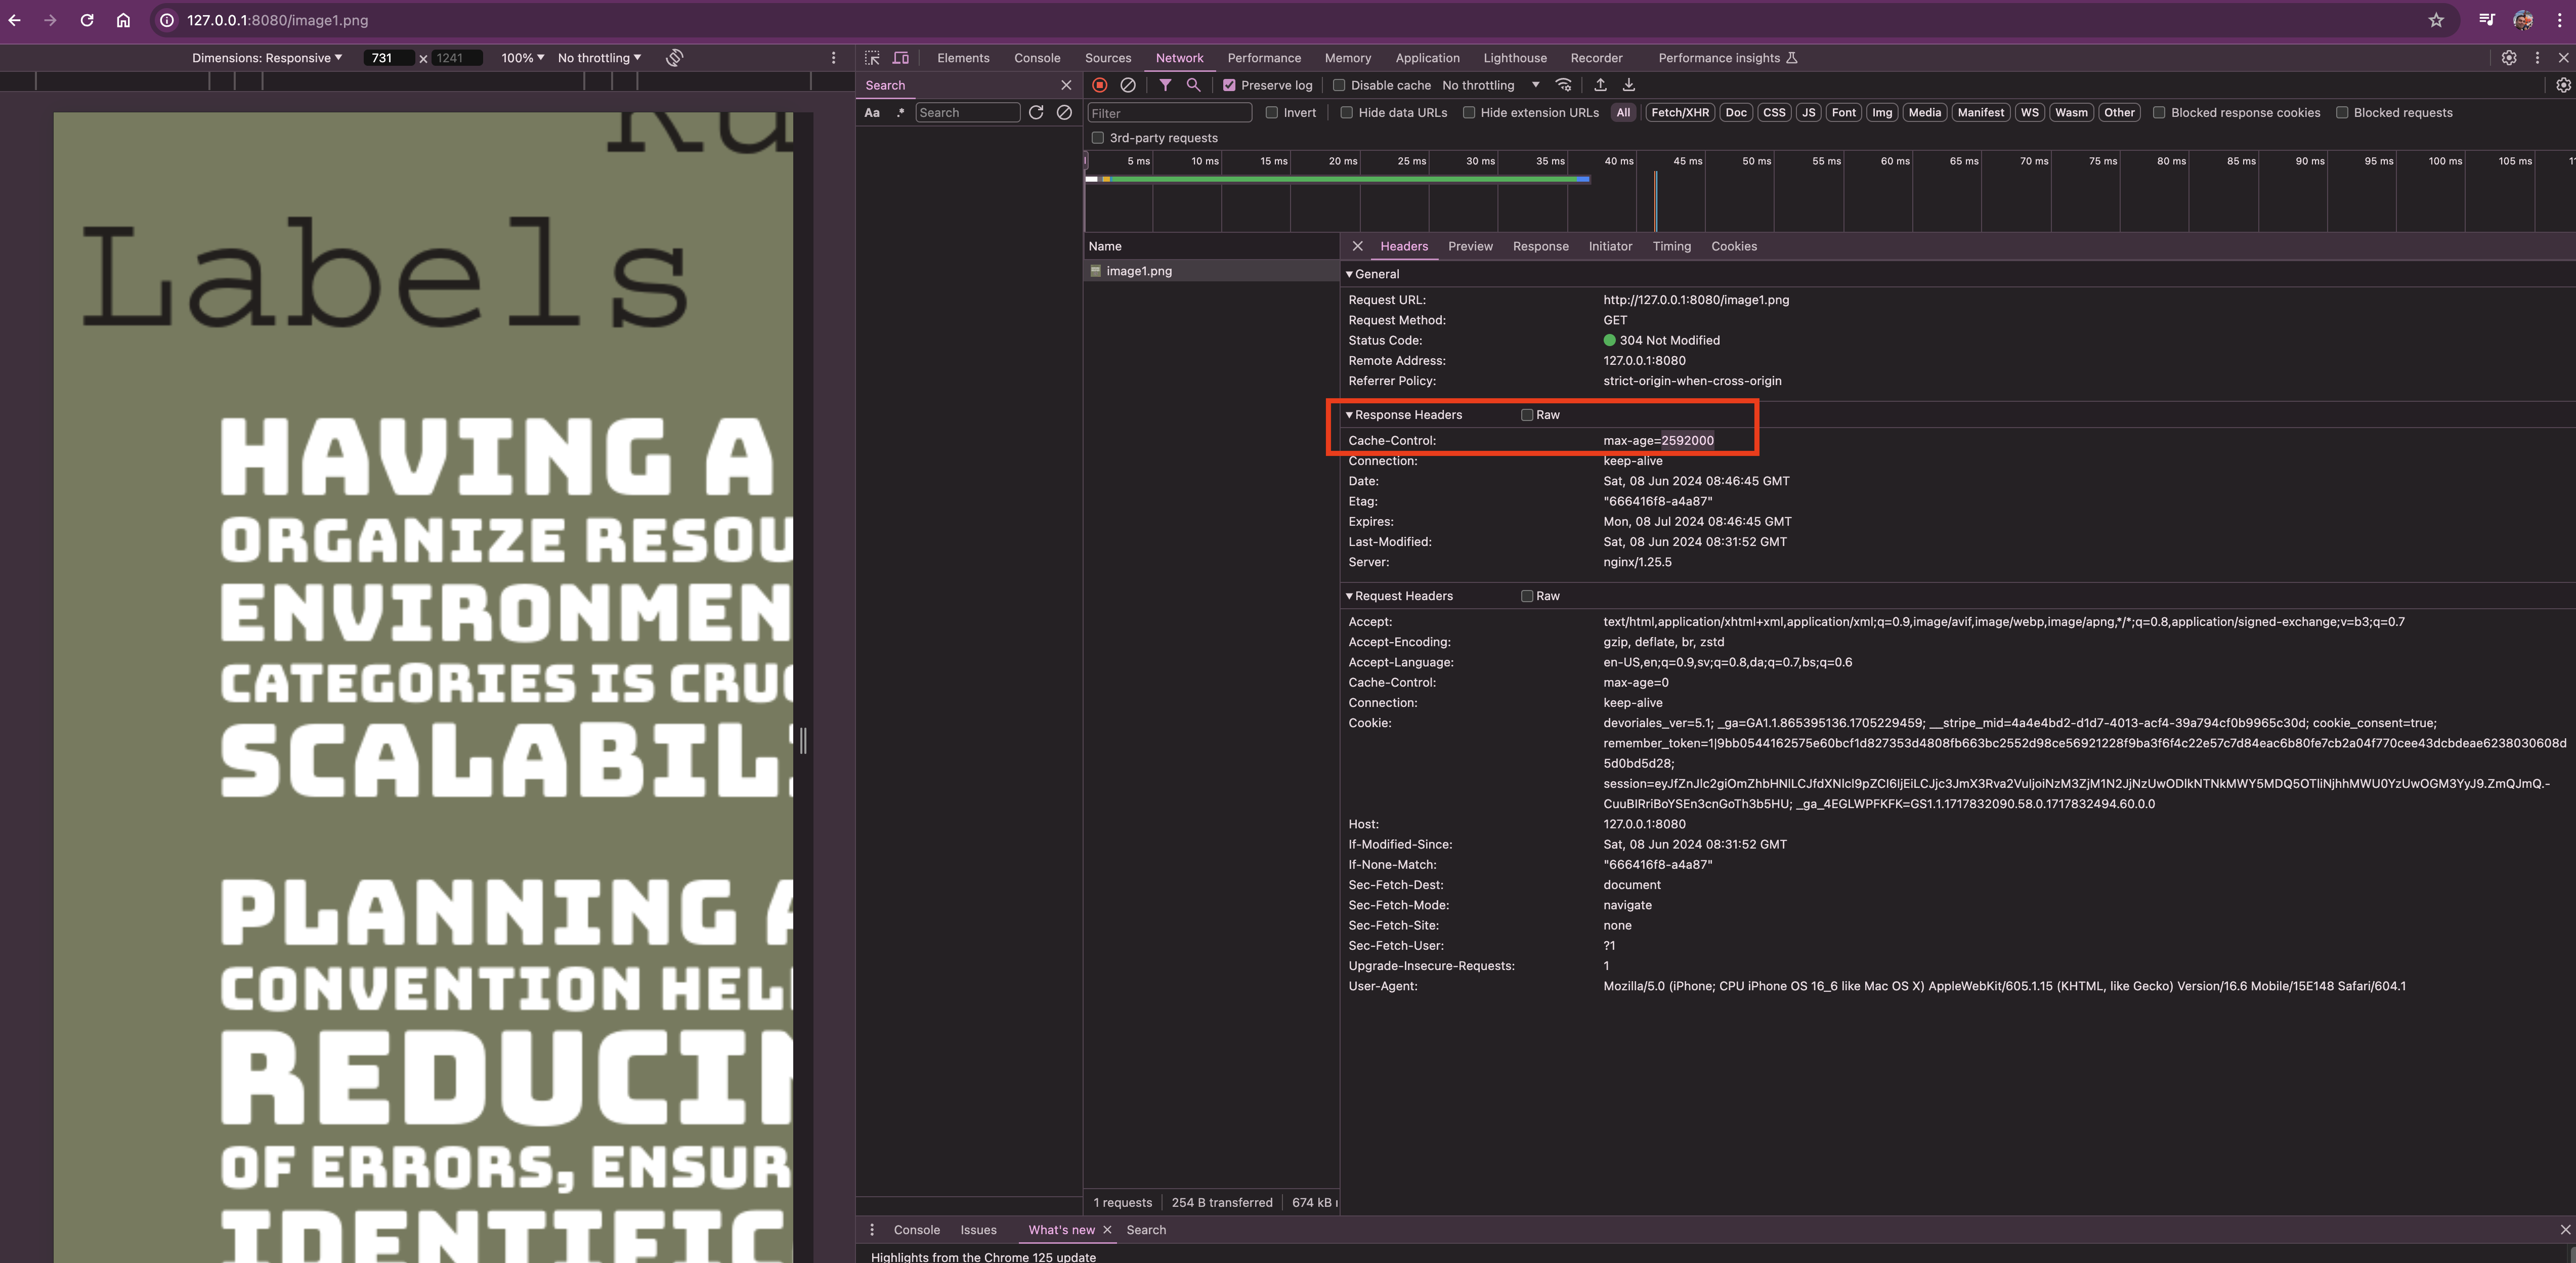
Great, we've now covered the basics of using regex in NGINX.
NGINX Proxy Pass
In this section, we'll learn how to configure NGINX to act as a reverse proxy, forwarding the entire HTTP request (headers and body) to another server for processing. This is particularly useful for load balancing, distributing requests across multiple servers, or proxying requests to an application server such as Flask, Node.js, or other backend services.
Flask Application - API Backend
We'll develop a Flask application that will serve as an API backend. This application will provide a simple RESTful API with two endpoints: /api/data and /api/users. These endpoints will return JSON responses, allowing us to see which backend server is handling the request.
Setting Up the Flask Application
First, let's set up the Flask application. We'll create a basic Flask app with the following structure, let's add flask folder with mkdir flask, the result should be like:
nginx-docker
├── conf
│   ├── html
│   │   ├── articles
│   │   ├── index.html
│   │   └── styles.css
│   ├── images
│   │   ├── image1.png
│   │   └── image2.png
│   └── nginx.conf
├── docker-compose.yml
└── flask
Create app.py which is the main application file. It defines two endpoints, /api/data and /api/users. Each endpoint returns a JSON response that includes the hostname of the server handling the request:
from flask import Flask, jsonify
import socket

app = Flask(__name__)

@app.route('/api/data', methods=['GET'])
def get_data():
    hostname = socket.gethostname()
    return jsonify({"message": "API Data From My Backend Service", "host": hostname})

@app.route('/api/users', methods=['GET'])
def get_users():
    users = {'john': 'active', 'doe': 'inactive', 'jane': 'active', 'smith': 'active'}
    hostname = socket.gethostname()
    return jsonify({"users": users, "host": hostname})

if __name__ == '__main__':
    app.run(host='0.0.0.0', port=5000)
❗We're also returning the hostname, which corresponds to the container ID. This is useful when configuring the load balancer later, as it allows us to identify which container is handling each request.
# ./flask/Dockerfile
FROM python:3.11-slim

# Set the working directory in the container to /app
WORKDIR /app

# Copy the requirements file into the container at /app
COPY requirements.txt requirements.txt

# Install any dependencies specified in requirements.txt
RUN pip install -r requirements.txt

# Copy the current directory contents into the container at /app
COPY app.py app.py

# Make port 5000 available to the world outside this container
EXPOSE 5000

# Run app.py when the container launches
CMD ["python", "app.py"]
Creating a Virtual Environment and Installing Flask
Before we start writing the Flask application code, we'll set up a virtual environment to manage our dependencies. Here are the steps:
-
Create a Virtual Environment: Navigate to the
flaskdirectory and create a virtual environment usingvenv:cd flask python3 -m venv venv -
Activate the Virtual Environment: Activate the virtual environment to isolate your project's dependencies.
-
On macOS and Linux:
source venv/bin/activate - On Windows:
venv\Scripts\activate - Install Flask: With the virtual environment activated, install Flask using
pip:pip install FlaskFreeze Dependencies: Generate a
requirements.txtfile that lists all the dependencies of your project. This file will be used to install the dependencies in the Docker container:pip freeze > requirements.txt
-
After these steps, your flask directory should look like this:
flask/
├── app.py
├── Dockerfile
├── requirements.txt
└── venv/
Reverse Proxy - Basic Configuration
To set up a basic reverse proxy, you need to edit the NGINX configuration file (nginx.conf). Here’s an example configuration:
server {
    listen 8080;
    server_name localhost;

    location /api/ {
        proxy_pass http://flask:5000;
        proxy_set_header Host $host;
        proxy_set_header X-Real-IP $remote_addr;
        proxy_set_header X-Forwarded-For $proxy_add_x_forwarded_for;
        proxy_set_header X-Forwarded-Proto $scheme;
    }
}
- proxy_pass: This directive defines the protocol and address of the proxied server(s). In this example,
http://flask:5000directs NGINX to forward requests to the Flask application running on port 5000. - proxy_set_header: These directives set additional headers that will be sent to the proxied server. This helps preserve the original request's details such as the host, client IP address, and protocol.
Example Setup with Docker Compose
Here’s a complete example using Docker Compose to set up NGINX and a Flask application:
Docker Compose File (docker-compose.yml):
version: '3.8'
services:
  nginx:
    image: nginx:latest
    ports:
      - "8080:8080"
    volumes:
      - ./nginx.conf:/etc/nginx/nginx.conf
      - ./html:/usr/share/nginx/html
      - ./images:/usr/share/nginx/images
    restart: always
    depends_on:
      - flask
    networks:
      - compose-network

  flask:
    build:
      context: ./flask
    ports:
      - "5001:5000"  # Changed port on host to 5001
    restart: always
    networks:
      - compose-network

networks:
  compose-network
Now let's expand our original nginx.conf file:
events {}

http {
    include /etc/nginx/mime.types;
    default_type application/octet-stream;

    server {
        listen 8080;
        server_name localhost;

        # Handle API requests with load balancing
        location /api/ {
            proxy_pass http://flask1:5000;
            proxy_set_header Host $host;

        }
    }
}
In this setup, the NGINX server listens on port 8080 and forwards requests made to /api/ to the Flask application running on port 5000. The additional proxy_set_header directives ensure that the request's original details are preserved and passed along to the backend server.
In this setup, we only have one single flask instance that will repond to the requests, like in the diagram:
Testing the Proxy Pass
After setting up and starting your Docker containers, you can test the proxy setup using curl or a web browser. For example, let's request the users by going to the http://127.0.0.1:8080/api/users:
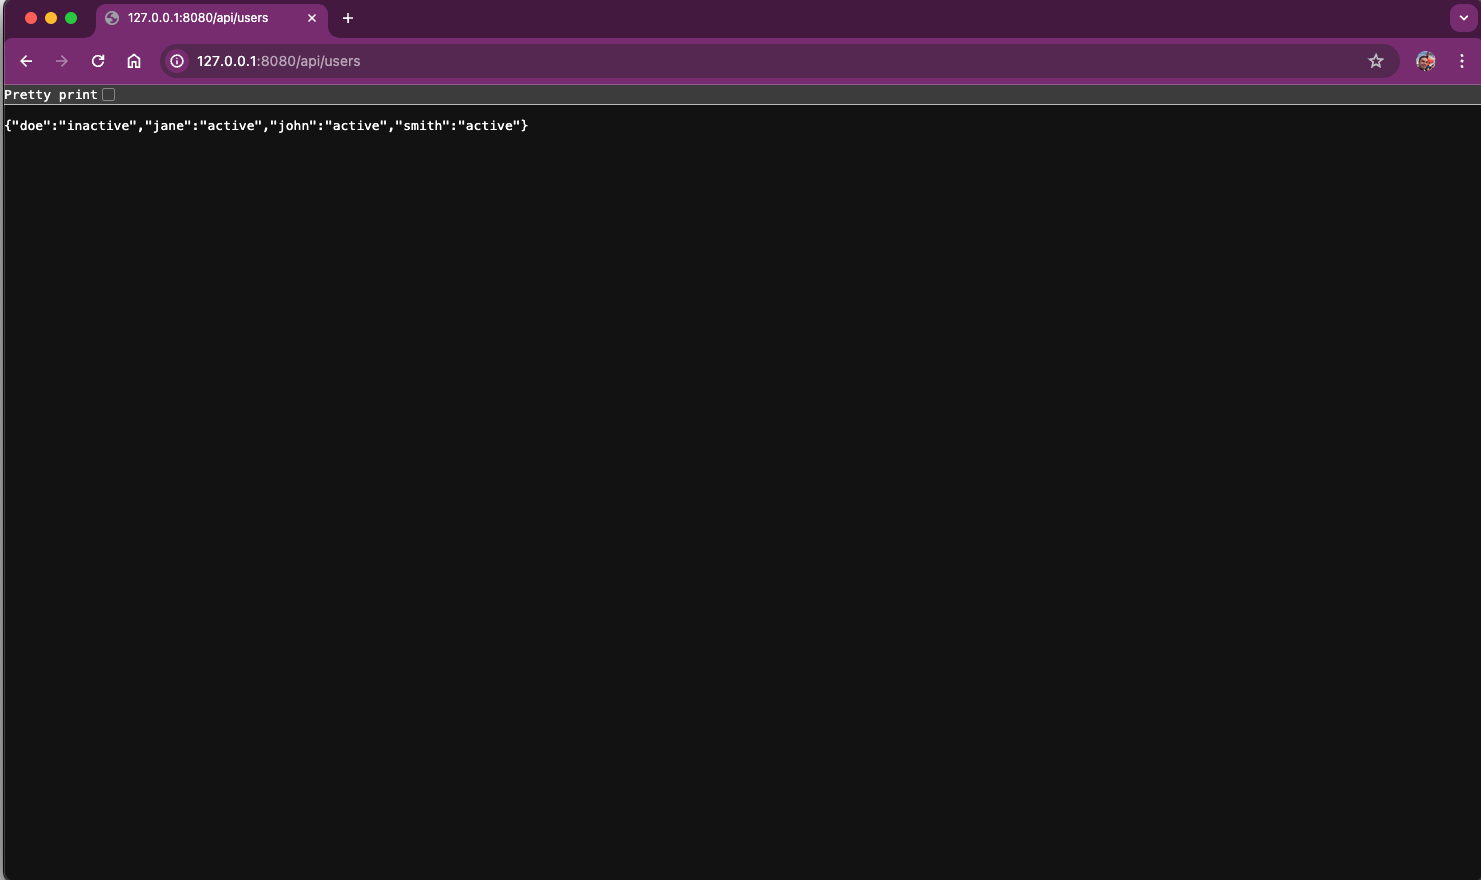
You should receive responses from the Flask application, confirming that NGINX is successfully forwarding the requests.
nginx Load Balancing
In this section, we'll discuss how to configure NGINX to load balance traffic across multiple backend servers. Load balancing improves the performance, reliability, and scalability of your application by distributing incoming requests among multiple servers. We'll walk through a practical example using Docker Compose to set up multiple Flask instances and configure NGINX to balance the load between them.
Updated NGINX Configuration for Load Balancing
Here's an updated version of the nginx.conf file to include load balancing:
events {}

http {
    include /etc/nginx/mime.types;
    default_type application/octet-stream;

    upstream flask_backend {
        server flask1:5000;
        server flask2:5000;
        server flask3:5000;
    }

    server {
        listen 8080;
        server_name localhost;

        root /usr/share/nginx/html;
        index index.html;

        location / {
            try_files $uri $uri/ =404;
        }

        location /articles {
            root /usr/share/nginx/html;
            index articles.html;
        }

        location /posts {
            alias /usr/share/nginx/html/articles;
            index articles.html;
        }

        location /courses {
            root /usr/share/nginx/html;
            try_files /courses/index.html /index.html =404;
        }

        # Serve image files (JPEG, PNG, GIF) with caching
        location ~* \.(jpg|jpeg|png|gif)$ {
            root /usr/share/nginx/images;
            expires 30d; # Cache images for 30 days
        }

        # Handle API requests with load balancing
        location /api/ {
            proxy_pass http://flask_backend;
            proxy_set_header Host $host;
        }
    }
}
The upstream directive defines a group of backend servers that NGINX will load balance across. In this example, flask_backend is the name of the upstream group containing three Flask instances (flask1, flask2, and flask3), all listening on port 5000.
The /api/ location block is configured to proxy requests to the flask_backend upstream group. The proxy_pass directive specifies the backend group, and the proxy_set_header directives ensure that the original request's details are preserved.
To set up multiple Flask instances and the NGINX load balancer, we'll update the Docker Compose:
Docker Compose File (docker-compose.yml):
version: '3.8'
services:
  nginx:
    image: nginx:latest
    ports:
      - "8080:8080"
    volumes:
      - ./nginx.conf:/etc/nginx/nginx.conf
      - ./html:/usr/share/nginx/html
      - ./images:/usr/share/nginx/images
    restart: always
    depends_on:
      - flask1
      - flask2
      - flask3
    networks:
      - mynetwork

  flask1:
    build:
      context: ./flask
    restart: always
    networks:
      - mynetwork

  flask2:
    build:
      context: ./flask
    restart: always
    networks:
      - mynetwork

  flask3:
    build:
      context: ./flask
    restart: always
    networks:
      - mynetwork

networks:
  mynetwork:
This configuration creates three Flask services (flask1, flask2, and flask3) and an NGINX service that proxies and load balances requests to these Flask instances. All containers will share the same network so they can communicate with each other.
Testing the Load Balancer
Once the services are up and running, you can test the load balancer by making multiple requests to the /api/data and /api/users endpoints. You should see responses from different backend servers, indicating that the load is being distributed:
for i in {1..3}
do
  curl http://localhost:8080/api/users
  echo ""
done
Output:
{"host":"4d19a74250fe","users":{"doe":"inactive","jane":"active","john":"active","smith":"active"}}

{"host":"004cf80b42a9","users":{"doe":"inactive","jane":"active","john":"active","smith":"active"}}

{"host":"4c6140f59579","users":{"doe":"inactive","jane":"active","john":"active","smith":"active"}}
Each response should include the hostname of the Flask instance that handled the request, demonstrating that NGINX is effectively distributing the load across multiple backend servers.
By configuring NGINX to load balance traffic, we can improve the performance, reliability, and scalability of our web application. This setup is particularly useful in production environments where high availability and efficient resource utilization are critical.
This will end the Load Balancer section.
Automating TLS with Certbot in NGINX Using Docker Compose
As the final step, we'll go through how to automate TLS updates using a tool called Certbot. Automating TLS certificate management in Docker with NGINX is a practical approach to ensure secure communication.
Directory Structure
Ensure your project directory includes the necessary folders. Inside the root folder of your project, nginx-docker, create new folders called certbot and certs:
mkdir certbot
mkdir certs
Your structure should look like this:
nginx-docker
├── certs
├── conf
│   ├── html
│   ├── images
│   ├── nginx
│   │   └── nginx.conf
│   └── certbot
├── docker-compose.yml
└── flask
Docker Compose Configuration
Update your docker-compose.yml to include Certbot and the necessary volumes:
version: '3.8'

services:
  nginx:
    image: nginx:latest
    ports:
      - "80:80"
      - "443:443"
    volumes:
      - ./nginx.conf:/etc/nginx/nginx.conf
      - ./html:/usr/share/nginx/html
      - ./images:/usr/share/nginx/images
      - ./certbot/www:/var/www/certbot
      - ./certbot/conf:/etc/letsencrypt
    restart: always
    depends_on:
      - flask1
      - flask2
      - flask3
    networks:
      - mynetwork

  flask1:
    build:
      context: ./flask
    restart: always
    networks:
      - mynetwork

  flask2:
    build:
      context: ./flask
    restart: always
    networks:
      - mynetwork

  flask3:
    build:
      context: ./flask
    restart: always
    networks:
      - mynetwork

  certbot:
    image: certbot/certbot:latest
    volumes:
      - ./certbot/www:/var/www/certbot
      - ./certbot/conf:/etc/letsencrypt
    networks:
      - mynetwork

networks:
  mynetwork:
The changes we've done are the following:
- Nginx Service: Configured to use ports 80 and 443, with volumes mounted for configuration, certificates, and web root for Certbot challenges.
- Certbot Service: Configured to renew certificates every 12 hours, with necessary volumes mounted for certificates and web root.
- Flask Service: Remains unchanged, but included for context.
NGINX Configuration
The following NGINX configuration is used to enable Let's Encrypt SSL/TLS certificates and set up HTTPS for your domain. Ensure you replace [domain-name] with your actual domain name throughout the configuration.
events {}

http {
    include /etc/nginx/mime.types;
    default_type application/octet-stream;

    server {
        listen 80;
        server_name [domain-name] www.[domain-name];
        server_tokens off;

        location /.well-known/acme-challenge/ {
            root /var/www/certbot;
        }

        location / {
            return 301 https://$host$request_uri;
        }
    }

    server {
        listen 443 ssl http2;
        server_name [domain-name] www.[domain-name];

        ssl_certificate /etc/letsencrypt/live/[domain-name]/fullchain.pem;
        ssl_certificate_key /etc/letsencrypt/live/[domain-name]/privkey.pem;

        location / {
            proxy_pass http://flask_backend;
            proxy_set_header Host $host;
            proxy_set_header X-Real-IP $remote_addr;
            proxy_set_header X-Forwarded-For $proxy_add_x_forwarded_for;
            proxy_set_header X-Forwarded-Proto $scheme;
        }
    }
}
HTTP Server Block (Port 80)
-
server_name [domain-name] www.[domain-name];: Specifies the domain names that the server will respond to. Replace
[domain-name]with your actual domain name. -
location /.well-known/acme-challenge/ { ... }:
- root /var/www/certbot;: This directive specifies the directory where Certbot will place the challenge files required for domain validation by Let's Encrypt. This ensures that Certbot can write and read the necessary files during the certificate issuance process.
-
location / { ... }:
- return 301 https://$host$request_uri;: Redirects all HTTP requests to the HTTPS version of the requested URL. This is important for enforcing secure connections once the certificates are in place.
HTTPS Server Block (Port 443)
-
listen 443 ssl http2;: Configures the server to listen on port 443 for HTTPS connections and enables HTTP/2 support.
-
server_name [domain-name] www.[domain-name];: Specifies the domain names that the server will respond to. Replace
[domain-name]with your actual domain name. -
ssl_certificate /etc/letsencrypt/live/[domain-name]/fullchain.pem;: Specifies the path to the SSL certificate file provided by Let's Encrypt. Replace
[domain-name]with your actual domain name. -
ssl_certificate_key /etc/letsencrypt/live/[domain-name]/privkey.pem;: Specifies the path to the private key file provided by Let's Encrypt. Replace
[domain-name]with your actual domain name.
These additions are essential for integrating Let's Encrypt with NGINX in a Docker environment. The HTTP server block ensures that Certbot can complete the domain validation process by placing challenge files in the .well-known/acme-challenge directory. The HTTPS server block is configured to use the SSL certificate and private key obtained from Let's Encrypt, thus enabling secure HTTPS connections.
Obtain Certificates with Certbot
Run Certbot to obtain the SSL/TLS certificates. Test the setup with a dry run first to avoid hitting rate limits:
docker-compose run --rm certbot certonly --webroot --webroot-path /var/www/certbot --dry-run -d [domain-name] -d www.[domain-name]
If the dry run is successful, run the command without the --dry-run flag to obtain the actual certificates:
docker-compose run --rm certbot certonly --webroot --webroot-path /var/www/certbot -d [domain-name] -d www.[domain-name]
Reload NGINX Configuration
Reload the NGINX configuration to apply the new certificates:
docker-compose restart nginx
Alternatively, if you want to avoid downtime, reload NGINX within the container:
docker-compose exec nginx nginx -s reload
Automate Certificate Renewal
Let's Encrypt certificates expire every 90 days. You can set up a cron job to automatically renew them. Add the following line to your crontab (crontab -e):
0 0 1 */2 * docker-compose run --rm certbot renew && docker-compose exec nginx nginx -s reload
This cron job will run at midnight on the first day of every other month, renewing the certificates and reloading NGINX.
Wrapping Up The nginx Series
In Part 1, we covered the basics of NGINX, including its installation, basic configuration, and how to serve static content. We also discussed the concept of load balancing and the benefits of using NGINX as a web server.
In this Part 2 article, we've gone deeper into NGINX's advanced features, focusing on regex, its reverse proxy capabilities, and load balancing. We’ve also walked through the process of developing a simple Flask application that serves as our backend API, demonstrating how to distribute requests across multiple backend servers. Additionally, we covered how to secure your NGINX server with TLS using Certbot and Let's Encrypt, ensuring encrypted communication between clients and servers.
Congratulations!
Aleksandro Matejic, a Cloud Architect, began working in the IT industry over 21 years ago as a technical specialist, right after his studies. Since then, he has worked in various companies and industries in various system engineer and IT architect roles. He currently works on designing Cloud solutions, Kubernetes, and other DevOps technologies.
You can contact Aleksandro by visiting his LinkedIn Profile