
Upgrading Your AWS EKS Cluster to latest version with AWS CDK
Upgrading an AWS Elastic Kubernetes Service (EKS) cluster to a newer Kubernetes version is crucial for accessing the latest features, security patches, and performance improvements.
From time to time, you might see the following in the AWS console:

This guide will walk you through upgrading an AWS EKS cluster to Kubernetes version 1.29, but this could be any version, utilizing a TypeScript-based AWS Cloud Development Kit (CDK) infrastructure as code. We'll leverage a specific deployment structure consisting of multiple files: cdk-eks-cluster-stack.ts, helm-charts.ts, and props.ts, each serving a distinct purpose in the deployment process.
❗Please note that in most cases, direct upgrades across multiple major versions are not supported. It is necessary to sequentially upgrade through each major version to ensure succeful upgrade
Simple Process
The following flowchart is a recommendation of a simple process of upgrading EKS cluster. It outlines the importance of verification on each stage:
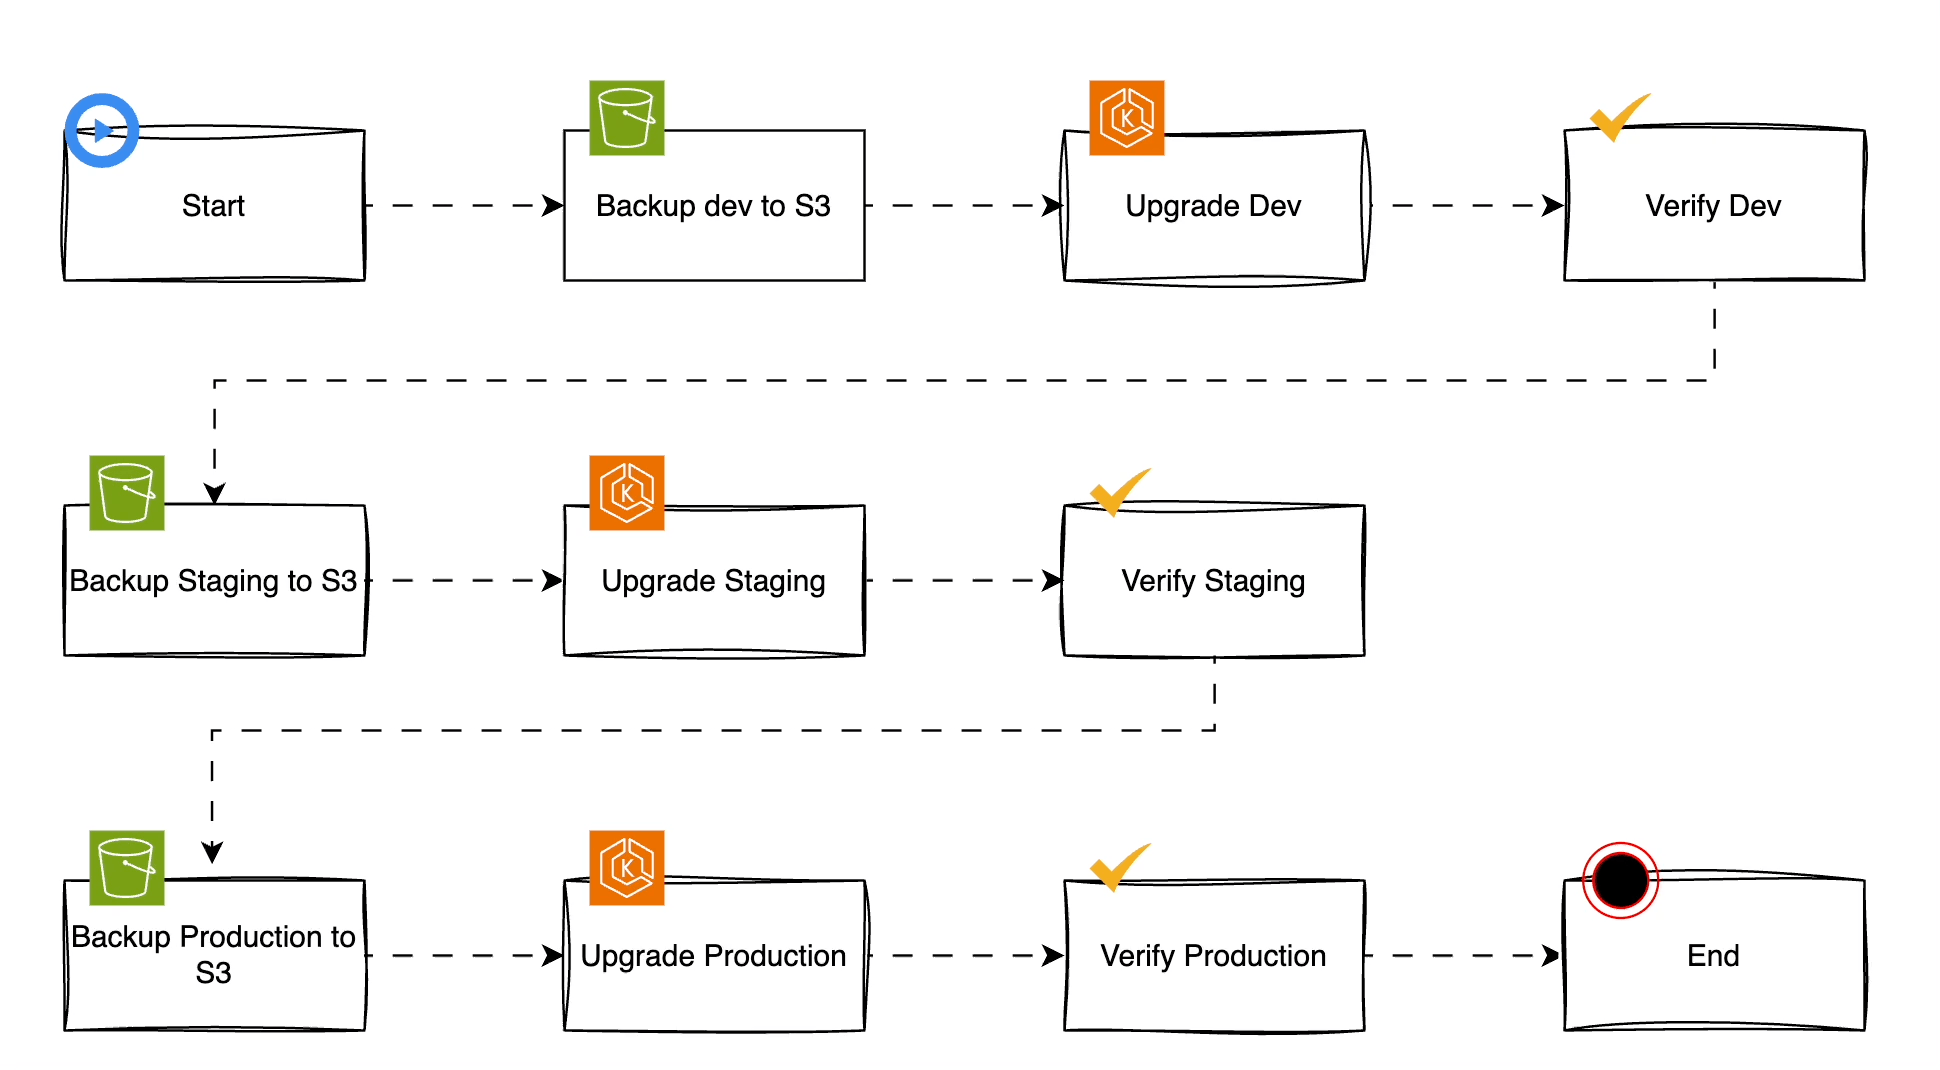
In this tutorial, we'll not cover how to back up the cluster.
Upgrade Checklist
Here's a structured approach to guide you through the upgrade process:
| Checklist Item | Description |
|---|---|
| Review Compatibility | Check the Amazon EKS Kubernetes release calendar for version support and plan the upgrade path. Link to the AWS doc |
| Update Tooling and Plugins | Ensure tools like kubectl and aws-cli are updated to versions compatible with the new Kubernetes version. |
| Cluster Add-ons Updates | Update add-ons like CoreDNS, kube-proxy, and the Amazon VPC CNI plugin for Kubernetes as per AWS guidance. |
| Kubernetes Backup | Make sure you have backed up your cluster before performing the upgrades. Tools like Velero can you making back ups, both backing up Kubernetes resources and also performing snapshots of the volumes mounted to your workloads. |
| Upgrade Helm Charts | Upgrade all the applications that are deployed as helm charts. |
| Node Group Upgrades | Upgrade node groups to compatible versions, using rolling updates for managed node groups to minimize disruption. |
| Application Compatibility | Test applications against the new Kubernetes version in a staging environment to identify potential issues. |
| Backup and Disaster Recovery Plan | Use tools like Velero for Kubernetes resource and persistent volume backups. |
| Deployment Strategy | Implement blue-green deployments or canary releases for critical services. |
| Pod Disruption Budgets (PDBs) | Use PDBs to ensure a minimum number of replicas remain available during the update. |
| Rolling Update Configuration | For self-managed nodes, ensure the rolling update configuration in CloudFormation or Terraform respects PDBs. |
| Monitoring and Logging | Enhance monitoring and logging to quickly identify and troubleshoot issues during and after the upgrade process. |
| Communication Plan | Communicate the upgrade plan, timeline, and potential impacts with your team and stakeholders. |
| Post-upgrade Validation | Validate the cluster's functionality and application performance post-upgrade. |
Components
AWS CDK
The AWS Cloud Development Kit (AWS CDK) is an open-source software development framework to define cloud infrastructure in code and provision it through AWS CloudFormation. It provides a high-level, object-oriented abstraction to define AWS resources in a programmatically structured manner, using familiar programming languages such as TypeScript, Python, Java, and C#.
KubectlLayer
The KubectlLayer in the AWS Cloud Development Kit (CDK) is essentially a Lambda layer designed to make Kubernetes cluster management simpler. Here’s a straightforward explanation:
What KubectlLayer Is:
- It’s a Lambda layer that includes the kubectl command-line tool.
- Created specifically for use with the AWS CDK.
- Comes in various versions to align with different versions of Kubernetes clusters.
How It Works:
- You can add KubectlLayer to your Lambda functions through CDK code.
- When deploying, the CDK includes this layer with your Lambda function's code.
- This setup allows your Lambda functions to use kubectl commands to talk to Kubernetes clusters directly.
Benefits:
- Ease of Kubernetes Management: It offers a straightforward method to execute kubectl commands within Lambda functions.
- Version Matching: Ensures that the kubectl version is compatible with your Kubernetes cluster version.
- Ready to Use: Eliminates the need to create and manage your own kubectl layer.
- Official documentation: https://docs.aws.amazon.com/cdk/api/v2/docs/aws-cdk-lib.lambda_layer_kubectl.KubectlLayer.html
- GitHub issue on version compatibility: https://github.com/aws/aws-cdk/issues/24282
- Example usage in TypeScript: https://docs.aws.amazon.com/cdk/api/v2/docs/aws-cdk-lib.aws_lambda-readme.html
AWS CDK EKS Cluster Setup Description
Here is an architecture diagram of my EKS setup:
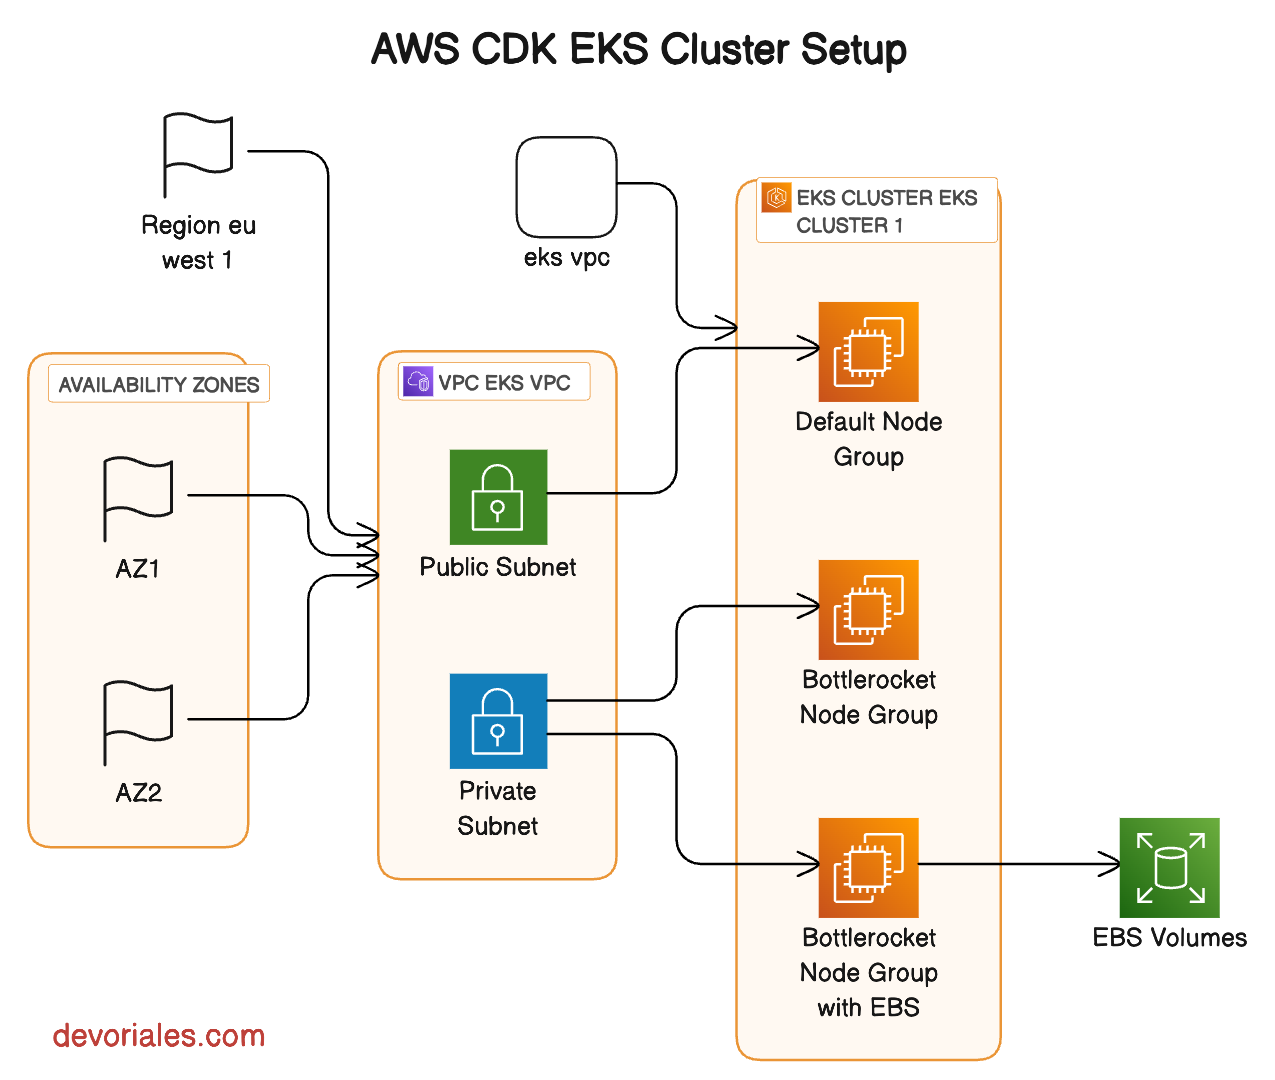
VPC Name: 'eks-vpc'
- A label for the cloud environment that defines a virtual network dedicated to the EKS cluster.
VPC CIDR: '10.0.0.0/20'
- Defines a block of IP addresses available for the resources within the VPC, offering over 4,000 IPs for use.
Region: 'eu-west-1'
- Specifies the AWS region in Ireland, optimizing latency and availability for users in Europe.
Max Availability Zones: 2
- Ensures high availability and fault tolerance by distributing resources across two distinct geographic locations within the region.
Public Subnet CIDR Mask: 24
- Allocates up to 256 IP addresses for resources that need to be accessible from the internet, such as load balancers.
Private Subnet CIDR Mask: 24
- Reserves IP addresses for internal resources that shouldn't be directly accessible from the internet, enhancing network security.
Cluster Name: 'eks-cluster-1'
- A unique identifier for the Kubernetes cluster, facilitating easy management and resource association.
Kubernetes Version: 1.28
- Determines the version of Kubernetes running on the cluster, ensuring compatibility with APIs and features.
Instance Type: 't3.micro'
- Specifies the compute capacity for the worker nodes in the cluster, offering a balance between cost and performance for general-purpose workloads.
Node Groups:
- Default Node Group: Utilizes the 't3.micro' instance type, providing a baseline compute capacity for running general-purpose workloads.
❗Please note, the default nodegroup is scaled to zero, and the reason is explained later in the document. - Bottlerocket Node Group: Leverages AWS Bottlerocket OS optimized for container workloads, offering enhanced security and performance with the same 't3.micro' instance type.
- Bottlerocket Node Group with EBS: Similar to the Bottlerocket Node Group but includes specific configurations for Amazon Elastic Block Store (EBS), enabling persistent storage solutions for stateful applications in Kubernetes.
➜ ~ kubectl get nodesOutput
NAME                                      STATUS   ROLES    AGE     VERSION               INTERNAL-IP   EXTERNAL-IP   OS-IMAGE                                KERNEL-VERSION                  CONTAINER-RUNTIME
ip-10-0-2-4.eu-west-1.compute.internal    Ready    <none>   9m38s   v1.28.5-eks-5e0fdde   10.0.2.4      <none>        Amazon Linux 2                          5.10.205-195.807.amzn2.x86_64   containerd://1.7.11
ip-10-0-3-53.eu-west-1.compute.internal   Ready    <none>   55m     v1.28.4-eks-d91a302   10.0.3.53     <none>        Bottlerocket OS 1.19.1 (aws-k8s-1.28)   6.1.72                          containerd://1.6.28+bottlerocket
ip-10-0-3-84.eu-west-1.compute.internal   Ready    <none>   5m20s   v1.28.4-eks-d91a302   10.0.3.84     <none>        Bottlerocket OS 1.19.1 (aws-k8s-1.28)   6.1.72                          containerd://1.6.28+bottlerocket
Understanding the Deployment Structure
The deployment structure for an AWS EKS cluster managed via AWS CDK consists of multiple components, each serving a specific purpose in the ecosystem. This structure is designed to encapsulate the entire AWS infrastructure needed for a robust, scalable, and secure Kubernetes environment. By leveraging TypeScript, developers gain the advantage of static typing alongside the expressive power of the AWS CDK, enabling them to define complex cloud infrastructures in a more intuitive and error-resistant manner.
At the core of this setup are several key files and constructs, each playing a critical role in the deployment and management of the EKS cluster.
lib/cdk-eks-cluster-stack.ts
This file is the backbone of our AWS CDK application. It defines the AWS EKS cluster stack and all related AWS resources required for the cluster's operation.
import * as cdk from 'aws-cdk-lib';
import { Construct } from 'constructs';
import * as ec2 from 'aws-cdk-lib/aws-ec2';
import * as eks from 'aws-cdk-lib/aws-eks';
import * as kms from 'aws-cdk-lib/aws-kms';
import * as iam from 'aws-cdk-lib/aws-iam';
import * as ssm from 'aws-cdk-lib/aws-ssm';
import { KubectlV28Layer } from '@aws-cdk/lambda-layer-kubectl-v28';
import { CdkEksClusterStackProps } from './props';
import { bottlerocketNodeGroup } from './props';
import { helmCharts } from './helm-charts';

export class CdkEksClusterStack extends cdk.Stack {
  public readonly cluster: eks.Cluster;

  constructor(scope: Construct, id: string, defaultNodeGroup: CdkEksClusterStackProps, bottlerocketNodeGroup: bottlerocketNodeGroup) {
    super(scope, id, {
      ...defaultNodeGroup,
      env: { account: process.env.CDK_DEFAULT_ACCOUNT, region: defaultNodeGroup?.region },
    });

    // VPC - public and private subnets
    const vpc = new ec2.Vpc(this, 'VPC', {
      vpcName: defaultNodeGroup?.vpcName,
      ipAddresses: ec2.IpAddresses.cidr(defaultNodeGroup?.vpcCidr.toString() ?? ''),
      maxAzs: defaultNodeGroup?.maxAzs,
      subnetConfiguration: [
        {
          subnetType: ec2.SubnetType.PUBLIC,
          name: 'PublicSubnet',
          cidrMask: defaultNodeGroup.publicSubnetCidrMask,
        },
        {
          subnetType: ec2.SubnetType.PRIVATE_WITH_EGRESS,
          name: 'PrivateSubnet',
          cidrMask: defaultNodeGroup.privateSubnetCidrMask,
        },
      ],
    });

  // Initialize a new EKS cluster within the given scope (usually an AWS CDK stack)
  this.cluster = new eks.Cluster(this, 'Cluster', {
    // Specify the VPC where the EKS cluster should be deployed
    vpc: vpc,

    // Define subnet settings for the cluster. Here, it uses private subnets with egress access and ensures one subnet per availability zone
    vpcSubnets: [{ subnetType: ec2.SubnetType.PRIVATE_WITH_EGRESS, onePerAz: true }],

    // Set the Kubernetes version for the cluster, derived from the defaultNodeGroup's eksVersion property
    version: defaultNodeGroup.eksVersion,

    // Add a custom Lambda layer for kubectl commands, allowing you to interact with the cluster. This specifies the version of kubectl to use
    kubectlLayer: new KubectlV28Layer(this, 'kubectl'),

    // Create a new KMS key for encrypting Kubernetes secrets, enhancing the security of sensitive data in your cluster
    secretsEncryptionKey: new kms.Key(this, 'EKS-Secrets-Encryption-Key', {
      enableKeyRotation: true, // Automatically rotate the encryption key to improve security
      description: 'EKS Secrets Encryption Key', // A clear description of the key's purpose
      alias: `EKS-Secrets-Encryption-Key-${defaultNodeGroup.clusterName}`, // A unique alias for the key, incorporating the cluster name for easy identification
    }),

    // Set the name of the cluster, using the clusterName property from defaultNodeGroup
    clusterName: defaultNodeGroup.clusterName,

    // Enable logging for various Kubernetes components to help with monitoring and troubleshooting
    clusterLogging: [
      eks.ClusterLoggingTypes.API,
      eks.ClusterLoggingTypes.AUDIT,
      eks.ClusterLoggingTypes.AUTHENTICATOR,
      eks.ClusterLoggingTypes.CONTROLLER_MANAGER,
      eks.ClusterLoggingTypes.SCHEDULER,
    ],

    // Configure the cluster's API server endpoint access. This setting allows both public and private access
    endpointAccess: eks.EndpointAccess.PUBLIC_AND_PRIVATE,

    // Set the default number of worker nodes in the cluster, based on the desiredSize from defaultNodeGroup
    defaultCapacity: defaultNodeGroup.desiredSize,

    // Specify the instance type for the default worker nodes, converting the instanceType from defaultNodeGroup to an ec2.InstanceType object
    defaultCapacityInstance: new ec2.InstanceType(defaultNodeGroup.instanceType.toString()),

    // Apply tags to the EKS cluster resources for organizational, billing, or management purposes
    tags: {
      'Name': `${defaultNodeGroup.clusterName}`, // Name tag with the cluster name
      'Environment': 'dev', // Example environment tag
      'Owner': 'devoriales', // Example owner tag
      ['kubernetes.io/cluster/' + defaultNodeGroup.clusterName]: 'owned', // Tag required by Kubernetes for resource management within the cluster
    },
  });

    // Bottlerocket nodegroup
    const ng_bottlerocket = new eks.Nodegroup(this, 'NodegroupBottlerocket_128', {
      cluster: this.cluster,
      instanceTypes: [new ec2.InstanceType(defaultNodeGroup.instanceType.toString())],
      amiType: eks.NodegroupAmiType.BOTTLEROCKET_X86_64,
      capacityType: eks.CapacityType.SPOT,
      minSize: bottlerocketNodeGroup.minSize,
      maxSize: bottlerocketNodeGroup.maxSize,
      desiredSize: bottlerocketNodeGroup.desiredSize,
      tags: {
        'Name': `${defaultNodeGroup.clusterName}-bottlerocket`,
        ['kubernetes.io/cluster/' + defaultNodeGroup.clusterName]: 'owned',
      },
    });
    const launchTemplate = new ec2.CfnLaunchTemplate(this, 'LaunchTemplate', {
      launchTemplateData: {
        blockDeviceMappings: [
          {
            deviceName: '/dev/xvda',
            ebs: {
              volumeSize: 5,
              deleteOnTermination: true,
              volumeType: 'gp2',
            },
          },
        ],
      },
    });

  const ng_bottlerocket_ebs = new eks.Nodegroup(this, 'NodegroupBottlerocketEBS_128', {
    cluster: this.cluster,
    instanceTypes: [new ec2.InstanceType(defaultNodeGroup.instanceType.toString())],
    amiType: eks.NodegroupAmiType.BOTTLEROCKET_X86_64,
    capacityType: eks.CapacityType.SPOT,
    minSize: bottlerocketNodeGroup.minSize,
    maxSize: bottlerocketNodeGroup.maxSize,
    desiredSize: bottlerocketNodeGroup.desiredSize,
    launchTemplateSpec: {
      id: launchTemplate.ref,
      version: launchTemplate.attrLatestVersionNumber,
    },
    tags: {
      'Name': `${defaultNodeGroup.clusterName}-bottlerocket-ebs`,
      ['kubernetes.io/cluster/' + defaultNodeGroup.clusterName]: 'owned',
    },
  });

    // bottlerocket nodegroup with EBS

    // Helm charts deployment
    helmCharts.forEach((chart) => {
      this.cluster.addHelmChart(chart.release, {
        chart: chart.chart,
        repository: chart.repository,
        namespace: chart.namespace,
        version: chart.version,
        wait: chart.wait,
        timeout: chart.timeout,
        values: chart.values,
      });
    });

    // Cluster role and auth configurations
    const eksClusterRole = this.cluster.role;
    eksClusterRole.addManagedPolicy(iam.ManagedPolicy.fromAwsManagedPolicyName('AmazonEKSVPCResourceController'));
    this.cluster.awsAuth.addMastersRole(iam.Role.fromRoleArn(this, 'ExistingRole', eksClusterRole.roleArn, { mutable: true }));
    this.cluster.awsAuth.addUserMapping(iam.User.fromUserName(this, 'ExistingUser', 'almat'), { username: 'almat', groups: ['system:masters'] });

    // OIDC and cluster name to SSM parameters
    new ssm.StringParameter(this, 'OIDCProvider', { parameterName: '/eks/oidc/provider', stringValue: this.cluster.openIdConnectProvider?.openIdConnectProviderArn?.toString() ?? '' });
    new ssm.StringParameter(this, 'ClusterName', { parameterName: '/eks/cluster/name', stringValue: this.cluster.clusterName });
  }
}
Details:
- VPC Configuration: Establishes a Virtual Private Cloud (VPC) with public and private subnets for the EKS cluster, ensuring isolation and network control.
- EKS Cluster Creation: Initiates an EKS cluster within the defined VPC, specifying the Kubernetes version, node group configurations, logging, and endpoint access.
- Node Group with Bottlerocket: Adds a managed node group using AWS Bottlerocket, an optimized OS for Kubernetes, enhancing security and maintenance.
- Helm Charts Deployment: Integrates various Helm charts for essential services like ingress controllers, monitoring tools (Prometheus and Grafana), the cluster autoscaler, and security components (Argo CD, Secrets Store CSI Driver).
- IAM Roles and Policies: Configures IAM roles for the EKS cluster and attaches necessary policies for cluster management and operations.
- SSM Parameters: Stores the OIDC provider and cluster name in AWS Systems Manager Parameter Store for easy retrieval and management.
- Nodegroups
lib/helm-charts.ts
This file defines a list of Helm charts to be deployed into the EKS cluster. Helm charts automate the deployment of applications and services within Kubernetes. Each chart entry specifies the package details, including the chart name, repository URL, namespace, and configuration values. This modular approach facilitates the easy addition or removal of services from the cluster.
import * as cdk from 'aws-cdk-lib';
// import props
import { CdkEksClusterStackProps, defaultCdkEksClusterStackProps } from '../lib/props';


interface HelmChart {
  chart: string;
  repository: string;
  namespace: string;
  release: string;
  version: string;
  wait: boolean;
  timeout?: cdk.Duration;
  values?: { [key: string]: any };
}

const helmCharts: HelmChart[] = [
  {
    chart: 'ingress-nginx',
    repository: 'https://kubernetes.github.io/ingress-nginx',
    namespace: 'ingress-nginx',
    release: 'ingress',
    version: '4.7.0',
    wait: true,
    timeout: cdk.Duration.minutes(15),
    values: {
      'controller.service.type': 'LoadBalancer',
      'autoscaling.enabled': 'true',
      'autoscaling.minReplicas': 2,
    },
  },
  // ...
  {
    chart: 'prometheus',
    repository: 'https://prometheus-community.github.io/helm-charts',
    namespace: 'monitoring',
    release: 'prometheus',
    version: '22.6.1',
    wait: true,
    timeout: cdk.Duration.minutes(15),
    },
    {
    chart: 'grafana',
    repository: 'https://grafana.github.io/helm-charts',
    namespace: 'monitoring',
    release: 'grafana',
    version: '6.56.6',
    wait: true,
    timeout: cdk.Duration.minutes(15),
    values: {
    'adminUser': 'admin',
    'adminPassword': 'admin',
    },
  },
  // cluster autoscaler
  {
     chart: 'cluster-autoscaler',
    release: 'cluster-autoscaler',
    namespace: 'kube-system',
    repository: 'https://kubernetes.github.io/autoscaler',
    version: '9.28.0',
    values: {
      autoDiscovery: {
        clusterName: `${defaultCdkEksClusterStackProps.clusterName}`,
      },
      'node-group-auto-discovery': `k8s.io/cluster-autoscaler/${defaultCdkEksClusterStackProps.clusterName},'k8s.io/cluster-autoscaler/enabled'`,
      awsRegion: `${defaultCdkEksClusterStackProps.region}`,
      rbac: {
        create: 'true',
        serviceAccount: {
          create: false,
          name: 'cluster-autoscaler',
        },
      },
    },
    wait: true,
    timeout: (cdk.Duration.minutes(15)),
  },
  {
    chart: 'argo-cd',
    repository: 'https://argoproj.github.io/argo-helm',
    namespace: 'argocd',
    release: 'argocd',
    version: '5.39.0',
    wait: true,
    // timeout: cdk.Duration.minutes(15),
  },
  // Secrets Store CSI driver
  {
    chart: 'secrets-store-csi-driver',
    repository: 'https://kubernetes-sigs.github.io/secrets-store-csi-driver/charts',
    namespace: 'kube-system',
    release: 'secrets-store-csi-driver',
    version: '1.3.3',
    values: {
    syncSecret: {
      enabled: true
    },
    enableSecretRotation: true,
    enableSecretRotationWebhook: true,
  },
    wait: true,
    timeout: cdk.Duration.minutes(15),
  },
  // Secrets Store AWS Provider
  {
    chart: 'secrets-store-csi-driver-provider-aws',
    repository: 'https://aws.github.io/secrets-store-csi-driver-provider-aws',
    namespace: 'kube-system',
    release: 'secrets-store-csi-driver-provider-aws',
    version: '0.3.3',
    wait: true,
    timeout: cdk.Duration.minutes(15),
  },
  // metrics-server
  {
    chart: 'metrics-server',
    release: 'metrics-server',
    namespace: 'kube-system',
    repository: 'https://kubernetes-sigs.github.io/metrics-server/',
    version: '3.10.0',
    wait: true,
    timeout: (cdk.Duration.minutes(15)),
  },
];

export { helmCharts };
lib/props.ts
The props.ts file contains TypeScript interfaces and default property values for configuring the EKS cluster and associated resources. It abstracts configuration details, making the stack more flexible and easier to adjust for different environments or requirements.
// props for infrastructure

// Path: lib/cdk-eks-cluster-stack.ts
import * as cdk from 'aws-cdk-lib';
import * as ec2 from 'aws-cdk-lib/aws-ec2';
import * as eks from 'aws-cdk-lib/aws-eks';

export interface CdkEksClusterStackProps extends cdk.StackProps {
    vpcName: string;
    vpcCidr: string;
    maxAzs: number;
    region: string;
    clusterName: string;
    publicSubnetCidrMask: number;
    privateSubnetCidrMask: number;
    eksVersion: eks.KubernetesVersion;
    instanceType: ec2.InstanceType;
    minSize: number;
    maxSize: number;
    desiredSize: number;
}

export interface IStackTags {
    [key: string]: string;
}

export const defaultStackTags: IStackTags = {
    'eks:cluster-name': 'eks-cluster-1',
    'eks:nodegroup-name': 'eks-nodegroup-1',
    'org': 'devoriales',
};


export const defaultCdkEksClusterStackProps: CdkEksClusterStackProps = {
    vpcName: 'eks-vpc',
    vpcCidr: '10.0.0.0/20',
    region: 'eu-west-1',
    maxAzs: 2,
    clusterName: 'eks-cluster-1',
    publicSubnetCidrMask: 24,
    privateSubnetCidrMask: 24,
    eksVersion: eks.KubernetesVersion.V1_27,
    instanceType: new ec2.InstanceType('t3.micro'),
    minSize: 3,
    maxSize: 4,
    desiredSize: 3,
};
bin/cdk-eks-cluster.ts
The file bin/cdk-eks-cluster.ts in an AWS Cloud Development Kit (CDK) project serves as the entry point for defining and deploying the cloud infrastructure as code. Its primary purpose is to instantiate the CDK application and define the stacks that make up the AWS infrastructure. Here's a breakdown of its components and purpose:
import 'source-map-support/register';
import * as cdk from 'aws-cdk-lib';
import { CdkEksClusterStack } from '../lib/cdk-eks-cluster-stack';
import { defaultCdkEksClusterStackProps } from '../lib/props';
import { bottlerocketNodeGroup } from '../lib/props';

const app = new cdk.App();

// stack for the EKS cluster
new CdkEksClusterStack(app, 'eks-cluster', defaultCdkEksClusterStackProps, bottlerocketNodeGroup);
Upgrading to Kubernetes 1.29
Preparing for the Upgrade
in this section we'll prepare by upgrading AWS CDK and lambda kubectllayer.
Update AWS CDK and npm
-
Upgrade AWS CDK Toolkit: To leverage the latest features and fixes, including support for Kubernetes 1.29 in EKS, start by upgrading the AWS CDK CLI globally using npm.
npm install -g aws-cdk@latest - Update Project Dependencies: Within your CDK project directory, update
aws-cdk-libandconstructslibraries to their latest versions.
npm update aws-cdk-lib constructs - Update your package.json file:
  "devDependencies": {
    "@types/jest": "^29.5.1",
    "@types/node": "20.1.7",
    "aws-cdk": "^2.127.0",
    "jest": "^29.5.0",
    "ts-jest": "^29.1.0",
    "ts-node": "^10.9.1",
    "typescript": "~5.0.4"
  },
  "dependencies": {
    "@aws-cdk/lambda-layer-kubectl-v28": "^2.2.0",
    "aws-cdk-lib": "^2.127.0",
    "constructs": "^10.2.70",
    "source-map-support": "^0.5.21"
  }
}
Please Note! At the time when I ran the update, the latest version was: 2.127.0
- Upgrade the KubectlLayer to 1.29:
npm i @aws-cdk/lambda-layer-kubectl-v29Now remove the old kuybectl layer from package.json and ensure that the new one has been added:
"dependencies": { "@aws-cdk/lambda-layer-kubectl-v28": "^2.2.0", <<<<<< remove this line "@aws-cdk/lambda-layer-kubectl-v29": "^2.0.0", "aws-cdk-lib": "^2.127.0", "constructs": "^10.2.70", "source-map-support": "^0.5.21" } } - Upgrade your helm charts as needed. My recommendation is to keep them up-to-date.
Modify CDK TypeScript for Kubernetes 1.29
With the libraries updated, we need to adjust our CDK code to deploy Kubernetes version 1.29 to our EKS cluster.
-
Specify Kubernetes Version: In your
CdkEksClusterStackclass withinprops.ts, modify the the code toeks.KubernetesVersion.V1_29.export const defaultCdkEksClusterStackProps: CdkEksClusterStackProps = { vpcName: 'eks-vpc', vpcCidr: '10.0.0.0/20', region: 'eu-west-1', maxAzs: 2, clusterName: 'eks-cluster-1', publicSubnetCidrMask: 24, privateSubnetCidrMask: 24, eksVersion: eks.KubernetesVersion.V1_29, // this needs to be changed instanceType: new ec2.InstanceType('t3.micro'), minSize: 0, maxSize: 2, desiredSize: 0, defaultNodeGroupName: 'eks-nodegroup-1', }; - Adjust
KubectlV28LayerUsage: TheKubectlV28Layermight probably not be compatible with Kubernetes 1.29. Adjust your code to either omit specifying akubectllayer or ensure it's compatible with Kubernetes 1.29. This might involve checking AWS CDK documentation for updates or exploring customkubectllayer solutions. Inlib/cdk-eks-cluster-stack.ts, I've modified the following:
import { KubectlV29Layer } from '@aws-cdk/lambda-layer-kubectl-v29';
Upgrading AWS EKS Node Groups to Kubernetes Version 1.29
AWS EKS does not support in-place upgrades of Kubernetes versions for existing node groups. Instead, the upgrade process involves creating new nodes with the desired Kubernetes version and gracefully migrating workloads from the old nodes to the new ones. This ensures minimal disruption to running applications and allows for a rollback in case issues arise during the upgrade process.
What I usualy do is, I set nodegroup that is created by default, to zero. The reason is, there is no good way to control the replacement of the default nodes. Instead I create nodegroups for different purposes.
For instance, in my case, I have two nodegroups, one with and one without EBS volume.
To trigger the replacement of the nodes, I change the name of the construct to reflect the Kubernetes version, in the following case, from NodegroupBottlerocketEBS_128 to NodegroupBottlerocketEBS_129
    // Bottlerocket nodegroup set to 129
    const ng_bottlerocket = new eks.Nodegroup(this, 'NodegroupBottlerocket_129', {
      cluster: this.cluster,
      instanceTypes: [new ec2.InstanceType(defaultNodeGroup.instanceType.toString())],
      amiType: eks.NodegroupAmiType.BOTTLEROCKET_X86_64,
      capacityType: eks.CapacityType.SPOT,
      minSize: bottlerocketNodeGroup.minSize,
      maxSize: bottlerocketNodeGroup.maxSize,
      desiredSize: bottlerocketNodeGroup.desiredSize,
      tags: {
        'Name': `${defaultNodeGroup.clusterName}-bottlerocket`,
        ['kubernetes.io/cluster/' + defaultNodeGroup.clusterName]: 'owned',
      },
    });

  // nodegroup bottlerocket with ebs set to 129
  const ng_bottlerocket_ebs = new eks.Nodegroup(this, 'NodegroupBottlerocketEBS_129', {
    cluster: this.cluster,
    instanceTypes: [new ec2.InstanceType(defaultNodeGroup.instanceType.toString())],
    amiType: eks.NodegroupAmiType.BOTTLEROCKET_X86_64,
    capacityType: eks.CapacityType.SPOT,
    minSize: bottlerocketNodeGroup.minSize,
    maxSize: bottlerocketNodeGroup.maxSize,
    desiredSize: bottlerocketNodeGroup.desiredSize,
    launchTemplateSpec: {
      id: launchTemplate.ref,
      version: launchTemplate.attrLatestVersionNumber,
    },
    tags: {
      'Name': `${defaultNodeGroup.clusterName}-bottlerocket-ebs`,
      ['kubernetes.io/cluster/' + defaultNodeGroup.clusterName]: 'owned',
    },
  });
With this, it will ensure that the old nodes will be deleted and the new ones will be created.
❗I'd strongly recommend that you make a snapshot of your persistent volumes with Velero to be able to restore data if you use EBS. If you use EFS as a storage solution, things get much easier.
Steps to Upgrade Node Groups to Kubernetes Version 1.29
In this section we'll update our props.ts to bump up the node group to have version 1.29 binaries.
-
Update Node Groups with Kubernetes 1.29:
- In our code, we will change the version of the eksVersion to 1.29.
Completing the Upgrade
After updating the CDK code:
-
Deploy Changes: Use the AWS CDK CLI to deploy your changes. This step initiates the upgrade process for your EKS cluster to Kubernetes version 1.29:
✗ cdk deploy eks-cluster ✨ Synthesis time: 3.81s eks-cluster: start: Building 2a171163a672e406ae403eb6a5298d6caecfff6ebc15a7fda67c2f942694c9ba:339242786023-eu-west-1 eks-cluster: success: Built 2a171163a672e406ae403eb6a5298d6caecfff6ebc15a7fda67c2f942694c9ba:339242786023-eu-west-1 eks-cluster: start: Publishing 2a171163a672e406ae403eb6a5298d6caecfff6ebc15a7fda67c2f942694c9ba:339242786023-eu-west-1 eks-cluster: success: Published 2a171163a672e406ae403eb6a5298d6caecfff6ebc15a7fda67c2f942694c9ba:339242786023-eu-west-1 eks-cluster: deploying... [1/1] eks-cluster: creating CloudFormation changeset... ✅ eks-cluster ✨ Deployment time: 453.73s Stack ARN: arn:aws:cloudformation:eu-west-1:339242786023:stack/eks-cluster/ab621f60-c8be-11ee-b3c3-067f2a8a5df7 ✨ Total time: 457.54s -
Monitor the Upgrade: Keep an eye on the deployment process. You can monitor the upgrade status in the AWS Management Console under the EKS service section or use the AWS CLI or use kubectl:
watch -n 2 kubectl get nodes Every 2.0s: kubectl get nodes NAME STATUS ROLES AGE VERSION ip-10-0-2-197.eu-west-1.compute.internal Ready <none> 16m v1.29.0-eks-a5ec690 ip-10-0-3-107.eu-west-1.compute.internal Ready <none> 16m v1.29.0-eks-a5ec690 -
Verify the Upgrade: Once the deployment is complete, verify that your cluster is running Kubernetes version 1.29.
kubectl versionOutput example:
Client Version: v1.29.1Kustomize Version: v5.0.4-0.20230601165947-6ce0bf390ce3Server Version: v1.29.0-eks-c417bb3You can also verify via the AWS console within the EKS view:
You can also verify the nodes by selecting a nodegroup, example:
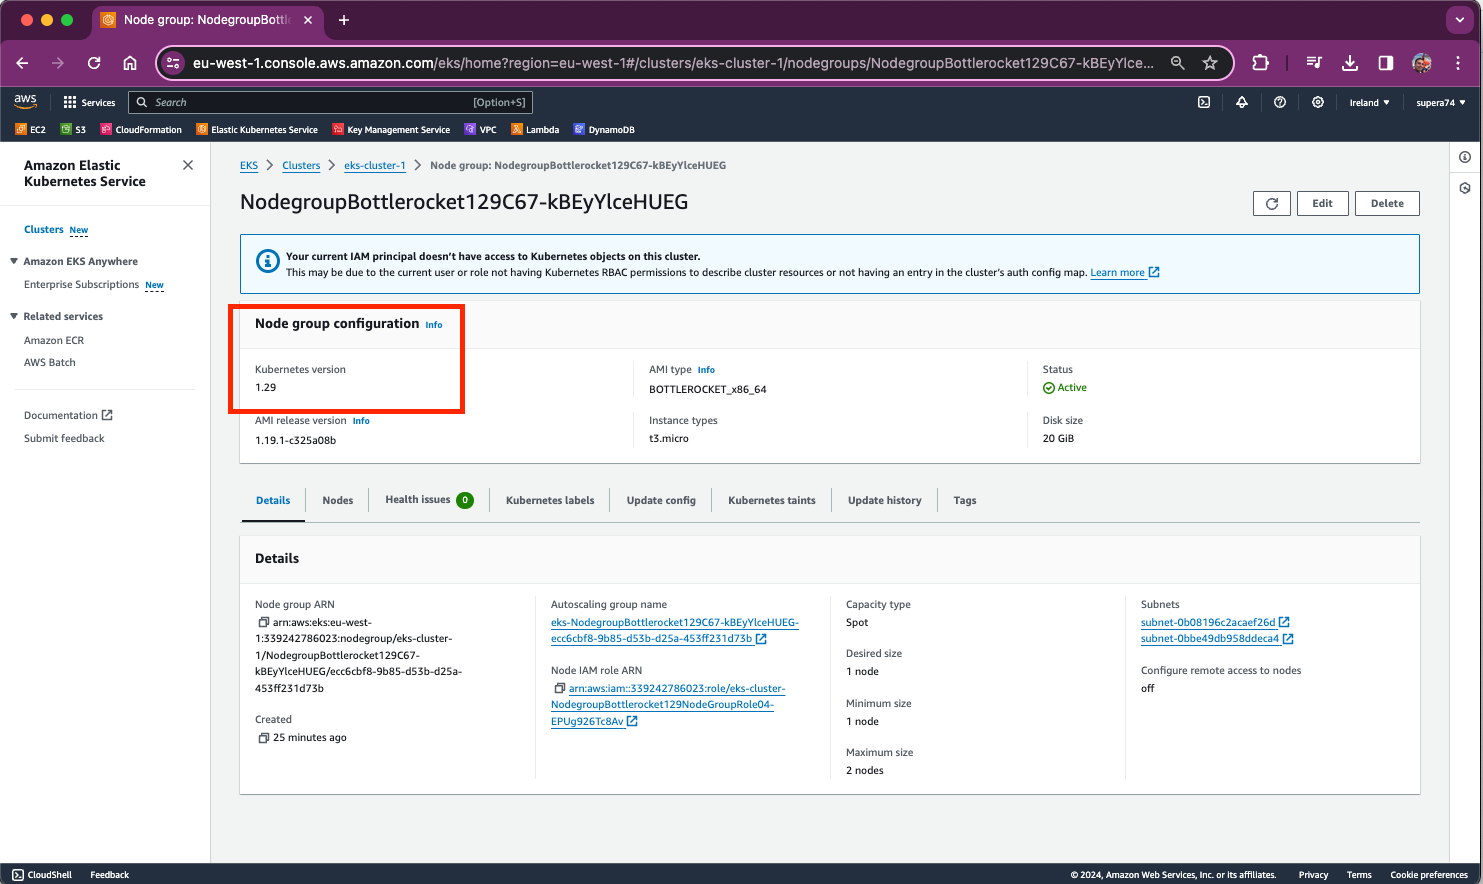
-
Test Your Applications: After the upgrade, thoroughly test your applications and services running in the cluster to ensure they operate correctly under the new Kubernetes version.
By following these steps, you ensure your AWS CDK project, along with your AWS EKS cluster, is updated to utilize Kubernetes version 1.29, leveraging the latest features and improvements offered by this version.
Supporting Tips - Maintaining High Availability During Cluster Operations
This section is just listing some upgrade tips.
Cordoning a node
Cordoning a node marks it as unschedulable, preventing any new pods from being scheduled onto it. This is typically the first step before draining a node, ensuring that only existing pods on the node are affected.
kubectl cordon <node-name>Drain a Node
Draining a node safely evicts all pods from the node according to their disruption policies. For DaemonSets, Kubernetes automatically ignores pods managed by DaemonSets during a drain since these are meant to run on all (or some) nodes in the cluster. For StatefulSets, Kubernetes respects the PodDisruptionBudgets if specified, and it tries to maintain the availability of applications.
kubectl drain <node-name> --ignore-daemonsets --delete-emptydir-dataIsn't this done automatically? I've noticed that if you have daemonsets running on a specific nodegroup, it can fail because it will not be able to drain the daemonset pods.
What is PodDisruptionBudgets
PodDisruptionBudgets (PDBs) are crucial Kubernetes objects that help maintain application availability during voluntary disruptions. These disruptions can include actions like node maintenance (draining nodes), deleting pods, or scaling down replicas in a deployment or replica set. A PDB limits the number of Pods of a replicated application that are down simultaneously from voluntary disruptions. This ensures that even during maintenance, a minimum level of availability is maintained. You could consider adding PodDisruptionBudgets to your applications to ensure that there is at least always one instance running.
❗Please note! This is not a topic for this blog post, but you might need to even consider Affinity and Anti-Affinity Rules and perhaps even Topology Spread Constraints to make sure that the pods are distributed across different nodes.
Understanding PodDisruptionBudgets
A PodDisruptionBudget allows you to specify the minimum number or percentage of replicas that must be up at a time. When a disruption request (like a node drain) is made, Kubernetes checks the PDB to ensure that the operation won't cause the specified minimum availability level to be violated. If the operation would cause such a violation, it is blocked or delayed until it's safe to proceed.
Components of a PodDisruptionBudget
minAvailable: Specifies the minimum number of Pods that must be available after the eviction. It can be an absolute number or a percentage.maxUnavailable: Specifies the maximum number of Pods that can be unavailable after the eviction. It can also be an absolute number or a percentage.selector: Determines which Pods the PDB applies to. It matches labels on the Pods.
Note
You can specify either minAvailable or maxUnavailable, but not both.
Example of a PodDisruptionBudget
Suppose you have a deployment running a critical application with 10 replicas, and you want to ensure that at least 2 of the replicas are available during voluntary disruptions. You can define a PDB like this:
apiVersion: policy/v1
kind: PodDisruptionBudget
metadata:
  name: devoriales-demo-app
spec:
  minAvailable: 2
  selector:
    matchLabels:
      app: devoriales-demo-app
Summary
In conclusion, upgrading an AWS Elastic Kubernetes Service (EKS) cluster to Kubernetes version 1.29 using the AWS Cloud Development Kit (CDK) in TypeScript is a straightforward yet detailed process. This guide provided a step-by-step approach to not only update the Kubernetes control plane but also the node groups, ensuring full compatibility with the latest Kubernetes features, security improvements, and performance enhancements.
Updating your AWS CDK and npm packages, modifying CDK code for version upgrades, and handling node group updates are essential steps in this process. Always try to keep your cluster and supporting applications up-to-date since LCM is an important process to keep vulnerabilities at the miminum and not to contribute to the technical debt account.
About the Author
Aleksandro Matejic, a Cloud Architect, began working in the IT industry over 21 years ago as a technical specialist, right after his studies. Since then, he has worked in various companies and industries in various system engineer and IT architect roles. He currently works on designing Cloud solutions, Kubernetes, and other DevOps technologies.
In his spare time, Aleksandro works on different development projects such as developing devoriales.com, a blog and learning platform launching in 2022/2023. In addition, he likes to read and write technical articles about software development and DevOps methods and tools.
You can contact Aleksandro by visiting his LinkedIn Profile
Thanks @Carlos