
Learn Kubernetes Customization with Kustomize
Introduction
Kustomize serves as a tool for managing configurations that uses the concept of layering. It allows you to uphold the configurations of your software and components. By applying yaml constructs, known as patches, it selectively supersedes the default settings. This process does not involve modifying the original files, thereby preserving their integrity.
This means the tool allows you to manage your application's configuration while maintaining the simplicity and coherence of the original YAML files.
Kustomize is also included in kubectl since version 1.14, if you have kubectl installed, you're already set to go! If you need to install kubectl, you can find the instructions on the official Kubernetes website.
Kustomize lets you create, modify, and manage Kubernetes native applications (those specified in YAML format) without losing their original structure. It achieves this by overlaying changes onto base resources.
For example, suppose you have an application you want to deploy in different environments. In each environment, you need to change some configuration details, such as the name of the application, the number of replicas, the image tag, etc. Instead of creating new YAML files for each environment, you can use Kustomize to manage these changes, keeping your files DRY (Don't Repeat Yourself).
The code for this tutorial can be found in this github repository: https://github.com/devoriales/kustomize-tutorial
Prerequisites
Before diving into Kustomize, you should have:
- Basic understanding of Kubernetes and YAML
- A working Kubernetes cluster setup (like microk8s, Minikube, Linode LKE, AWS EKS etc)
- Kubectl installed on your machine (Kustomize has been included in kubectl since version 1.14)
Getting Started with Kustomize
Imagine that you're working on a project as a DevOps engineer and you're handling multiple environments such as development, staging, and production.
Each environment has its own set of configuration values, such as different database credentials. The application's configuration is spread across multiple Kubernetes manifest files, and you're finding it challenging to manage and update these configurations across different environments.
Moreover, when you want to add a new feature or make changes to your application, you need to modify the configuration and apply it to each environment separately. This process can be time-consuming, error-prone, and difficult to manage as your application grows and becomes more complex.
The following diagram illustrates a very simple scenario. We want to have a Nginx implementation by having a common base configuration. We also want to have different configurations depending on the environment. The diagram illustrates Development and Production environments. The replicas of our Nginx workloads differes between the environments:
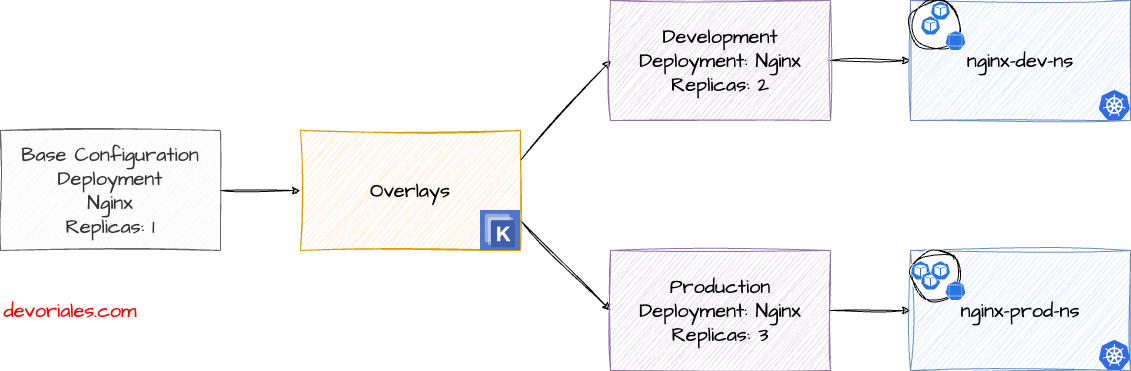
In the next following sections, we'll apply a solution related to the diagram. The environments will be simulated in two different Kubernetes namespaces:
- nginx-dev-ns
- nginx-prod-ns
Let's see how we can utilize Kustomize by implementing a solution for the scenario illustrated in the diagram.
Required Files for Kustomize Configuration
For a successful application of Kustomize, a well-structured directory with the necessary configuration files is crucial.
Here is what we need to fullfil our project, the directory structure should be like the following:
── base
│   ├── deployment.yaml
│   ├── kustomization.yaml
│   └── service.yaml
└── overlays
    ├── development
    │   ├── kustomization.yaml
    │   └── namespace.yaml
    └── production
        ├── kustomization.yaml
        └── namespace.yaml
Outline:
| File/Directory | Description |
|---|---|
base/ |
The base directory is home to the common configuration files. These are shared across all environments. |
base/deployment.yaml |
This file contains the deployment configuration for the application. It's a common resource shared across all environments. |
base/service.yaml |
This is the service configuration for the application, defining how the application is exposed. It's also a common resource. |
base/kustomization.yaml |
This special file tells Kustomize what resources to include when constructing the base configuration. |
overlays/ |
Overlays are where environment-specific configurations are kept. Each environment (e.g., development, production) gets its own directory. |
overlays/development/ |
This directory holds the configuration specific to the development environment. |
overlays/development/kustomization.yaml |
Inside here, Kustomize is instructed what modifications (or "patches") to apply to the base resources for the development environment. |
overlays/development/namespace.yaml |
This file is unique to the development environment and creates a namespace specifically for development. |
overlays/production/ |
Similar to the development directory, this holds the configuration specific to the production environment. |
overlays/production/kustomization.yaml |
This file instructs Kustomize on what modifications to apply to the base resources for the production environment. |
overlays/production/namespace.yaml |
This file is unique to the production environment and creates a namespace specifically for production. |
Part 1 - Basic Configuration
code: https://github.com/devoriales/kustomize-tutorial/tree/main/ver_1
In this first part, we will learn fundamentals of Kustomize tool.
1. Create the Base Configuration
First, we will create a base configuration for a simple Nginx deployment.
Create a directory base and inside it create two files: deployment.yaml and service.yaml.
deployment.yaml
apiVersion: apps/v1
kind: Deployment
metadata:
  name: nginx
spec:
  replicas: 1
  selector:
    matchLabels:
      app: nginx
  template:
    metadata:
      labels:
        app: nginx
    spec:
      containers:
      - name: nginx
        image: nginx:latest
        ports:
        - containerPort: 80
service.yaml
apiVersion: v1
kind: Service
metadata:
  name: nginx
spec:
  ports:
  - port: 80
  selector:
    app: nginx
kustomization.yaml
apiVersion: kustomize.config.k8s.io/v1beta1
kind: Kustomization

resources:
  - deployment.yaml
  - service.yaml
2. Creating an Overlay
Now, let's create an overlay that modifies the number of replicas.
Create a new directory overlays/development and within it, create a kustomization.yaml file.
kustomization.yaml
apiVersion: kustomize.config.k8s.io/v1beta1
kind: Kustomization
namespace: nginx-dev-ns
resources:
  - namespace.yaml
bases:
- ../../base
patchesStrategicMerge:
- |-
  apiVersion: apps/v1
  kind: Deployment
  metadata:
    name: nginx
  spec:
    replicas: 2
This file uses the base configuration and applies a patch to change the number of replicas in the deployment to 2.
We also want to create a namespace for development:
namespace.yaml
apiVersion: v1
kind: Namespace
metadata:
  name: nginx-dev-ns
bases: This is a list of paths to directories or files containing kustomization.yaml files that this Kustomize configuration is based on. They can be either local or remote. The base is the common ground where the main resources are defined, and then you can apply different changes depending on the overlays.
patchesStrategicMerge: This field specifies a list of strategic merge patches that should be applied to resources in the base. A strategic merge patch is a specific format for updating certain fields of a resource, while leaving others untouched.
The section after - |- is a strategic merge patch that updates the replicas field of the nginx deployment. The |- in YAML denotes a literal block scalar where new lines will be preserved.
3. Creating an Overlay for Production environment
One of the strengths of Kustomize is the ability to create multiple overlays for various scenarios. For instance, you can create a development overlay with a different number of replicas or different application settings.
To do so, you need to create a new directory overlays/production, and within it, create another kustomization.yaml file, similar to the one in the development directory, but with different configurations.
Create a new directory overlays/production, and within it, create a kustomization.yaml file:
kustomization.yaml
apiVersion: v1
kind: Namespace
metadata:
  name: nginx-prod-ns
---
apiVersion: kustomize.config.k8s.io/v1beta1
kind: Kustomization
namespace: nginx-prod-ns
bases:
- ../../base
patchesStrategicMerge:
- |-
  apiVersion: apps/v1
  kind: Deployment
  metadata:
    name: nginx
  spec:
    replicas: 3
We also want to create a namespace for production:
namespace.yaml
apiVersion: v1
kind: Namespace
metadata:
  name: nginx-prod-ns
4. Inspect the Configuration
Before deploying our final configurations, we can inspect what will be applied without actually applying it. We can start checking the development configurations:
kubectl kustomize overlays/development
Output:
apiVersion: v1
kind: Namespace
metadata:
  name: nginx-dev-ns
---
apiVersion: v1
kind: Service
metadata:
  name: nginx
  namespace: nginx-dev-ns
spec:
  ports:
  - port: 80
  selector:
    app: nginx
---
apiVersion: apps/v1
kind: Deployment
metadata:
  name: nginx
  namespace: nginx-dev-ns
spec:
  replicas: 2
  selector:
    matchLabels:
      app: nginx
  template:
    metadata:
      labels:
        app: nginx
    spec:
      containers:
      - image: nginx:latest
        name: nginx
        ports:
        - containerPort: 80
Notice the number of replicas has changed to correspond to what you have set in the overlay.
5. Applying the Configuration - Development environment
Now you have two separate overlays for production and development, each with a different number of replicas. You can apply the development configuration as follows:
With the following, we can deploy the development instance of our nginx project:
kubectl kustomize overlays/development | kubectl apply -f -
You should get the following output:
namespace/nginx-dev-ns created
service/nginx created
deployment.apps/nginx created
We can verify the resources in nginx-dev-ns namespace:
kubectl get all -n nginx-dev-ns

NAME                         READY   STATUS    RESTARTS   AGE
pod/nginx-57d84f57dc-6bbrf   1/1     Running   0          58s
pod/nginx-57d84f57dc-lh5tn   1/1     Running   0          58s

NAME            TYPE        CLUSTER-IP      EXTERNAL-IP   PORT(S)   AGE
service/nginx   ClusterIP   10.96.130.167   <none>        80/TCP    59s

NAME                    READY   UP-TO-DATE   AVAILABLE   AGE
deployment.apps/nginx   2/2     2            2           59s

NAME                               DESIRED   CURRENT   READY   AGE
replicaset.apps/nginx-57d84f57dc   2         2         2       58s
This is the essence of Kustomize: it allows you to manage variations of your application for different environments while maintaining the simplicity and coherence of the original YAML files. In this case, you can manage the number of replicas for each environment by just modifying the corresponding overlay.
Dry Run - Prod Environment
We will repeat the process for the production environment.
Let's verify that the configuration in the overlay applies correct:
kubectl kustomize overlays/production

apiVersion: v1
kind: Namespace
metadata:
  name: nginx-prod-ns
---
apiVersion: v1
kind: Service
metadata:
  name: nginx
  namespace: nginx-prod-ns
spec:
  ports:
  - port: 80
  selector:
    app: nginx
---
apiVersion: apps/v1
kind: Deployment
metadata:
  name: nginx
  namespace: nginx-prod-ns
spec:
  replicas: 3
  selector:
    matchLabels:
      app: nginx
  template:
    metadata:
      labels:
        app: nginx
    spec:
      containers:
      - image: nginx:latest
        name: nginx
        ports:
The final configuration looks good, we have three replicas and our namespace so we can carry on by applying this to our cluster:
kubectl kustomize overlays/production | kubectl apply -f -
Verify that all resources have been deployed correctly:
kubectl get all -n nginx-prod-ns

NAME                         READY   STATUS    RESTARTS   AGE
pod/nginx-57d84f57dc-fsnkm   1/1     Running   0          26m
pod/nginx-57d84f57dc-kzfgn   1/1     Running   0          26m
pod/nginx-57d84f57dc-w9wfn   1/1     Running   0          26m

NAME            TYPE        CLUSTER-IP      EXTERNAL-IP   PORT(S)   AGE
service/nginx   ClusterIP   10.96.194.223   <none>        80/TCP    26m

NAME                    READY   UP-TO-DATE   AVAILABLE   AGE
deployment.apps/nginx   3/3     3            3           26m

NAME                               DESIRED   CURRENT   READY   AGE
replicaset.apps/nginx-57d84f57dc   3         3         3       26m
Great we now have two namespaces running workloads with the correct number of replicas!
Part 2 - Advanced Configuration
code: https://github.com/devoriales/kustomize-tutorial/tree/main/ver_2
In this section, we'll learn more advanced Kustomize techniques.
In addition to what we already did in Part 1, we will add the following resources:
- configMap: contains database connection details
- Secret: contains credentials for the database
We will have different credentials between production and development environments.
As earlier, we will have different number of replicas between the environments.
Although, the scenario is the same, we will add some more configurations to our small web project.
The folder and file structure will look like the following:
├── base
│   ├── deployment.yaml
│   ├── kustomization.yaml
│   └── service.yaml
└── overlays
    ├── development
    │   ├── kustomization.yaml
    │   ├── namespace.yaml
    │   └── replica_patch.yaml <<< New file
    └── production
        ├── deployment.yaml
        ├── kustomization.yaml
        ├── namespace.yaml
        └── replica_patch.yaml <<< New file
Add Another Patch File
In the previous example, in our overlay/kustomization.yaml we used the following overlay to patch the deployment with a new replicas value:
patchesStrategicMerge:
- |-
  apiVersion: apps/v1
  kind: Deployment
  metadata:
    name: nginx
  spec:
    replicas: 2
This time we will modify this section and add a file instead:
patchesStrategicMerge:
  - replica_patch.yaml
We will also create replica_patch.yamlfile in the overlay folder:
# replica_patch.yaml
apiVersion: apps/v1
kind: Deployment
metadata:
  name: nginx
spec:
  replicas: 2
Now this file will be applied as an overlay to the original deployment file.
Update the Deployment Files
Since we're going to use the values from configMap and secret, we need to update our deployment files in the base directory (both for dev and prod):
apiVersion: apps/v1
kind: Deployment
metadata:
  name: nginx
spec:
  replicas: 1
  selector:
    matchLabels:
      app: nginx
  template:
    metadata:
      labels:
        app: nginx
    spec:
      containers:
      - name: nginx
        image: nginx:latest
        ports:
        - containerPort: 80
        env:
        - name: DATABASE_HOST
          valueFrom:
            configMapKeyRef:
              name: web-app-config
              key: hostname
        - name: DATABASE_PORT
          valueFrom:
            configMapKeyRef:
              name: web-app-config
              key: port
        - name: DATABASE_NAME
          valueFrom:
            configMapKeyRef:
              name: web-app-config
              key: dbname
        - name: DATABASE_USER
          valueFrom:
            secretKeyRef:
              name: web-app-credentials
              key: username
        - name: DATABASE_PASSWORD
          valueFrom:
            secretKeyRef:
              name: web-app-credentials
              key: password
The values will be different for each environment.
Create Secret And configMap Generator
In this section we will create a secret and ConfigMap.
In Kustomize, configMapGenerator and secretGenerator are used to dynamically generate ConfigMaps and Secrets, respectively, that can be used by other Kubernetes resources like Pods or Deployments.
The main advantage of using configMapGenerator and secretGenerator is that any changes to the original files or literals will result in a new ConfigMap or Secret being generated with a unique hash appended to its name.
This is beneficial because Kubernetes will roll out changes to the associated Pods due to the name change, ensuring the Pods are using the latest configuration or secrets.
If you want to disable the appending of the hash, you can add disableNameSuffixHash: true under the respective generator.
The overlay for the development environment could look like this:
# dev/kustomization.yaml
apiVersion: kustomize.config.k8s.io/v1beta1
kind: Kustomization
namespace: nginx-dev-ns
resources:
  - namespace.yaml
bases:
  - ../../base
patchesStrategicMerge:
  - replica_patch.yaml
configMapGenerator:
- name: web-app-config
  literals:
    - hostname=dev-db.devoriales.com
    - port=5432
    - dbname=webapp-dev
secretGenerator:
- name: web-app-credentials
  literals:
    - username=dev-user
    - password=dev-password
The overlay for the prod environment:
# dev/kustomization.yaml
apiVersion: kustomize.config.k8s.io/v1beta1
kind: Kustomization
namespace: nginx-prod-ns
resources:
  - namespace.yaml
bases:
  - ../../base
patchesStrategicMerge:
  - replica_patch.yaml
configMapGenerator:
- name: web-app-config
  literals:
    - hostname=prod-db.devoriales.com
    - port=5432
    - dbname=webapp-prod
secretGenerator:
- name: web-app-credentials
  literals:
    - username=prod-user
    - password=prod-password
Please note! This is a simplified example, you would of course not keep the sensitive data like this.
With the following, we will DRY RUN the configuration without applying the code to our cluster:
kubectl kustomize overlays/development

apiVersion: v1
kind: Namespace
metadata:
  name: nginx-dev-ns
---
apiVersion: v1
data:
  dbname: webapp-dev
  hostname: dev-db.devoriales.com
  port: "5432"
kind: ConfigMap
metadata:
  name: web-app-config-cbdd2kd7km
  namespace: nginx-dev-ns
---
apiVersion: v1
data:
  password: ZGV2LXBhc3N3b3Jk
  username: ZGV2LXVzZXI=
kind: Secret
metadata:
  name: web-app-credentials-54mh6cfbdg
  namespace: nginx-dev-ns
type: Opaque
---
apiVersion: v1
kind: Service
metadata:
  name: nginx
  namespace: nginx-dev-ns
spec:
  ports:
  - port: 80
  selector:
    app: nginx
---
apiVersion: apps/v1
kind: Deployment
metadata:
  name: nginx
  namespace: nginx-dev-ns
spec:
  replicas: 2
  selector:
    matchLabels:
      app: nginx
  template:
    metadata:
      labels:
        app: nginx
    spec:
      containers:
      - env:
        - name: DATABASE_HOST
          valueFrom:
            configMapKeyRef:
              key: hostname
              name: web-app-config-cbdd2kd7km
        - name: DATABASE_PORT
          valueFrom:
            configMapKeyRef:
              key: port
              name: web-app-config-cbdd2kd7km
        - name: DATABASE_NAME
          valueFrom:
            configMapKeyRef:
              key: dbname
              name: web-app-config-cbdd2kd7km
        - name: DATABASE_USER
          valueFrom:
            secretKeyRef:
              key: username
              name: web-app-credentials-54mh6cfbdg
        - name: DATABASE_PASSWORD
          valueFrom:
            secretKeyRef:
              key: password
              name: web-app-credentials-54mh6cfbdg
        image: nginx:latest
        name: nginx
        ports:
        - containerPort: 80
It looks good, let's apply our manifest files:
kubectl kustomize overlays/development | kubectl apply -f -

namespace/nginx-dev-ns created
configmap/web-app-config-cbdd2kd7km created
secret/web-app-credentials-54mh6cfbdg created
service/nginx created
deployment.apps/nginx created
We can verify our secret and configMap:
kubectl get -o yaml cm web-app-config-cbdd2kd7km


apiVersion: v1
data:
  dbname: webapp-dev
  hostname: dev-db.devoriales.com
  port: "5432"
kind: ConfigMap
metadata:
  annotations:
    kubectl.kubernetes.io/last-applied-configuration: |
      {"apiVersion":"v1","data":{"dbname":"webapp-dev","hostname":"dev-db.devoriales.com","port":"5432"},"kind":"ConfigMap","metadata":{"annotations":{},"name":"web-app-config-cbdd2kd7km","namespace":"nginx-dev-ns"}}
  name: web-app-config-cbdd2kd7km
  namespace: nginx-dev-ns

kubectl get -o yaml secret web-app-credentials-54mh6cfbdg
apiVersion: v1
data:
  password: ZGV2LXBhc3N3b3Jk
  username: ZGV2LXVzZXI=
kind: Secret
metadata:
  annotations:
    kubectl.kubernetes.io/last-applied-configuration: |
      {"apiVersion":"v1","data":{"password":"ZGV2LXBhc3N3b3Jk","username":"ZGV2LXVzZXI="},"kind":"Secret","metadata":{"annotations":{},"name":"web-app-credentials-54mh6cfbdg","namespace":"nginx-dev-ns"},"type":"Opaque"}
  name: web-app-credentials-54mh6cfbdg
  namespace: nginx-dev-ns
type: Opaque
Both configMap and secret looks correct and have been created successfully.
Note that both has a unique hash suffix. If you make any changes , the generators will create a new configMap or secret with updated hash suffixes and a new deployment will occur.
We can test this by chaning the password in our secret:
secretGenerator:
- name: web-app-credentials
  literals:
    - username=dev-user
    - password=dev-password-2
We can now apply the changes:
kubectl kustomize overlays/development | kubectl apply -f -

namespace/nginx-dev-ns unchanged
configmap/web-app-config-cbdd2kd7km unchanged
secret/web-app-credentials-978tgd458f created
service/nginx unchanged
deployment.apps/nginx configured
➜  ver_2 git:(main) ✗ k get secret
NAME                             TYPE     DATA   AGE
web-app-credentials-54mh6cfbdg   Opaque   2      5m50s
web-app-credentials-978tgd458f   Opaque   2      8s
Please note how another secret has been created:
 kubectl get secret

NAME                             TYPE     DATA   AGE
web-app-credentials-54mh6cfbdg   Opaque   2      5m50s
web-app-credentials-978tgd458f   Opaque   2      8s
Our pods are running fine in dev environment:
kubectl get pods

NAME                     READY   STATUS    RESTARTS   AGE
nginx-746699d555-vcftj   1/1     Running   0          25m
nginx-746699d555-w5gp9   1/1     Running   0          25m
Challenge
You can now repeat the same for production environment. Change the values for your database connections and credentials in the configMap and Secret.
Helm vs. Kustomize: A Comparison
The following table compares features and comparisons between Helm and Kustomize:
| Feature/Aspect | Helm | Kustomize |
|---|---|---|
| Definition | A "package manager for Kubernetes", managing Kubernetes applications through Helm Charts - packages of pre-configured Kubernetes resources. | A template-free way to customize application configuration. Operates directly on Kubernetes manifest files and included as part of kubectl. |
| Configuration | Customizable via values.yaml file to override certain chart defaults. | Uses a base and overlay methodology, where a base configuration file is 'patched' with one or more overlay files to create the final configuration. |
| Templating | Uses a templating engine to process values.yaml files and generate Kubernetes manifest files. | Does not use templates, instead uses a patching mechanism. |
| Dependency Management | Excellently manages dependencies and packages applications. Can bundle different Kubernetes resources into a single Helm chart, including other charts as dependencies. | Lacks a built-in mechanism for managing dependencies. |
| GitOps - ArgoCD | Built-in support Helm charts | Built-in support for Kustomize |
| Simplicity | With its templating and charting capabilities, it offers more complex features, making it suitable for larger and more intricate projects. | Provides a simple and straightforward approach to customizing Kubernetes resources, making it easy to understand and use, especially for smaller projects. |
| Learning Curve | Given its complexity and wide array of features, it might present a steeper learning curve. | Generally has a lower learning curve due to its simplicity and straightforward approach. |
Remember, the choice between Helm and Kustomize will depend on your project's specific needs and the complexity of your application's deployments. Often, they can also be used together, leveraging the strengths of both tools. For example, you can use Helm's package management to distribute your application and Kustomize's customization capabilities to fine-tune deployments.
Summary
In this tutorial we have explored the fundamentals of Kustomize, a tool that allows for management and customization of Kubernetes applications.
Kustomize takes an approach, to application configuration by eliminating the need for templates. This not enhances the maintainability and scalability of applications. Also simplifies the process compared to tools like HELM that rely on templating.
When choosing between Kustomize and Helm it's essential to consider the requirements of your project. Each tool brings its strengths to the table. Helm excels in more complex projects due to its package management and dependency handling capabilities. On the hand Kustomize shines in projects thanks to its straightforward approach.
By leveraging both Helm and Kustomize together you can optimize your deployments effectively. Utilize Helm, for distributing your application while utilizing Kustomize for tuning your deployments.
About the Author
Aleksandro Matejic, a Cloud Architect, began working in the IT industry over 21 years ago as a technical specialist, right after his studies. Since then, he has worked in various companies and industries in various system engineer and IT architect roles. He currently works on designing Cloud solutions, Kubernetes, and other DevOps technologies.
In his spare time, Aleksandro works on different development projects such as developing devoriales.com, a blog and learning platform launching in 2022/2023. In addition, he likes to read and write technical articles about software development and DevOps methods and tools.
You can contact Aleksandro by visiting his LinkedIn Profile
Remember, Devoriales is here to support your learning journey. In the world of Kubernetes, things move fast, but don't worry, we'll keep you up to date. Stay tuned for more tutorials and deep dives into the exciting world of Kubernetes and its ecosystem.