
Keep Resources Safe with Python Context Managers

TL;DR
Context managers in Python are crucial for effective resource management, preventing resource leaks and ensuring streamlined code execution, particularly with file operations and exception handling. This tutorial will cover the basics of context managers, their operational mechanisms, and the process for creating your own.
We begin by defining context managers and exploring their significant role in managing resources efficiently. The blog will feature real-world examples to demonstrate how context managers can boost both code safety and performance.
Following that, we offer a detailed, step-by-step guide to developing your custom context managers. This section will include comprehensive explanations and code samples to equip you with the skills needed to integrate these managers into your own projects.
Lastly, we examine the capabilities of Python’s inherent context manager functions and discuss how to enhance these with custom handlers. Through practical examples, we will detail how to design and implement these handlers to improve your coding techniques.
Content
What is a Context Manageropen() and close() methods - Grocery List Example
Potential Problems using open() and close()
Resource Leak
Exception Handling
Creating Custom Context Managerwith statement
Thread-Safe Shared Resource Access
Context Managers with contextlib
What is a Context Manager?
A context manager is a concept in Python that helps you manage resources, such as file handles, database connections, or sockets. It ensures that the resources are properly acquired and released, preventing potential issues like resource or memory leaks.
What these methods do is setting up a runtime context and perform the cleanup operations when the context is not needed anymore.
The following diagram demonstrates the flow of the context manager process:

- Entry Point: The process begins at the entry point of the context manager, initializing the context management protocol.
- Resource Acquisition: The system initiates the resource acquisition phase, where a specific method is invoked to secure access to the required resource, such as a file or a database connection.
- Managed Block: Following successful resource acquisition, you enter the managed block. This is where operations involving the resource take place, such as reading from or writing to a file.
- Resource Release: Upon completion of the managed block, a method is executed to release the resource, ensuring that it is no longer in use and is properly closed or freed.
- Exit Point: The process concludes at the exit point of the context manager, signaling the end of resource management and the return to normal execution flow.
One of the most common use cases for context managers is handling file I/O operations. By using context managers, developers can ensure that file handles are properly opened and closed, preventing resource leaks and other issues that can arise when managing resources manually.
Context managers are typically used with the with statement. When you use a context manager, it will take care of setting up and cleaning up resources for you, so you don't have to worry about doing it manually. It makes your more readable, and less prone to errors.
However, before diving into using with statement, we will explore how to create our own custom handler. By doing so, we will get a deeper understanding of the underlying concepts.
open() and close() methods - Grocery List Example
In the following example, we'll use a simple use case to demonstrate how to handle external resources.
We have a file containing a list of grocery items and their respective quantities.
Our goal is to read the data in this file using our code.
The file with our grocery items looks like this:
shopping.txt
Tomatoes,5
Potatoes,3
Carrots,5
Apples,4
Milk,1
Bread,2
Eggs,12
One way to read our grocery list data without using any context manager is to use the open() and close() methods:
# read shopping list from file
file = open('shopping.txt', 'r')
shopping_list = file.read()
file.close()

for item in shopping_list.splitlines():
    item, amount = item.split(',')
    print(f"{item}: {amount}")
Output:
Tomatoes: 5
Potatoes: 3
Carrots: 5
Apples: 4
Milk: 1
Bread: 2
Eggs: 12
Everything worked perfect, but there are a few potential pitfalls with this approach.
Potential Problems using open() and close() methods
The code we have previously written has some potential pitfalls:
-
Manual resource management: The
open()andclose()methods require you to manually manage the file resource. If you forget to call theclose()method, the file will remain open, leading to a resource leak. This can be problematic, especially if you have multiple files open at the same time. - Exception handling: The code does not include any exception handling. If an error occurs while reading the file, the
close()method might not be called, leaving the file open. This can lead to resource leaks and make it more difficult to debug the issue. -
Less readable: Manually managing resources can make your code less readable, as you need to keep track of the
open()andclose()methods for each file you work with.
Resource leak
Although it's not always easy to produce a resource leak, we can attempt to create one to demonstrate the potential problems of not managing resources properly.
In this section, we'll walk through the process of creating a resource leak and how it can affect the system.
To capture a resource leak, we can monitor the number of open file handles in the system based on our shopping list. Here's one way to monitor open file handles (at least on Unix systems):
resource_leak.py
'''
devoriales.com
path: context_manager/resource_leak.py

description: We will try to cause a resource leak by opening a file and reading it
'''

import time
import os

for _ in range(1000):
    file = open('shopping.txt', 'r') # open the file in read mode
    data = file.read()
    print(data)
    print('PID: ', os.getpid()) # print PID of the current process
    time.sleep(0.1)  # Sleep for 100 milliseconds before opening the file again
This code creates a loop that runs X times. In each iteration, it opens the file shopping.txt with read-only mode and reads its contents. It then prints the contents to the console along with the process ID of the current Python process obtained using the os.getpid() function. The code then waits for X milliseconds using the time.sleep() function before moving on to the next iteration. This creates a situation where the file is continuously opened and closed repeatedly, consuming system resources and potentially leading to a resource leak.
The goal of this code is to intentionally produce a resource leak by repeatedly opening a file without properly closing it.
Let's run the code with the following command:
python3 resource_leak.py &now we need to monitor the number of open file descriptors for the process. We can use lsof command along with the PID that is in your terminal from your Python code.
watch -n 1 "lsof -p PID | wc -l"Replace PID with the actual process ID. This command will show the number of open file descriptors for the Python process every 0.1 second.
You can find the PID in the terminal as we have included the os.getpid() method.
❗If you don't have the watch command on your system, you can either install it as a package or create your own watch script.
For example, on macOS, you can install the watch command using Homebrew:
brew install watchIf you prefer to write your own shell script, here is an example:
watch.sh
#!/bin/bash

# devoriales.com
# description: watch.sh
# This script runs a command passed as argument and refreshes the output every second.
# It is useful to watch the output of a command that is not interactive.

while true;
do
  clear
  eval "$@" # run the command passed as argument
  sleep 1
done
Save the script in a file named watch.sh, and make it executable by running:
chmod +x watch.shNow we can run the script in the same way as with the one from brew:
./watch.sh "lsof -p PID | wc -l"
Replace PID with the actual process ID
❗If you observe a continuous increase in the number of open file descriptors over time, it indicates that file handles are not being closed, causing a resource leak. As mentioned earlier, this may not always work.
Exception handling
As we already pointed out, our code does not include any exception handling. In the following example, we will add a try-except-finally block to capture any errors that might occur when we handle the file:
try:
    file = open('shopping.txt', 'r')
    shopping_list = file.read()
    file.close()
except FileNotFoundError:
    print("File not found")
finally:
    print("File closed")

for item in shopping_list.splitlines():
    item, amount = item.split(',')
    print(f"{item}: {amount}")
Now we have a pretty nice code which takes care of closing the file automatically and handling exceptions more efficiently.
Fortunately, there is a easier way to do this which we will learn in the coming sections.
Less readable code
Imagine that we need to manage several files opening and closing in the code. This would make our code pretty messy.
Here is an example of how we could deal with muliple file opening and closing:
try:
    file1 = open('file1.txt', 'r')
    file2 = open('file2.txt', 'w')
    file3 = open('file3.txt', 'r+')

    # do something with the files

    file1.close()
    file2.close()
    file3.close()

except FileNotFoundError:
    print("File not found")

finally:
    print("Files closed")
Even though we haven't covered the 'with' statement yet, we can agree that the following code is easier to understand and requires fewer lines of code:
with open('file1.txt', 'r') as file1, open('file2.txt', 'w') as file2, open('file3.txt', 'r+') as file3:

    # do something with the files

print("Files closed")
Creating Custom Context Manager
In this section, we will write our own context manager by implementing the __enter__() and __exit__() methods in a Python class.
The __enter__() method is called when entering the with block, and it can return an object that will be used in the block.
The __exit__() method is called when exiting the block and takes three arguments: the exception type, exception value, and traceback.
Here's an example of a custom context manager that measures the execution time of a block of code:
'''
devoriales.com
path: context_manager/measure_time.py

description: context manager to measure the execution time of a function
'''

import time
import random

class ExecutionTime:
    def __init__(self, name):
        self.name = name

    def __enter__(self):
        self.start_time = time.time()

    def __exit__(self, exc_type, exc_val, exc_tb):
        print(f'{self.name} took {time.time() - self.start_time} seconds')

with ExecutionTime('sleeping'):
    time.sleep(2)


def heavy_calculation():
    print("Starting calculation...")
    # random time
    time.sleep(random.random())
    print("Calculation is done!")

try:
    with ExecutionTime('heavy_calculation'):
        heavy_calculation()
except Exception as e:
    print(e)
Output:
sleeping took 2.0051119327545166 seconds
Starting calculation...
Calculation is done!
heavy_calculation took 0.5688560009002686 seconds
In the code we define a class ExecutionTime which is used as a context manager to measure the time taken by a code block to execute.
It has an __enter__() method to start the timer and an __exit__() method to print the time taken to execute the code block. The code then uses this context manager to measure the time taken by time.sleep(2) and a heavy calculation function called heavy_calculation().
The __exit__()has some arguments:
exc_type: This is the type of exception that occurred, if any. If no exception occurred, this will beNone.exc_val: This is the value of the exception that occurred, if any. If no exception occurred, this will beNone.exc_tb: This is the traceback object that represents the call stack at the point where the exception occurred, if any. If no exception occurred, this will beNone.
When the with block is entered, the __enter__() method records the current time. When the block is exited, the __exit__() method calculates the elapsed time and prints it.
In the next section, we will learn about with statement which basically does exactly what our example of ExecutionTime class was doing. But since it's already avaible to us in Python, so we don't need write this on our own context manager in most of the cases.
Better readable: Let's use with statement
A context manager is an object in Python that defines the methods __enter__() and __exit__() to manage resources. These methods are used to set up a runtime context and perform the necessary clean-up operations when the context is no longer needed.
The following diagram demonstrates the flow of the context manager process, similar to the one we looked at earlier in the post.
This time, we've included the __enter__() and __exit__() methods in the diagram to provide a more comprehensive illustration:

- The entry point of the context manager is reached.
- The resource acquisition process starts, and the
__enter__()method is called. - You enter the managed block, where you perform operations on the acquired resource, like reading or writing to a file.
- Once the managed block is completed, the
__exit__()method is called to release the resource. - The exit point of the context manager is reached, and the resource is now properly managed.
By using context managers, developers can ensure that the handles are properly opened and closed, preventing resource leaks and other issues that can arise when managing resources manually.
In the following example, the with statement is used to open and read a file, and ensures that the file is automatically closed when the block of code is exited, even if an exception occurs:
with open('file.txt', 'r') as file:
    data = file.read()
    print(data)
In the example above, the open() function returns a context manager that takes care of opening and closing the file. The with statement ensures that the file is automatically closed when the block of code is exited, preventing the need to explicitly call file.close().
Using the with statement with a context manager simplifies the code and makes it more readable, as you don't need to write additional code to handle opening and closing the file.
Thread-Safe Shared Resource Access
Imagine that we are developing a multi-threaded application that involves a shared resource, such as a database or file. Multiple threads need to access this shared resource simultaneously to read and write data, and we need to ensure that the data is not corrupted or overwritten by concurrent access.
To prevent this, we can use a threading lock. A lock is a synchronization mechanism that allows only one thread at a time to access the shared resource. When a thread needs to access the shared resource, it acquires the lock, which prevents other threads from accessing the resource until the lock is released. Once the thread has finished accessing the resource, it releases the lock, allowing other threads to access the resource in turn.
Using a lock ensures that the shared resource is accessed safely and prevents data corruption or race conditions that can occur when multiple threads access the resource simultaneously. By using locks, you can write multi-threaded applications with confidence, knowing that shared resources are protected from concurrent access by multiple threads.
Those of you that already have some knowledge in Python programming may wonder why this is a problem since Python is single-threaded due to the global interpreter lock (GIL). The GIL ensures that only one thread can execute Python bytecode at a time, effectively preventing true multi-core parallelism.
There are still cases where multiple threads can access shared resources in Python, even with the GIL in place. For example, if a Python program uses external libraries or system calls that release the GIL, multiple threads can execute simultaneously and compete for access to shared resources.
In addition, other Python implementations, such as Jython and IronPython, do not have a GIL and can execute multiple threads in parallel.
Use case - create a thread-safe class
We have the following requireement that we need to fulfil:
Create a Python script that implements a shared resource, a thread-safe mechanism for accessing and modifying this shared resource, and two worker threads that modify the shared resource in a thread-safe manner. The shared resource should consist of a list of randomly generated names, and each worker thread should append new random names to this list. The script should use a threading lock to ensure that the shared resource is not modified by multiple threads simultaneously, and the output should show which thread has acquired the lock and the current contents of the shared resource.
Using locks and context managers can help ensure that shared resources are accessed safely and prevent data corruption or race conditions, even in a single-threaded Python program. In multi-threaded programs, using locks is even more important to ensure that shared resources are accessed safely by multiple threads.
Solution Approach
Imagine a multi-threaded application where threads are responsible for generating and storing data into a shared data structure. Each thread simulates a worker that processes data and stores results. Without proper synchronization, concurrent modifications to the shared data structure could lead to inconsistent or corrupt data, known as a "race" condition.
This use case is a classic example of using threading and locks in Python to manage access to shared resources. It is particularly useful in applications where data consistency and thread safety are paramount, such as in financial services, real-time data processing, and multi-user environments. By implementing such a pattern, developers can ensure that their multi-threaded applications are robust, scalable, and free of race conditions.
The following diagram shows how our application will work with data, having two threads:
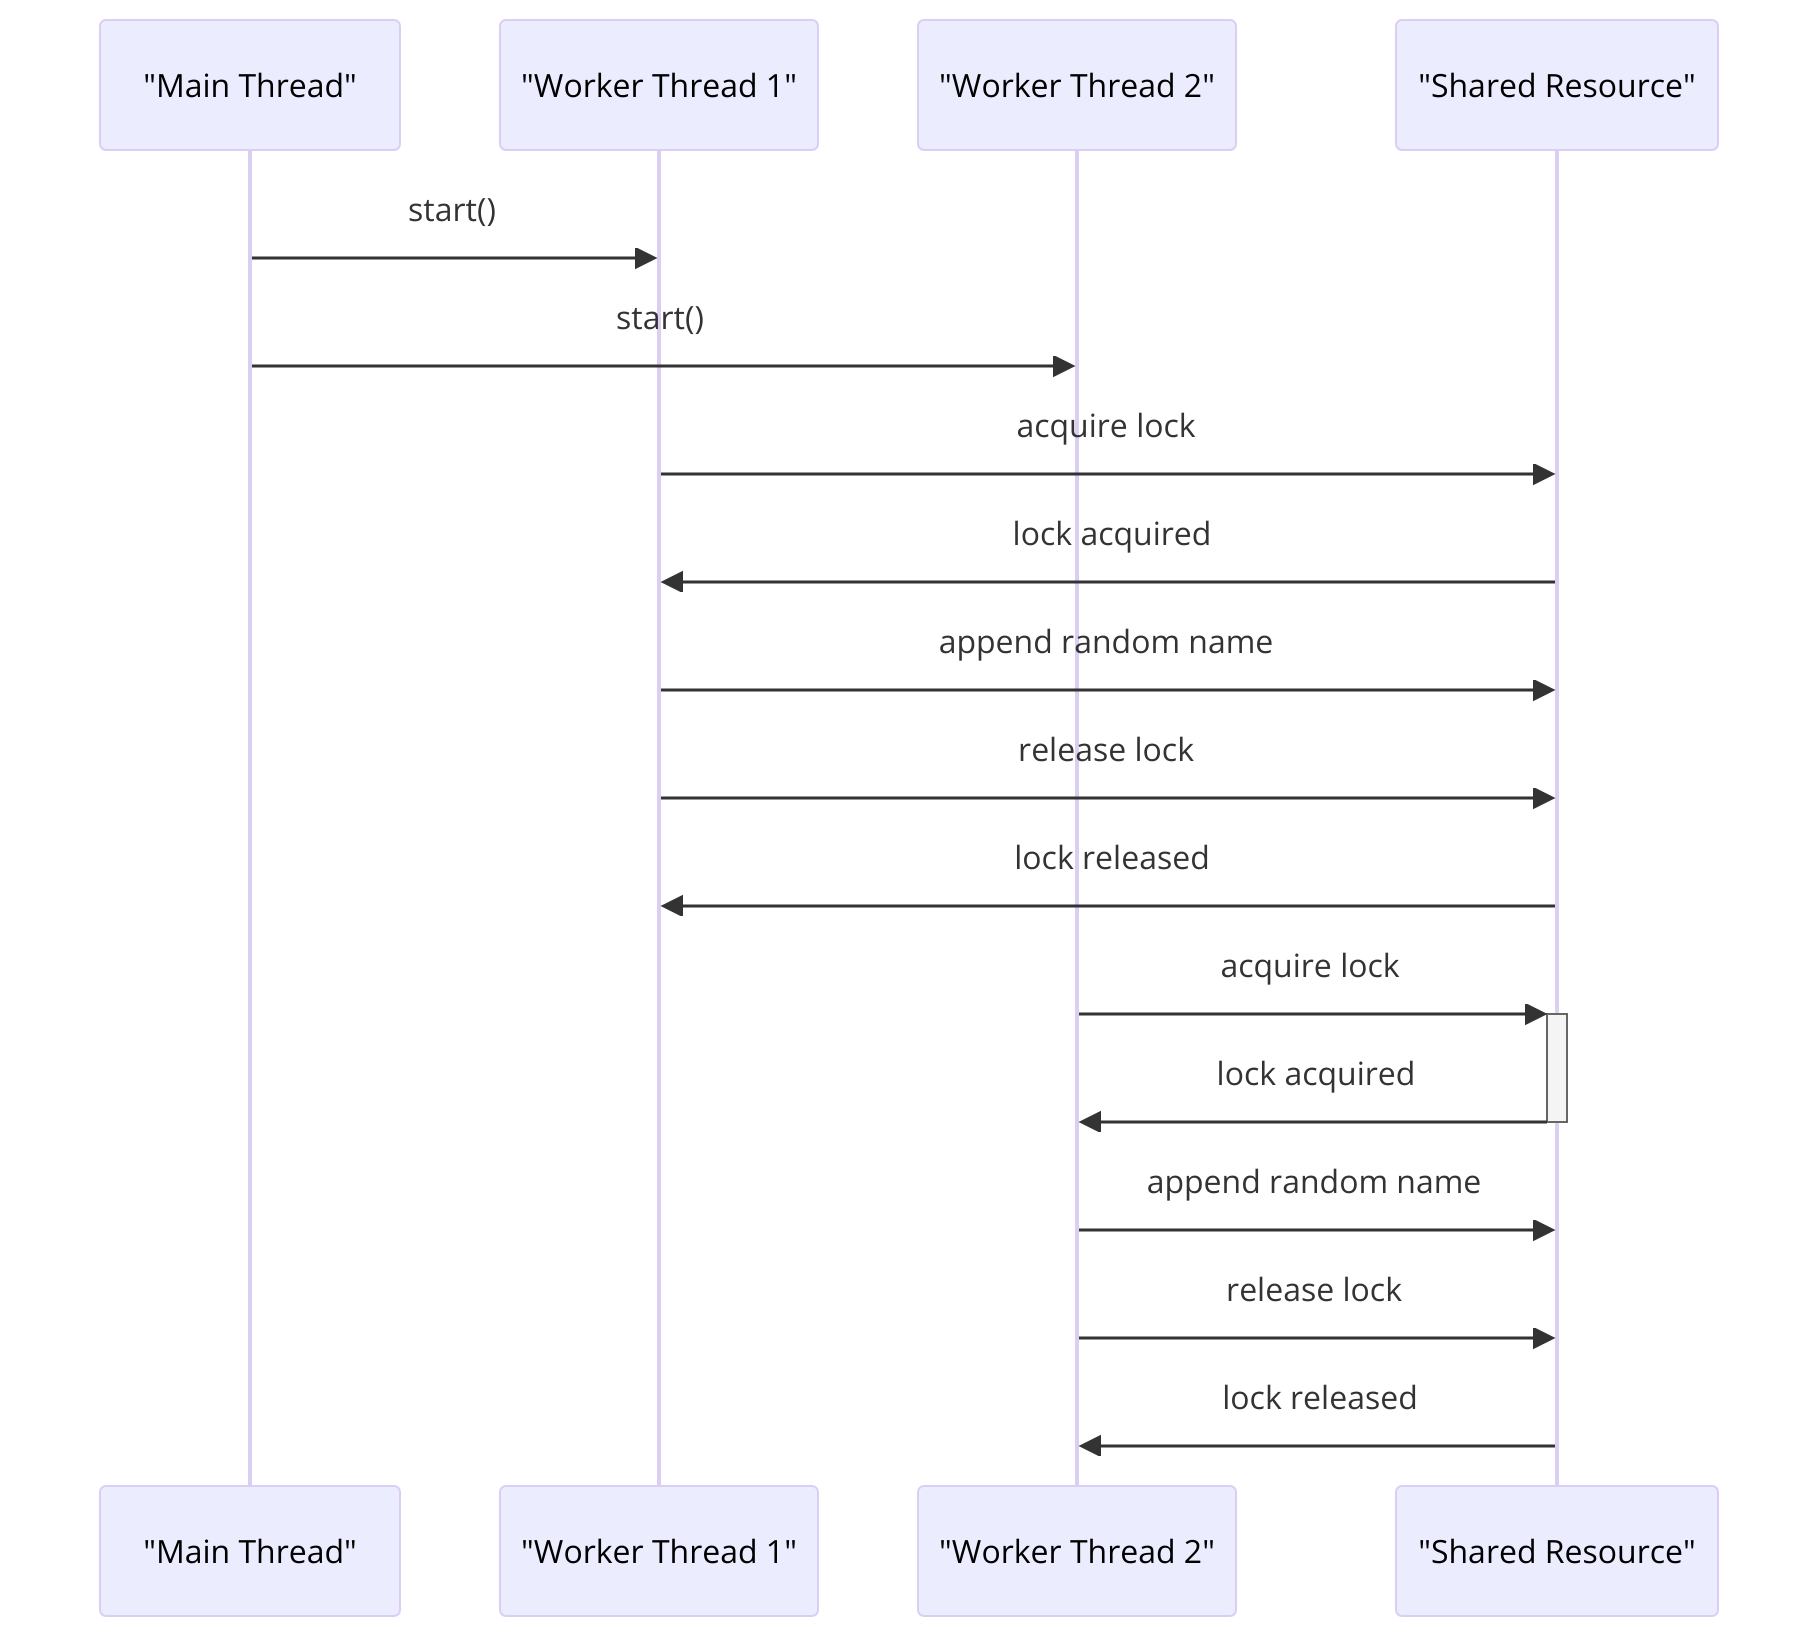
It's an example of using a threading lock to manage access to a shared resource between threads. The shared resource will be a list, and the threads add a random name to the list while simulating a long running task. The threading lock ensures that the threads can access the shared resource one at a time, preventing conflicts that could lead to data corruption. Finally, the code prints out the current state of the shared resource.
Here comes the full code of the implementation which does exactly as outlined in the diagram.
"""
devoriales.com
path: context_manager/lock_example.py

description: context manager to lock a shared resource between threads
"""

import threading
import time
import random
import faker


class SharedResource:
    def __init__(self):
        self.data = []
        self.lock = threading.Lock()

    def add_data(self, value):
        with self.lock:
            self.data.append(value)

    def get_data(self):
        with self.lock:
            return self.data


def worker_function(shared_resource):
    for _ in range(10):
        print(f'lock acquired by {threading.current_thread().name}')
        # random name to the shared resource
        shared_resource.add_data(faker.Faker().name())
        # random sleep time to simulate a long running task
        time.sleep(random.random())
        print(f"{threading.current_thread().name} is getting data")
        print(shared_resource.get_data()) # get the data from the shared resource
        print(f"data: {shared_resource.get_data()}")
        time.sleep(0.1)


if __name__ == '__main__':
    shared_resource = SharedResource()
    worker1 = threading.Thread(target=worker_function, args=(shared_resource,), name="Thread 1")  # create a thread
    worker2 = threading.Thread(target=worker_function, args=(shared_resource,), name="Thread 2")  # create a thread
    worker1.start()  # start the thread
    worker2.start()  # start the thread
    worker2.join()  # wait for the thread to finish
    worker2.join()  # wait for the thread to finish

#  print out the full data if you wish
# print(f"full data: {shared_resource.get_data()}")
Details
-
SharedResource Class:
- Purpose: Encapsulates a shared list (
self.data) and a lock (self.lock) used to synchronize access to the list. - Methods:
__init__: Initializes a newSharedResourceinstance with an empty list and a new lock.add_data: Uses the lock to ensure that appending a new value to the list is a thread-safe operation.get_data: Uses the lock to safely retrieve a copy of the list.
- Purpose: Encapsulates a shared list (
-
worker_function:
- Arguments: Accepts a
SharedResourceinstance. - Behavior: Each thread running this function will attempt to add data to the shared resource ten times. The data added is a randomly generated name, simulating a scenario where threads continuously update the shared resource.
- Concurrency Simulation: Each iteration includes a randomized sleep time to mimic the unpredictable execution timing in real-world scenarios. The function also prints the current state of the data, showcasing the current thread's view of the shared resource.
- Arguments: Accepts a
-
Main Execution Block:
- Thread Initialization: Two threads (
worker1andworker2) are created, each targeting theworker_functionwith the shared resource as an argument. - Thread Management: Starts both threads and waits for them to finish (
join()), ensuring that the main program waits for all thread activities to complete before exiting. - Final Data Output: An optional print statement at the end (commented out) can be used to display the final state of the shared data, demonstrating the cumulative result of all thread operations.
- Thread Initialization: Two threads (
Output (partial):
lock acquired by Thread 1
lock acquired by Thread 2
Thread 1 is getting data
['Joel Jenkins', 'Thomas Herman']
data: ['Joel Jenkins', 'Thomas Herman']
Thread 2 is getting data
['Joel Jenkins', 'Thomas Herman']
data: ['Joel Jenkins', 'Thomas Herman']
lock acquired by Thread 1
lock acquired by Thread 2
Thread Thread 1 is getting data
['Joel Jenkins', 'Thomas Herman', 'Sandra Fisher', 'Kelly Burns']
data: ['Joel Jenkins', 'Thomas Herman', 'Sandra Fisher', 'Kelly Burns']
...
The output is showing that two threads are acquiring the lock on the shared resource and adding random names to the data list using the add_data method.
They are then sleeping for a random amount of time to simulate a long-running task before getting the current data from the shared resource using the get_data method. Finally, the current data is printed to the console. This process is repeated X times for each thread.
The output shows that both threads are able to access the shared resource and that the lock is working as expected to prevent race conditions.
Context Managers with contextlib
The @contextmanager decorator from the contextlib package makes it easy to define context managers for simple use cases, such as file I/O operations or database connections, without having to create a full-blown class.
We can use the example we had in the section Creating Custom Context Managers
Just as a refresher, we have a class that measures the execution time of a block of code:
import time

class ExecutionTime:
    def __init__(self, name):
        self.name = name

    def __enter__(self):
        self.start_time = time.time()

    def __exit__(self, exc_type, exc_val, exc_tb):
        print(f'{self.name} took {time.time() - self.start_time} seconds')

with ExecutionTime('sleeping'):
    time.sleep(2)


def heavy_calculation():
    print("Starting calculation...")
    # random time
    time.sleep(random.random())
    print("Calculation is done!")

try:
    with ExecutionTime('heavy_calculation'):
        heavy_calculation()
except Exception as e:
    print(e)
Instead of writing this class, we can use the contextlib module to simplify this code by creating a context manager using a decorator:
'''
devoriales.com
path: context_manager/measure_time_contextlib.py

description: context manager to measure the execution time of a function using contextlib
'''
import time
import random
from contextlib import contextmanager

@contextmanager
def execution_time(function_name):
    start_time = time.time() # this is executed before the function is executed
    yield # this is where the function is executed
    print(f'{function_name} took {time.time() - start_time} seconds') # this is executed after the function is executed


def heavy_calculation():
    print("Starting calculation...")
    # random time
    time.sleep(random.random())
    print("Calculation is done!")

for _ in range(10):
    with execution_time('heavy_calculation'):
        print(f"Round {_} of 10")
        heavy_calculation()
        print("Calculation is done!")
output (partial):
...
Round 8 of 10
Starting calculation...
Calculation is done!
Calculation is done!
heavy_calculation took 0.0029120445251464844 seconds
Round 9 of 10
Starting calculation...
Calculation is done!
Calculation is done!
heavy_calculation took 0.6710917949676514 seconds
In this example, we defined a context manager using the @contextmanager decorator.
The yield statement indicates the point at which the block of code inside the with statement should be executed.
The context manager function itself is defined similarly to the ExecutionTime class we had before, but without the __init__ and __exit__ methods. Instead, we define the start time and then use yield to hand control over to the code inside the with statement.
Using the contextmanager decorator is a convenient way to create a context manager without having to define a separate class with __enter__ and __exit__ methods.
Summary
This blog post examines Python's context managers, vital tools that facilitate the setup and teardown of a runtime context, ensuring clean-up when no longer needed.
The discussion includes practical applications such as file I/O, highlighting how context managers manage resource leaks and exceptions effectively using the open() and close() methods. It further explores the development of custom context managers for scenarios requiring robust thread-safe operations.
Concluding, the article introduces the contextlib module, detailing its utilities in simplifying context manager creation through decorators, enhancing code maintainability and readability.
About the Author
Aleksandro Matejic, a Cloud Architect, began working in the IT industry over 21 years ago as a technical specialist, right after his studies. Since then, he has worked in various companies and industries in various system engineer and IT architect roles. He currently works on designing Cloud solutions, Kubernetes, and other DevOps technologies.
In his spare time, Aleksandro works on different development projects such as developing devoriales.com, a blog and learning platform launching in 2022/2023. In addition, he likes to read and write technical articles about software development and DevOps methods and tools.
You can contact Aleksandro by visiting his LinkedIn Profile