
Unlock the Power of AWS and OIDC in GitHub Actions - Part 2 of 2
TL;DR
In Part 1 of our article series on AWS and OIDC in GitHub Actions, we discovered the many benefits of using OpenID Connect (OIDC) for federated identity management and why it's the superior choice compared to creating users within your AWS account. We also explored the key resources necessary to get started.
And now, it's time for Part 2 where the real fun begins! Get ready to roll up your sleeves and let's set up OIDC in GitHub Actions.
Content
This part has the following content:
Source Code
You can find the source code under the following link:
https://github.com/devoriales/oidc-aws-github
Tutorial
In this tutorial, we will guide you through the process of creating the following resources:
- IAM resources using Terraform, which will be stored in your GitHub repository.
- A Lambda function, which we will write and store in your Git repository.
- A process to clean up the Lambda function.
All code that we will write will be stored in a git repository.

Preparation
You need to create the following as a preparation for writing the code:
- AWS Profile
- GitHub Repository
AWS Profile
Ensure that your AWS credentials, including the access key ID and secret access key, are properly configured and that the AWS profile environment variable is defined in your shell. If not, running Terraform code from your local machine will not be possible. To set up your credentials, refer to the official guide on how to configure your credentials file. Note that this setup is typically a one-time process for creating IAM resources. Alternatively, you can also perform this setup manually in the AWS console.
To set up an AWS profile locally, you can follow the steps:
-
-
Install the AWS CLI: find the instructions and binaries on the following AWS page https://docs.aws.amazon.com/cli/latest/userguide/getting-started-install.html
-
Run the following command in your terminal to configure the AWS CLI: "
aws configure". You will be prompted to enter your AWS access key ID, secret access key, default region name, and default output format.
-
Create a Github Repo
Create a directory where you're going to write your code.
In addition, create a .github/workflows folder where you are going to store your github actions workflow file.
You should have the following directories in your folder:
├── .git
├── .github
│ └── workflows
IAM Resources in AWS
In the first step, we will set up the IAM resources that are needed to allow GitHub Actions jobs to authenticate with short-lived tokens.
This is the only time we will use an AWS access key and secret access key to do this from the local machine.
Terraform code that we will write will perform the following actions in AWS:
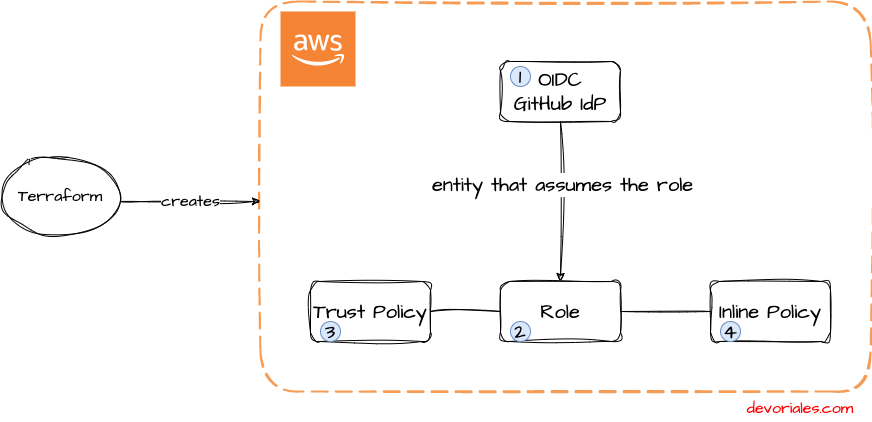
- Set up GitHub as Identity provider (a service that provides authentication for users or service to access AWS resources)
- Create an IAM role named "
oidc-gh-role" that will be assumed by the GitHub jobs - Create a Trust Policy that contains the Trusted entities, in our case we will be using a federated identity from a OpenID Connect (OIDC) provider with the ARN "
arn:aws:iam::xxxxxxx:oidc-provider/token.actions.githubusercontent.com" which is hosted by GitHub
Use Case
The requirement is to create a Lambda function that can be built, deployed, tested, and cleaned up through a CI/CD process. Additionally, our Cybersecurity team has mandated the discontinuation of the use of Access Key IDs and Secret Access Keys.
How To Solve The Use Case
We will solve this in the following order:
- Setup OIDC provider, a role, Trust Policy and inline policy via Terraform
- Write a simple function in Python that will accept a name and return a greeting with status code 200. If no name gets provided, it will return status code 400 and the job will fail.
- Build a pipline via Github Actions which will use
aws-actions/configure-aws-credentials@v1action that can be used to configure AWS credentials for use in other GitHub Actions
The CICD process will look like in the following diagram:

Terraform Code
- Install Terraform CLI on your computer. The official guide can be found here.
- Create a folder, e.g.
tf-assume-role-aws - Create the following files in the GitHub Repo:
- main.tf: In this file, we will define resources such as AWS and IAM OpenID Connect (OIDC) provider.
- iam.tf: In this file, we will define an IAM role that allows the OIDC provider to assume the role and grants external user identities permissions to access AWS resources in the account. We will also define a resource for a custom trust policy for the OIDC provider.
- variables.tf: In this file, we will define variables that will be used by any resources
main.tf - will hold main resources that we want to deploy to AWS:
provider "aws" {
  region = var.region
  profile = var.profile
}- The
providerblock at the top of the code sets the AWS provider with the specified region and profile.
❗6938fd4d98bab03faadb97b34396831e3780aea1 is the thumbprint of GitHub Actions OIDC provider
Next, we will proceed to write the IAM resources that we intend to create in the iam.tf file.
iam.tf - holds all IAM related resources
❗IAM policies and role have been explained in Part 1 of this series and will define now them in Terraform.
# oidc provider
resource "aws_iam_openid_connect_provider" "example" {
  url = "https://token.actions.githubusercontent.com" # URL of the identity provider
  client_id_list = ["sts.amazonaws.com"] # List of client IDs (also known as audiences)
  thumbprint_list = ["6938fd4d98bab03faadb97b34396831e3780aea1"] # List of server certificate thumbprints for the OpenID Connect (OIDC) identity provider's server certificates

}


# custom trust policy for oidc provider
data "aws_iam_policy_document" "oidc_trust_policy" {
  statement {
    effect = "Allow"
    actions = ["sts:AssumeRoleWithWebIdentity"]
    principals {
      type = "Federated"
      identifiers = ["arn:aws:iam::${data.aws_caller_identity.current.account_id}:oidc-provider/token.actions.githubusercontent.com"]
    }
    condition {
      test = "StringLike"
      variable = "token.actions.githubusercontent.com:aud"
      values = ["sts.amazonaws.com"]
    }
    condition {
      test = "StringLike"
      variable = "token.actions.githubusercontent.com:sub"
      values = ["repo:devoriales/oidc-aws-github:*"]
    }

  }
    statement {
    effect = "Allow"
    actions = ["sts:AssumeRole"]
    principals {
      type = "Service"
      identifiers = ["lambda.amazonaws.com"]
    }
    }
}


data "aws_caller_identity" "current" {}


# resource to create an iam role
resource "aws_iam_role" "gh-role" {
  name = "oidc-gh-role"
  assume_role_policy = data.aws_iam_policy_document.oidc_trust_policy.json
}

# resource for iam role policy
resource "aws_iam_role_policy" "gh-lambda-policies" {
  name = "oidc-gh-policies"
  role = aws_iam_role.gh-role.id
  policy = <<EOF
{
  "Version": "2012-10-17",
  "Statement": [
    {
      "Sid": "VisualEditor0",
      "Effect": "Allow",
      "Action": [
        "iam:PassRole"
      ],
      "Resource": "arn:aws:iam::${data.aws_caller_identity.current.account_id}:role/${aws_iam_role.gh-role.name}"
    },
    {
      "Sid": "VisualEditor1",
      "Effect": "Allow",
      "Action": [
        "lambda:CreateFunction",
        "lambda:InvokeFunction",
        "lambda:UpdateFunctionCode",
        "lambda:DeleteFunction",
        "lambda:GetFunction"
      ],
      "Resource": "arn:aws:lambda:eu-west-1:${data.aws_caller_identity.current.account_id}:function:*"
    }
  ]
}
EOF
}
IAM OpenID Connect (OIDC) provider
The resource aws_iam_openid_connect_provider resource creates an IAM OpenID Connect (OIDC) provider with the specified URL, client IDs and server certificate thumbprints.
url field specifies the URL of the identity provider
client_id_list field specifies a list of client IDs (also known as audiences) that are allowed to authenticate with the OIDC provider.
thumbprint_list field specifies a list of server certificate thumbprints for the OpenID Connect (OIDC) identity provider's server certificates.
Trust Policy - oidc_trust_policy
The policy defined in the data "aws_iam_policy_document" "oidc_trust_policy" block is a trust policy, which is used to specify who is allowed to assume the IAM role.
The policy has two statements, each with different permissions, exactly like we have seen earlier in this post.
Together, these statements allow the role to be assumed by either an OIDC provider that meets the specified conditions, or by the AWS Lambda service.
The reason why we're using a data block instead of a resource block is that the code is reusing the trust policy document defined in the data "aws_iam_policy_document" "oidc_trust_policy" block in multiple places. By using a data block, the trust policy only needs to be defined once and can be easily referenced by multiple resources. This makes the code more organized, readable, and easier to maintain.
IAM Role - gh-role
The resource block for the aws_iam_role creates an IAM role with the name "oidc-gh-role" and sets the trust policy for the role using the policy document defined in the data block described above
IAM Policy - gh-lambda-policies
This is the inline policy that gets attached to the gh-role IAM role. It grants the following IAM permissions to the role:
"lambda:CreateFunction",
"lambda:InvokeFunction",
"lambda:UpdateFunctionCode",
"lambda:DeleteFunction",
"lambda:GetFunction"
variables.tf - variables that will be used by any resources
It's a good practice to keep all values in a variables file so we can reuse those when needed:
variable "region" {
  description = "AWS region"
  default     = "eu-west-1" # change this to your region
  type        = string
}
# the user account used for provisioning
variable "profile" {
  description = "AWS profile"
  default     = "devoriales_admin" # change this to your profile
  type        = string
}
Run Terraform from your local machine
It's time to set up our IAM resources in AWS via Terraform.
Make sure that you have your credential file or environment variables configured on your local machine.
Example:
export AWS_PROFILE=<your AWS profile>devoriales_admin is my profile in ~/.aws/credentials file.
At this point, you should have everything in place and your git reposiroty folder should look like the following:
.
├── .git
├── .github
└── workflows
├── iam.tf
├── main.tf
├── variables.tf
Now let's run terraform init, plan and deploy
- Step 1 - terraform init
- Step 2 - terraform plan
- Step 3 - terraform apply
$ terraform init

Initializing the backend...


Terraform has been successfully initialized!

$ terraform plan

ta.aws_caller_identity.current: Reading...
aws_iam_openid_connect_provider.example: Refreshing state... [id=arn:aws:iam::xxxxxxx:oidc-provider/token.actions.githubusercontent.com]
aws_s3_bucket.example: Refreshing state... [id=oidc-aws-github-github-actions]
data.aws_caller_identity.current: Read complete after 0s [id=xxxxxxx]
data.aws_iam_policy_document.oidc_trust_policy: Reading...
...

 $ terraform apply

erraform apply -auto-approve
data.aws_caller_identity.current: Reading...
aws_iam_openid_connect_provider.example: Refreshing state... [id=arn:aws:iam::xxxxxxx:oidc-provider/token.actions.githubusercontent.com]
aws_s3_bucket.example: Refreshing state... [id=oidc-aws-github-github-actions]
data.aws_caller_identity.current: Read complete after 0s [id=xxxxxxx]
...
Please note! xxxxxxx should show your AWS account
Verification - IAM Resources
After the successful terraform apply, we need to verify that all resources have been provisioned to AWS account.
Login to your AWS console and check the following:
- In IAM - Identity providers: check if the
token.actions.githubusercontent.comhas been created - In IAM - Roles: Check if
oidc-gh-rolehas been created- In
oidc-gh-rolecheck that the customer inline policy has been created - In
oidc-gh-role- Trust Relashionships - check that the Trust Policy has been created
- In
Check the following video that shows how to verify your configuration:
Lambda Function
We will write a very simple Python function that serves as a handler for an AWS Lambda function. It is basically intended to handle a request and return a response.
It will accept a payload object that contains information about the event that triggered the Lambda function. This function is a simple example of how a Lambda function can be used to process an event and return a response. In a real-world scenario, the logic of the function would likely be more complex and involve additional processing, data storage, and other interactions with other AWS services.
We will send a dictionary from GitHub Actions that contains the name or signature of the person who triggered the action. The function should then greet that name:
# devoriales.com - 2022
# Description: This is a simple lambda function that returns a JSON object.

import json

def lambda_handler(event, context):
    name = event["name"]
    # do not allow empty names
    if name == "":
        return {
            'statusCode': 400,
            'body': json.dumps('Name cannot be empty')
        }
    else:
        return {
            'statusCode': 200,
            'body': json.dumps('Hello from Lambda, ' + name)
        }
If the value of name is not an empty string, the function returns a JSON-formatted response with a status code of 200 (OK) and a body message of "Hello from Lambda, [value of name]", otherwise it will repond with status code 400 and the job will fail. We will write our workflow file in the next section.
GitHub Actions Workflow file
In your github repository, create the following folders:
├── .github
│ └── workflows
We will proceed with our project and create the workflow file for packaging and deploying our Lambda function. We will utilize the workflow_dispatch event to manually trigger the workflow and define inputs, specifically an input named "branch" which is a required string type with a description. This input allows you to specify the branch on which the workflow should run.
Create the workflow file, named "workflow.yaml", and save it in the workflows folder:
name: Deploy Lambda Function

on:
  workflow_dispatch:

# set secret in repo settings
env:
  ROLE_TO_ASSUME: ${{ secrets.AWS_ROLE_ARN }}

jobs:

  build:
    runs-on: ubuntu-latest
    # These permissions are needed to interact with GitHub's OIDC Token endpoint.
    permissions:
      id-token: write
      contents: read

    steps:
      - name: Checkout code
        uses: actions/checkout@v2
      - name: Set up Python
        uses: actions/setup-python@v2
        with:
          python-version: 3.8
      - name: Install dependencies
        run: |
          pip install awscli #
      - name: Configure AWS credentials from Test account
        uses: aws-actions/configure-aws-credentials@v1
        with:
          role-to-assume: ${{ env.ROLE_TO_ASSUME }}
          aws-region: eu-west-1
          role-session-name: MySessionName
      - name: Zip lambda
        run: |
          if aws lambda get-function --function-name gh-test-lambda; then
            aws lambda delete-function --function-name gh-test-lambda
          fi
          # create Lambda function
          zip gh-test-lambda.zip lambda_function.py
          aws lambda create-function --function-name gh-test-lambda --zip-file fileb://gh-test-lambda.zip --runtime python3.8 --handler lambda_function.lambda_handler --role arn:aws:iam::339242786023:role/oidc-gh-role
# create second job to test Lambda function
  test:
    needs: [build]
    runs-on: ubuntu-latest
    # These permissions are needed to interact with GitHub's OIDC Token endpoint.
    permissions:
      id-token: write
      contents: read

    steps:
      - name: Checkout code
        uses: actions/checkout@v2

      - name: Set up Python
        uses: actions/setup-python@v2
        with:
          python-version: 3.8
      - name: Install dependencies
        run: |
          pip install awscli #
      - name: Configure AWS credentials from Test account
        uses: aws-actions/configure-aws-credentials@v1
        with:
          role-to-assume: ${{ env.ROLE_TO_ASSUME }}
          aws-region: eu-west-1
          role-session-name: MySessionName
      - name: Test Lambda
        run: |
          aws lambda invoke --function-name gh-test-lambda --invocation-type RequestResponse --log-type Tail --payload "{\"name\":\"$GITHUB_ACTOR\"}" output.txt
          cat output.txt
          grep -q "200" output.txt || exit 1

  cleanup:
  # remove Lambda and run just after build and test
    needs: [build, test]
    runs-on: ubuntu-latest
    # These permissions are needed to interact with GitHub's OIDC Token endpoint.
    permissions:
      id-token: write
      contents: read

    steps:
      - name: Checkout code
        uses: actions/checkout@v2

      - name: Set up Python
        uses: actions/setup-python@v2
        with:
          python-version: 3.8
      - name: Install dependencies
        run: |
          pip install awscli #
      - name: Configure AWS credentials from Test account
        uses: aws-actions/configure-aws-credentials@v1
        with:
          role-to-assume: ${{ env.ROLE_TO_ASSUME }}
          aws-region: eu-west-1
          role-session-name: MySessionName
      - name: Clean Lambda
        run: |
          aws lambda delete-function --function-name gh-test-lambda
This workflow aims to automate the deployment of a lambda function on AWS. It utilizes GitHub Actions to check out the code, set up the environment, install dependencies, configure AWS credentials, and create the lambda function. Additionally, it enables selection of the branch on which the workflow should run and allows manual triggering.
We will break down our GitHub Actions workflow file a little bit so we understand some significant part of it:
workflow_dispatchevent is used to trigger a workflow manually, means user can manually run the workflow by clicking on the "Run workflow" button in the GitHub UI, or by sending a POST request to the GitHub REST API.- In GitHub Actions, a "
job" is a set of steps that are executed in a specific environment. Jobs are defined within a workflow and can be composed of one or more individual actions. We have three of them:- build
- test
- cleanup
aws-actions/configure-aws-credentials@v1:This third party action (widely used) is used to configure the AWS credentials that the job will use to access AWS resources.role-to-assume: This parameter is used to specify the ARN (Amazon Resource Name) of the IAM role that the job will assume. This role must have the necessary permissions to access the desired AWS resources. ❗Please note, this information should be stored as a secret instead of writing it directly into the file.aws-region: This parameter is used to specify the AWS region in which the job will operate.role-session-name: This parameter is used to specify a session name for the job. This session name can be used for auditing and troubleshooting purposes.
-
role-session-nameis an optional field that allows you to specify a name for the session in which the job is assuming the specified IAM role. This session name can be used for auditing and troubleshooting purposes. When a role is assumed, a session is created, and the role's permissions are temporarily granted to the session. The session name can be used to identify the session and tie it back to the job or user that assumed the role. For example, you might use the session name to track which jobs or users are accessing which resources and when.
The workflow file also has some Lambda commands such as:
- In the build step, we package and create a lambda function.
- In the test step, we invoke the lambda function and perform a test where we expect a return code of 200. If no parameter is passed, the lambda will fail.
- In the cleanup step, we delete the lambda function from the AWS account.
GitHub Action Secret
For the workflow file to run, you need to create a secret called AWS_ROLE_ARN
To create a GitHub Actions secret for a repository, you can follow these steps:
- Go to the repository's main page on GitHub
- Click on the "Settings" tab
- Select "Secrets" from the left-side menu
- Click on the "New repository secret" button
- Enter a name for the secret:
AWS_ROLE_ARN, and its value. The value should be like:arn:aws:iam::xxxxxxxx:role/oidc-gh-role.Replacexxxxxxxxwith your own account number - Click on the "Add secret" button
The secret is now available to be used in your GitHub Actions workflows, and can be accessed using the secrets.<secret_name> syntax.
The environment variable ROLE_TO_ASSUME is set to the value of the GitHub Actions repository secret AWS_ROLE_ARN and can be accessed by all jobs.
Commit Code To GitHub
You should have the following folders and files in your folder:
$ git add .
$ git commit -m "your commit message"
$ git push origin <branch-name>
Verification Of GitHub Actions
In this final section, we will verify that everything we have developed functions properly.
This will be done by executing our GitHub Actions and verifying that the Lambda function is successfully created, the test passes, and finally, that the Lambda function is cleaned up.
At this point, you should already have deployed IAM resources to your AWS account through Terraform. Your git repository should at least have the following folder structure and files:
├── .github
│ └── workflows
│ └── workflow.yaml
├── .terraform
├── get_workflows.py
├── iam.tf
├── lambda_function.py
├── main.tf
├── variables.tf
The following video is showing how to run and verify your GitHub Actions and check how it looks in the AWS management console:
Summary
In this article we have learned the following:
- What OIDC is and how to use it to assume a role
- Why you should stop using AWS user acess credentials
- What IAM resources you need to set it up
- How to provision your IAM resources with Terraform
- How to write and use GitHub Actions by assuming a role
About the Author
Aleksandro Matejic, a Cloud Architect, began working in the IT industry over 21 years ago as a technical specialist, right after his studies. Since then, he has worked in various companies and industries in various system engineer and IT architect roles. He currently works on designing Cloud solutions, Kubernetes, and other DevOps technologies.
In his spare time, Aleksandro works on different development projects such as developing devoriales.com, a blog and learning platform launching in 2022/2023. In addition, he likes to read and write technical articles about software development and DevOps methods and tools. You can contact Aleksandro by visiting his LinkedIn Profile.